Light and Fluffy Flourless Chocolate Cake
This flourless chocolate cake recipe has only 5 ingredients! It is super light and airy and not dense like other recipes. Even without the flour, this easy cake is still fluffy, spongey, and delicious-it’s almost like magic! You will love this gluten free chocolate cake!
You may have your doubts about how good this cake is- I mean cake without flour? Blasphemy.
But once you make this cake, I BET you will change your mind. The first time I made it I had my doubts too.
In pastry school we made our fair share of cakes but never made a flourless cake, so I was skeptical. Honestly, I felt the same way when I made this chocolate mousse cake, but omg now these are two of my favorite chocolate cakes on my site!
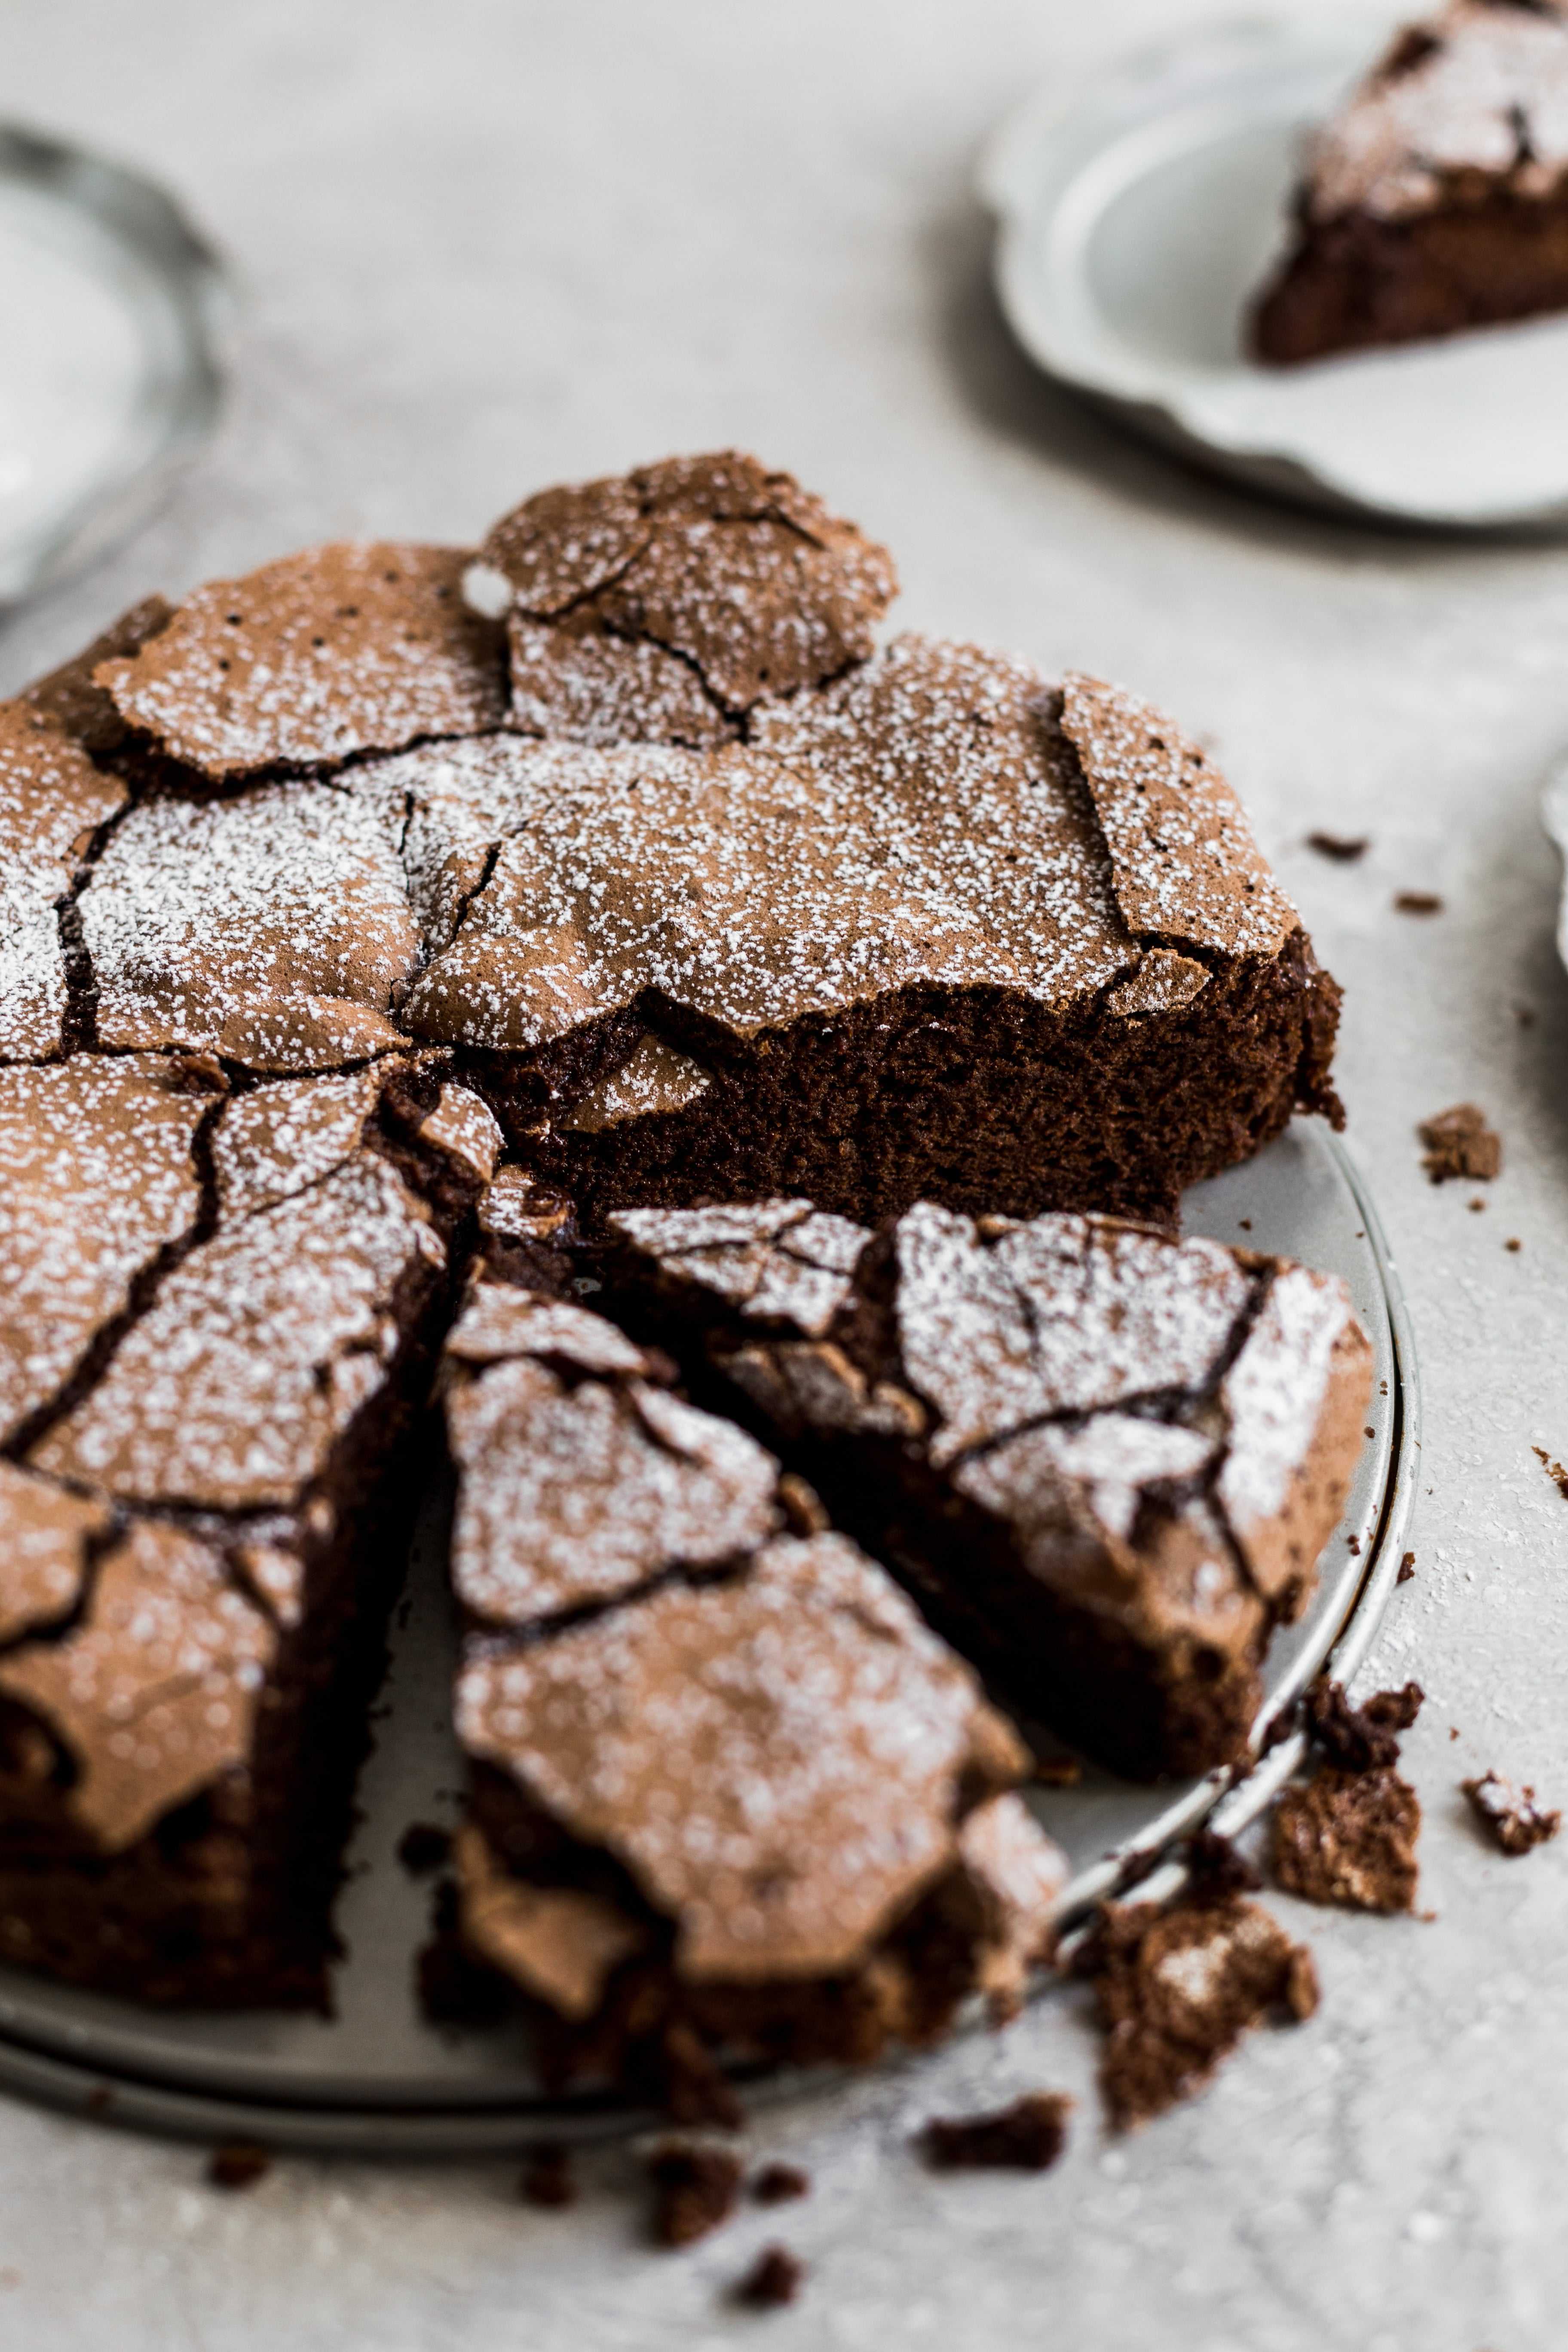
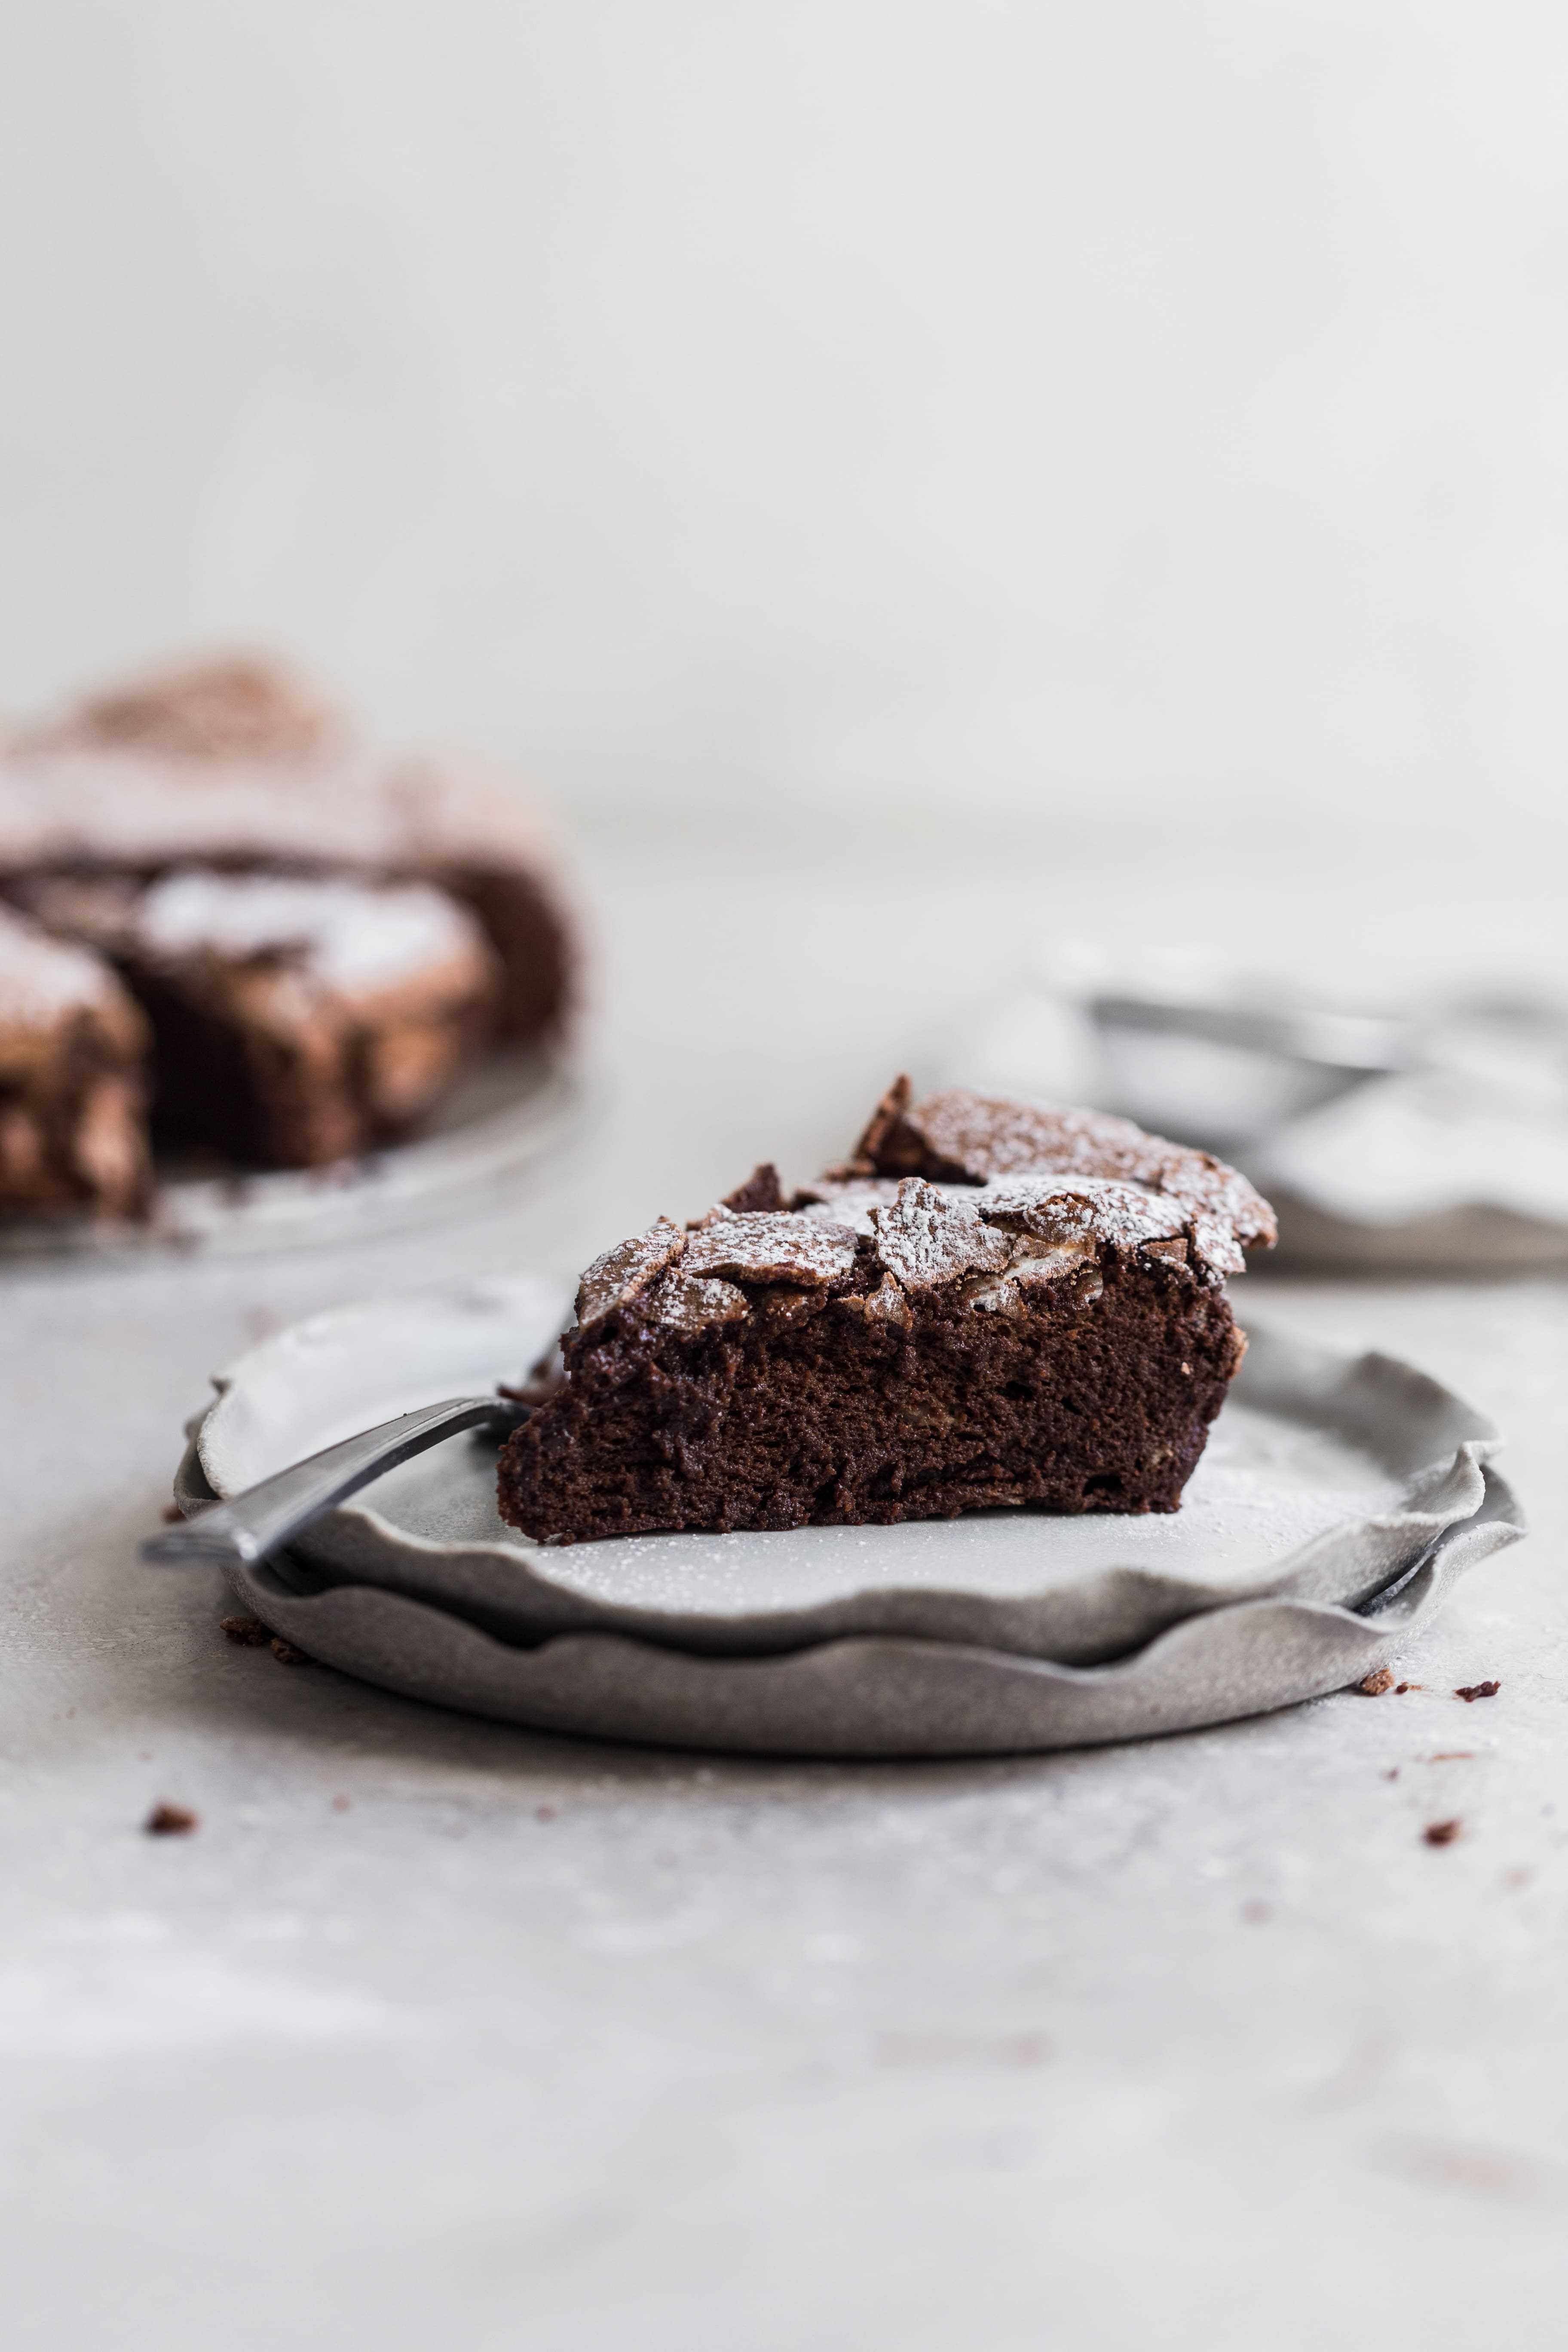
After I took that first bite though- I hooked! The cake is super fluffy and light and has a rich chocolate flavor. It’s not dense like some other flourless chocolate cakes.
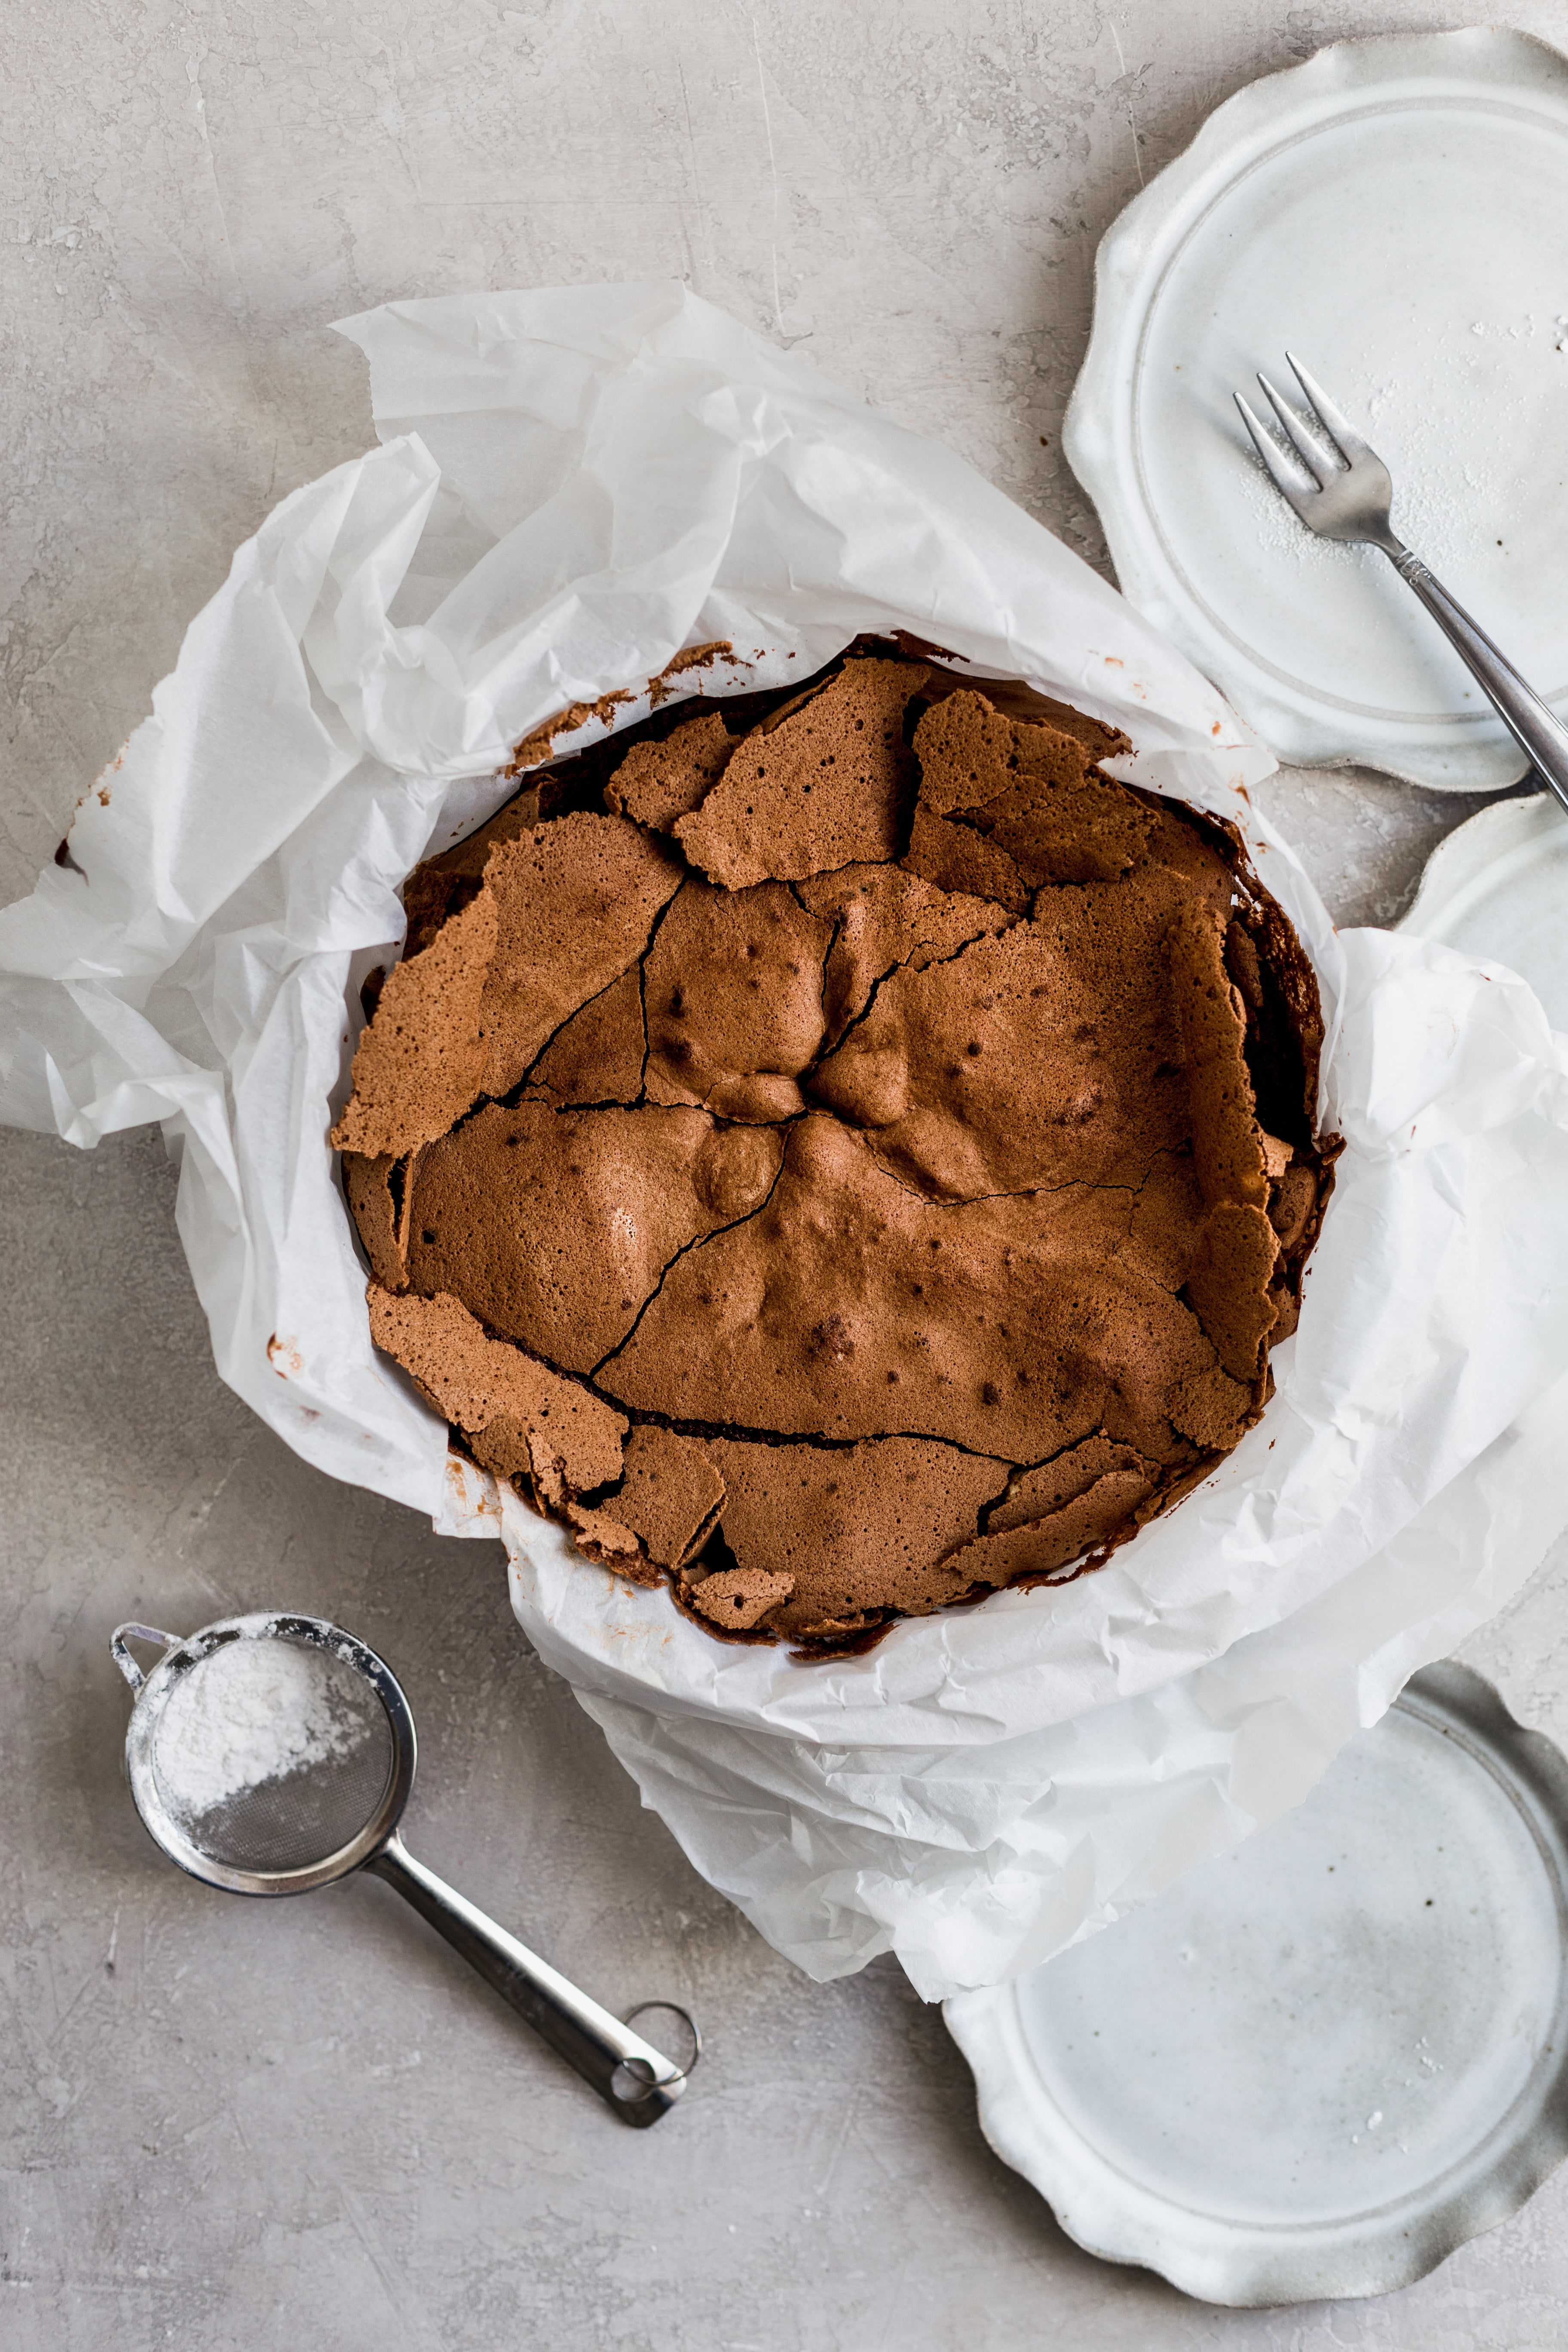
What gives this cake its light and airy texture are the whipped eggs whites that are then folded into the chocolate mixture. They help the cake rise in the oven and then when the cake comes out it sinks slightly to create this crackled chocolate crispy top.
While this may be the only gluten-free cake recipe on my site you can always substitute 1:1 gluten free flour for my 6 inch chocolate cake recipe, or if youre having a birthday party then this one bowl chocolate cake could be your go to.
Ingredients you need

Type of chocolate
I use 8 ounces of semi sweet chocolate in this recipe. You can either use a baking bar or chocolate chips. I don’t recommend using milk chocolate for this recipe because it would be too sweet. Any dark chocolate or bittersweet is fine too but it wont be as sweet.
The best way to measure out the chocolate is if you have a kitchen scale. If you don’t, the amount you need is about 1 1/3rd cups of chopped chocolate or chocolate chips.
Instructions

Serving
Serve this cake with a dusting of confectioners’ sugar. Use a small sifter to sift the sugar all over the top of the cake. Either serve it in the pan with the parchment paper, or lift it out carefully and serve on a cake plate.
You can also top the cake with whipped cream and fresh berries or some vanilla ice cream!


Light and Fluffy Flourless Chocolate Cake
Ingredients
- 1/2 cup unsalted butter, or margarine
- 8 oz semi sweet chocolate or chocolate chips, About 1 1/3rd cups
- 1 tbsp brewed instant coffee, Sub vanilla extract
- 6 large eggs, separated
- 1/2 cup granulated sugar
Equipment
- pyrex bowl
Instructions
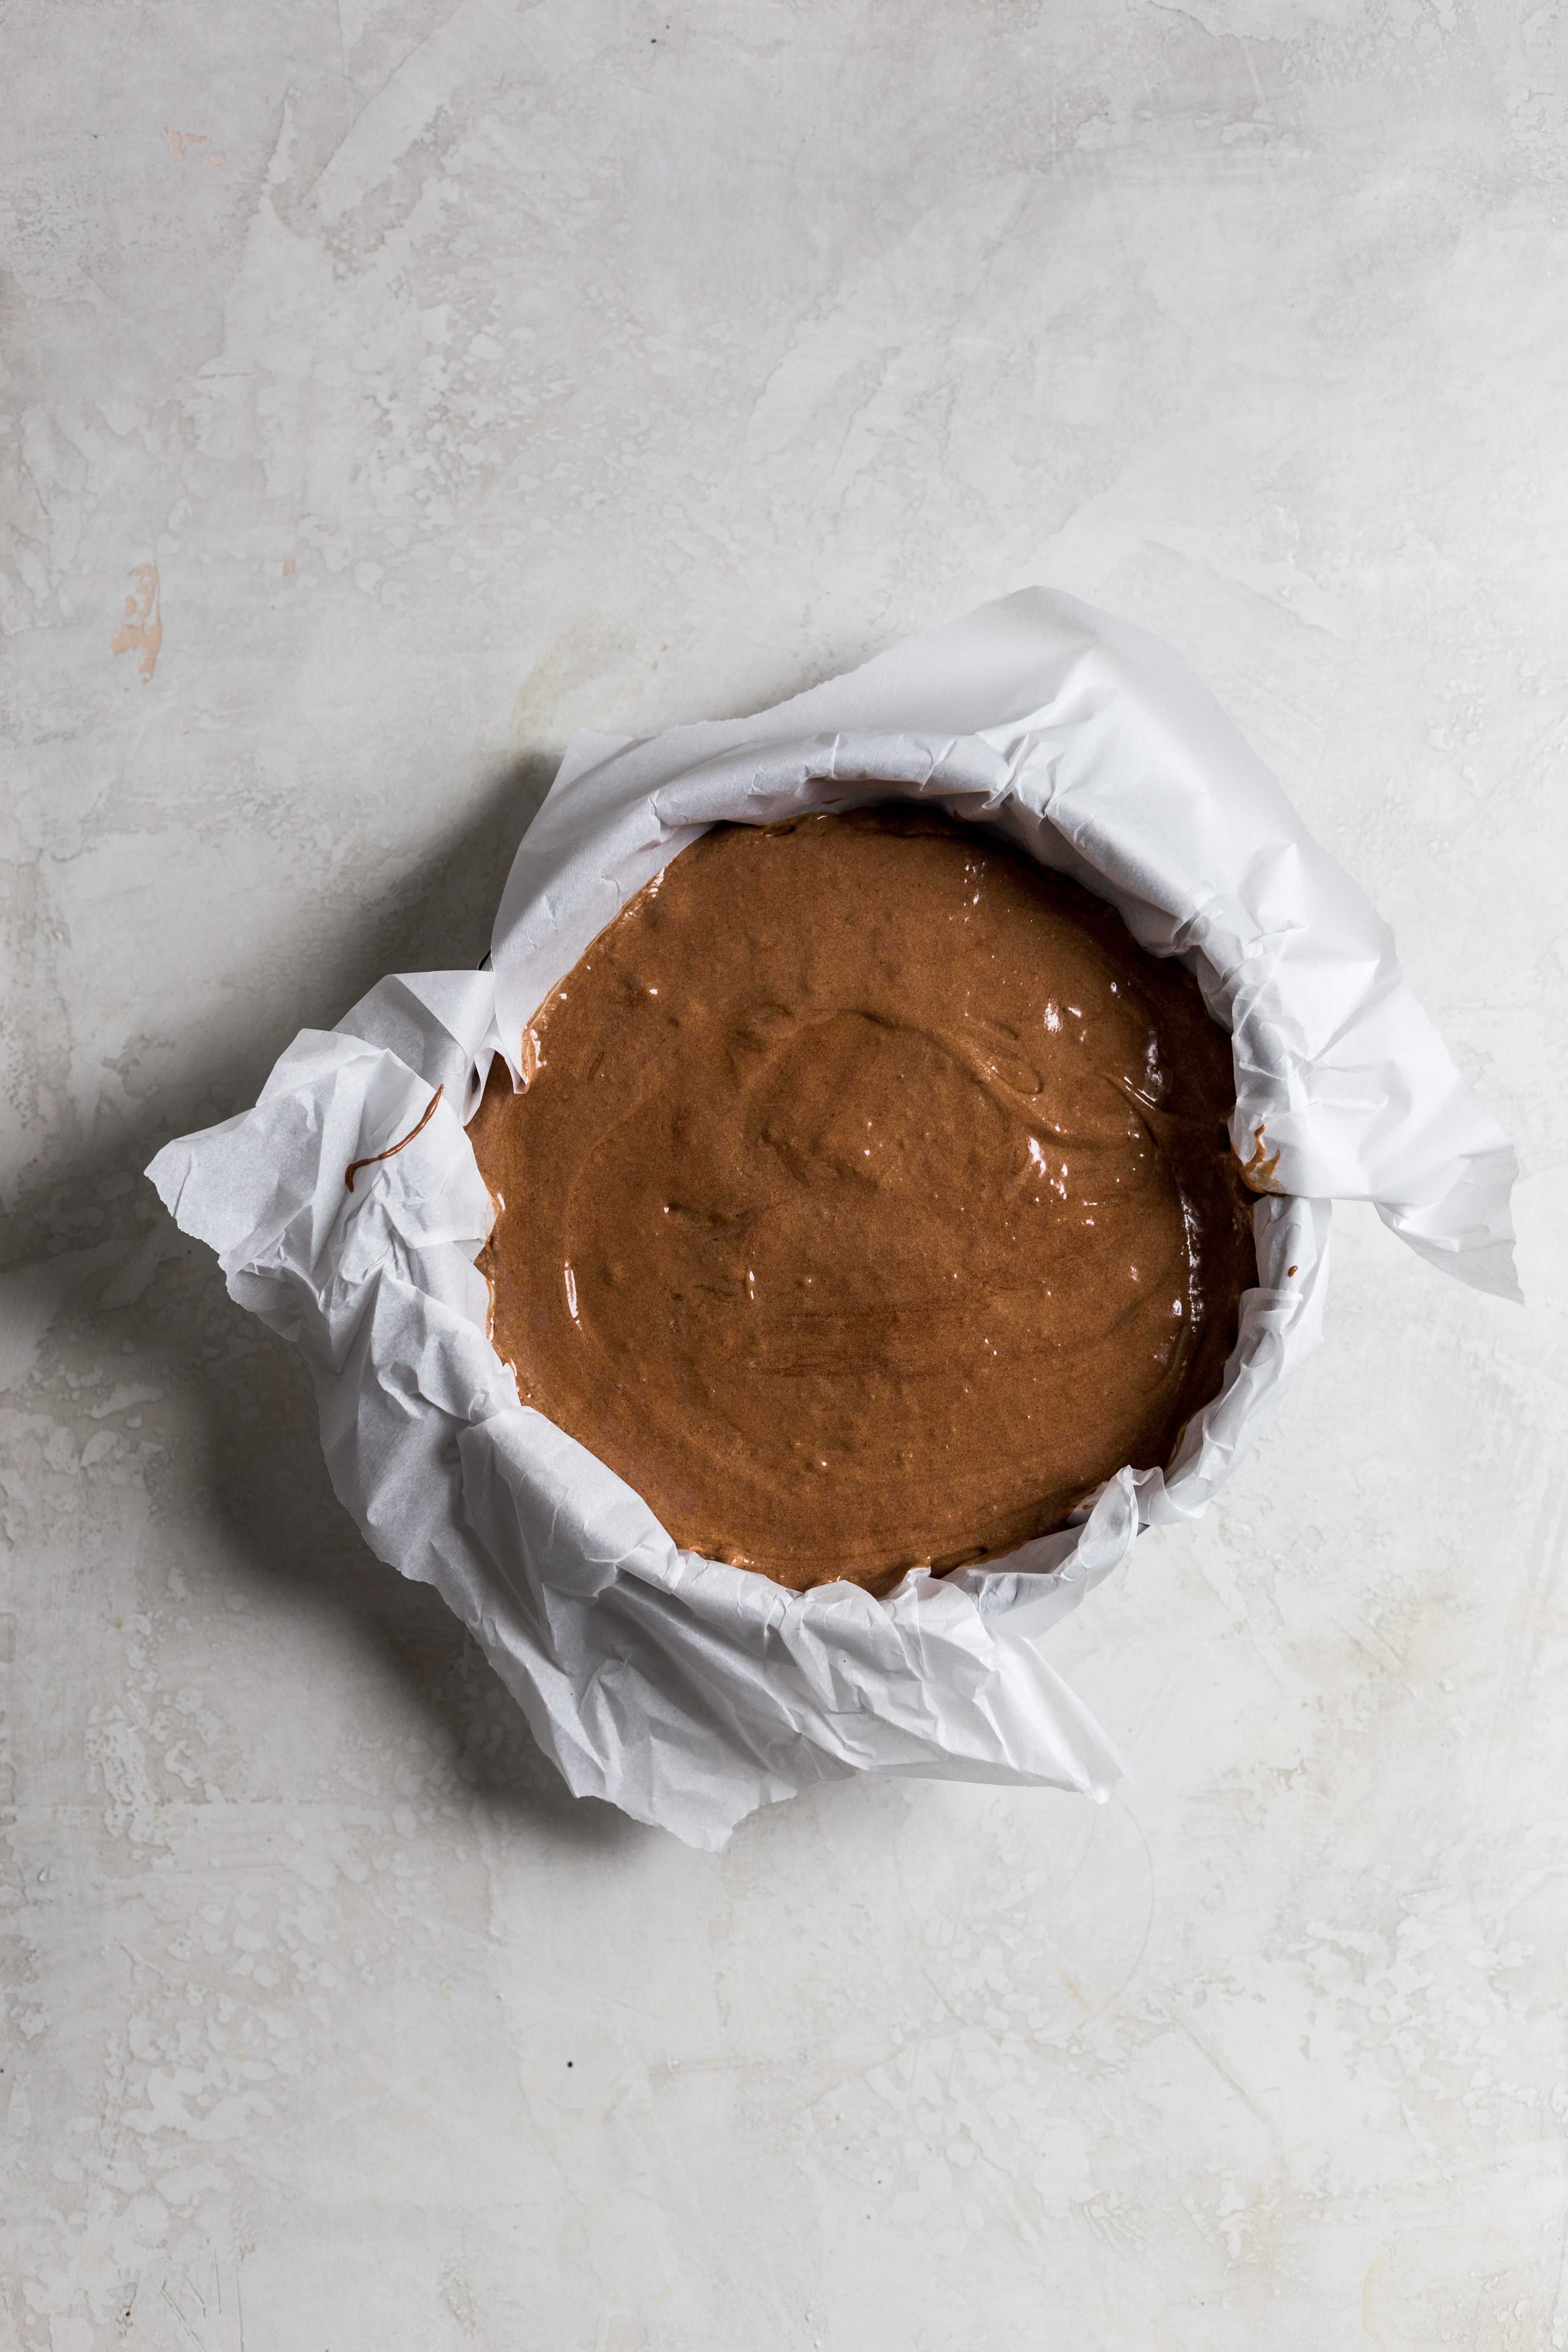
- Preheat the oven to 300° F and line a 9” springform pan with parchment paper.
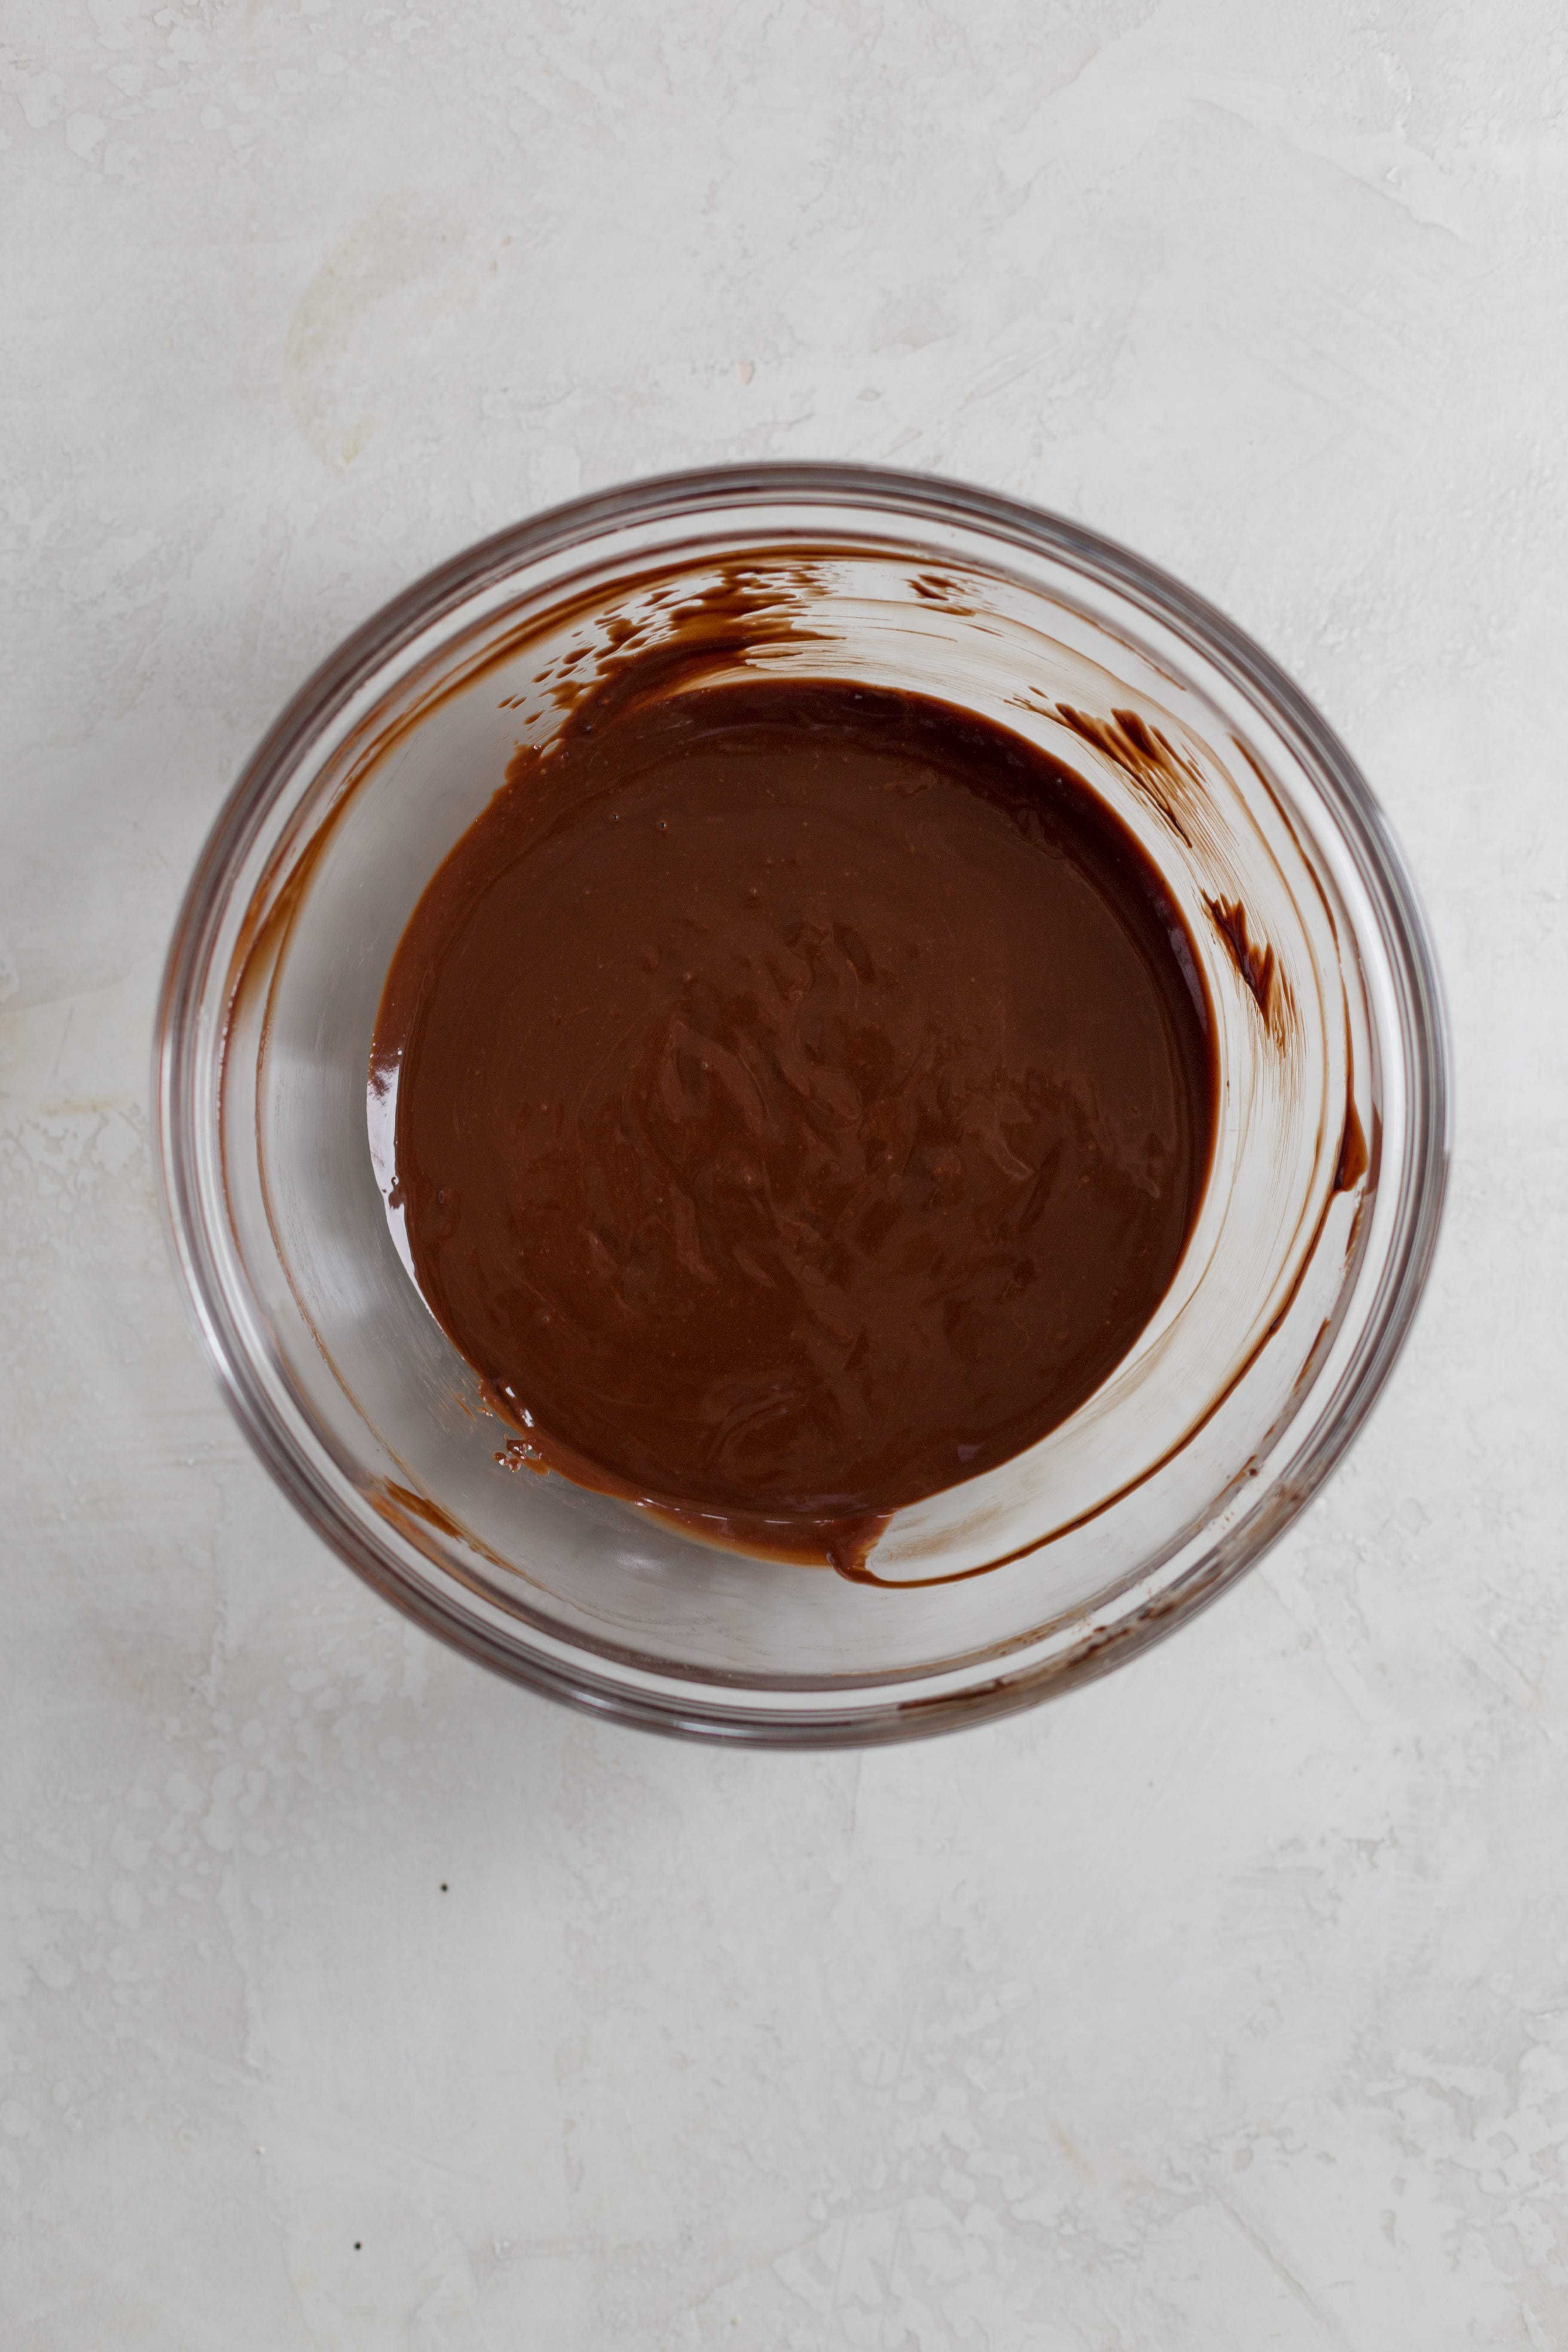
- Melt the chocolate and butter together in a microwave safe bowl- preferably an 8’’ bowl- for 30 seconds at a time, mixing in between until the chocolate is completely melted. Cool. Prepare the tablespoon of instant coffee with hot water. Pour it into the chocolate and mix.
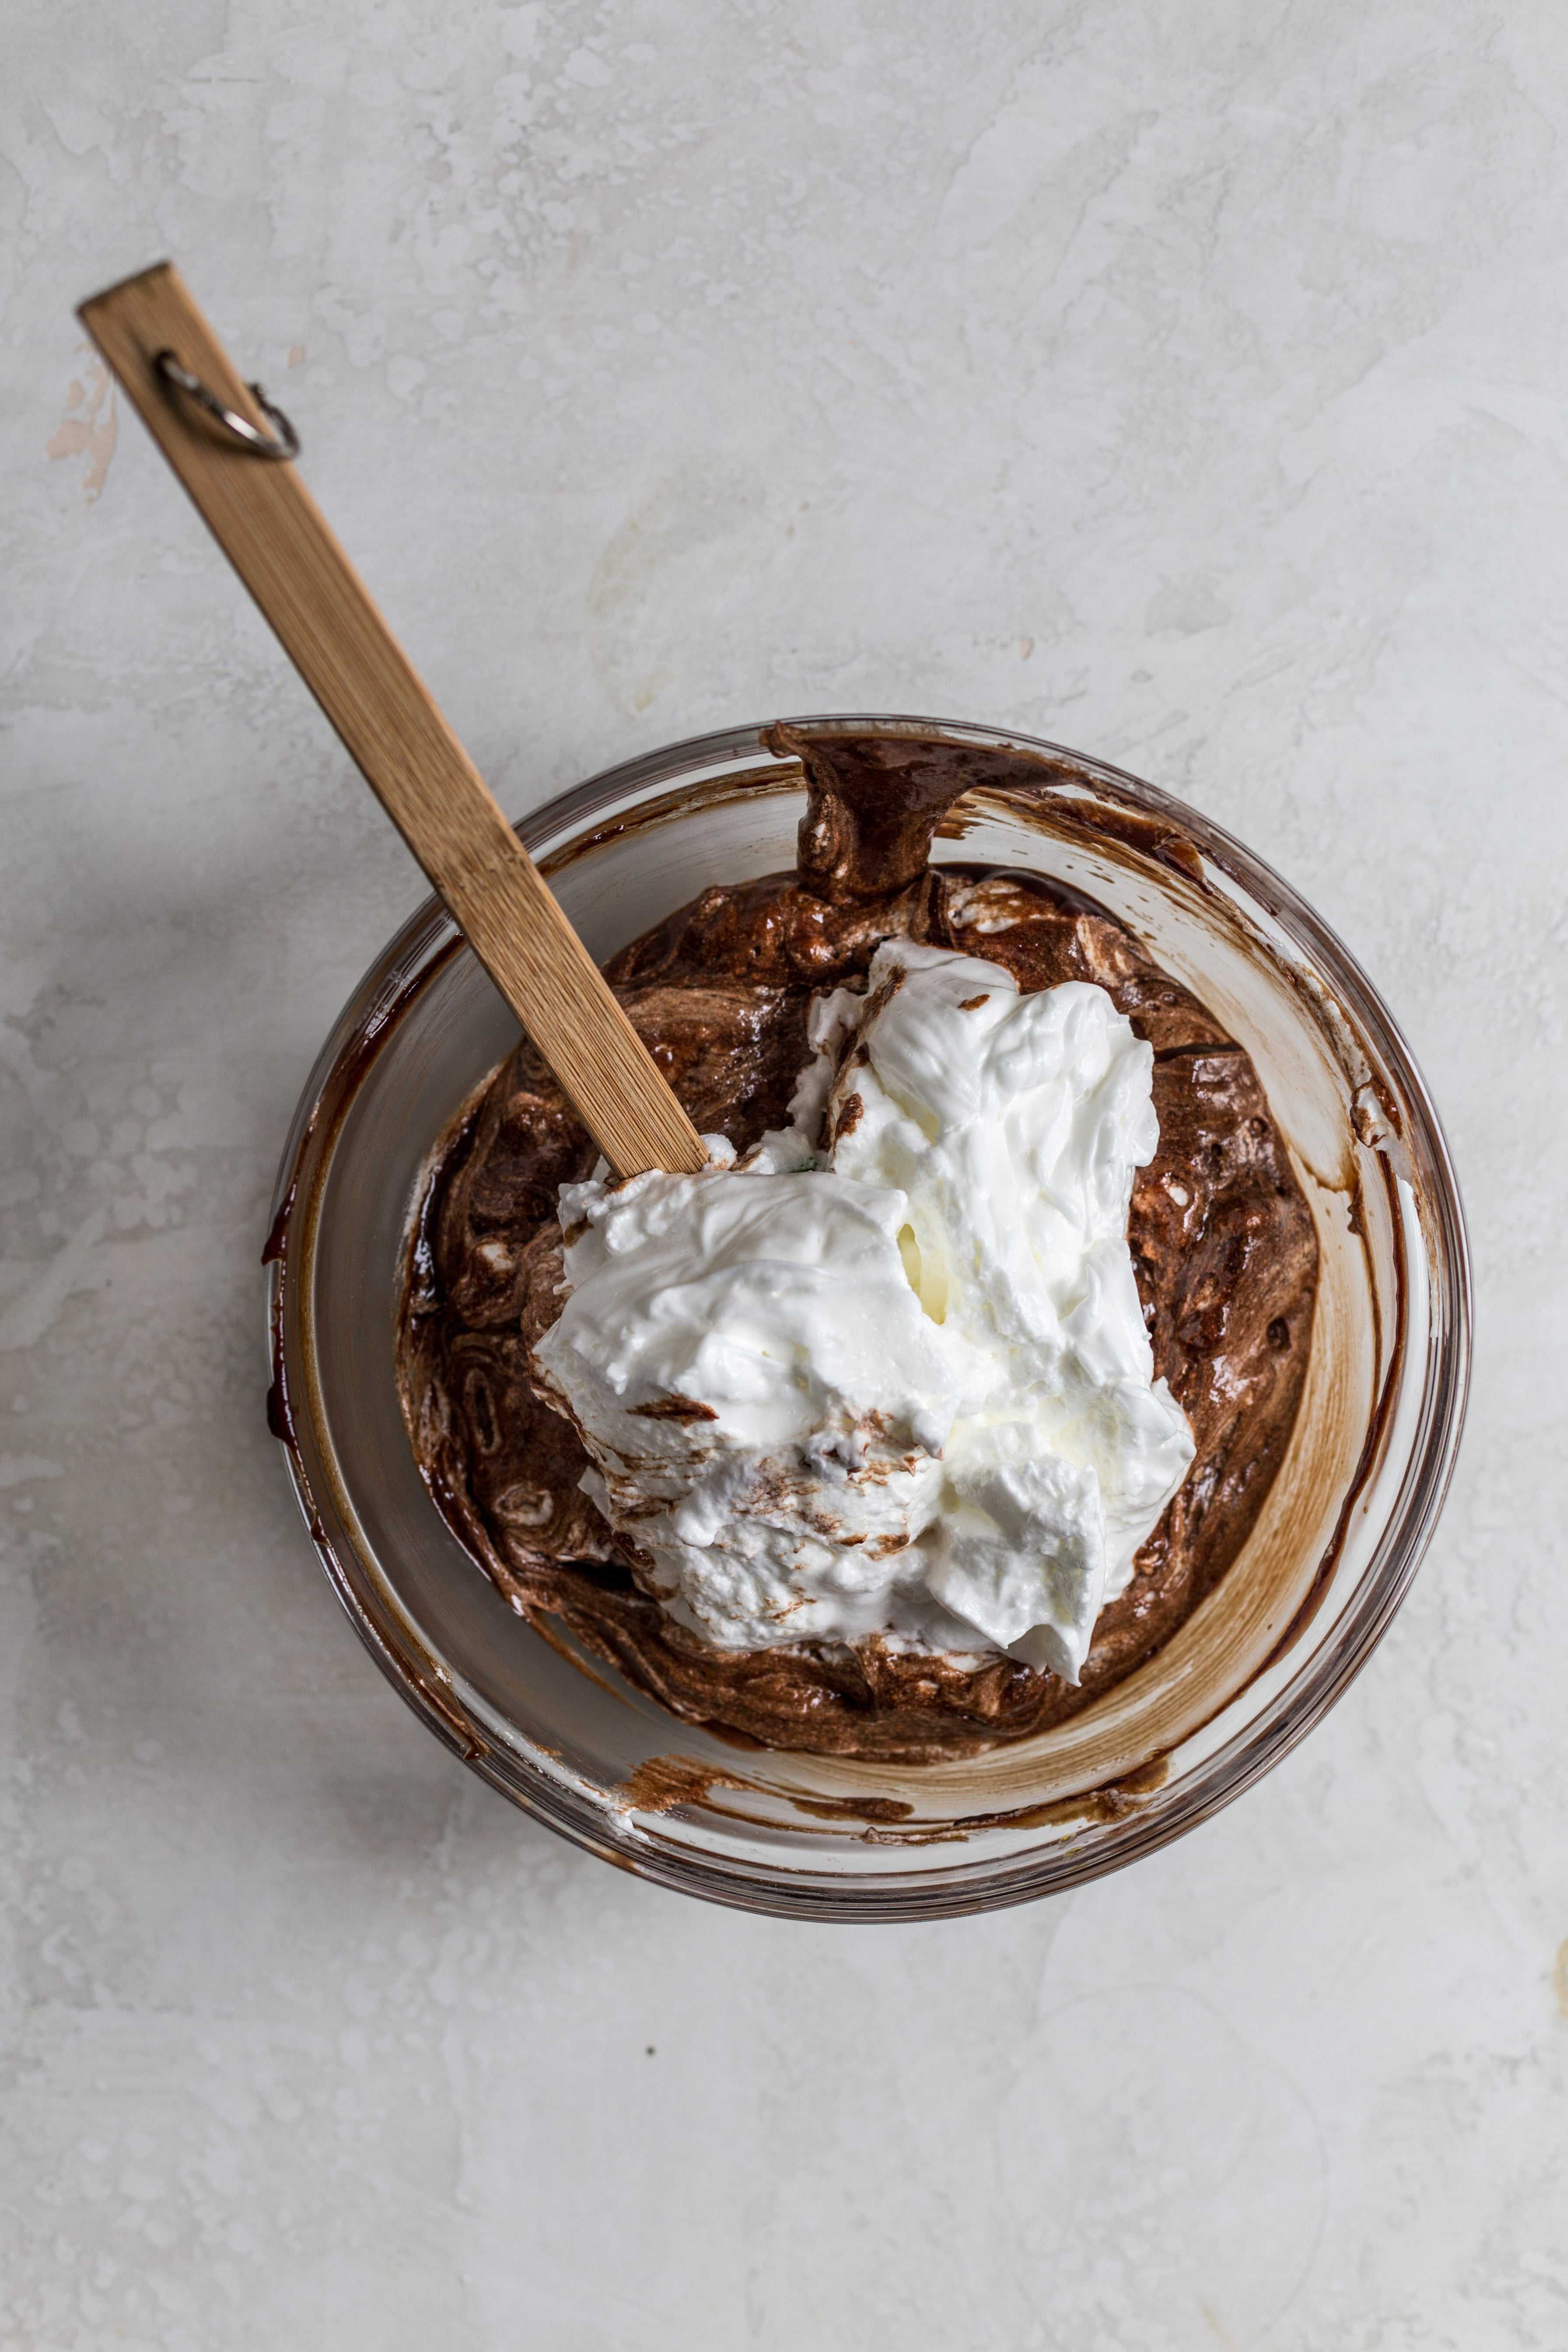
- Separate the eggs by adding the whites into the mixing bowl of a stand or hand mixer, and the yolks into the chocolate mixture. Mix the chocolate mixture with a spatula until combined.
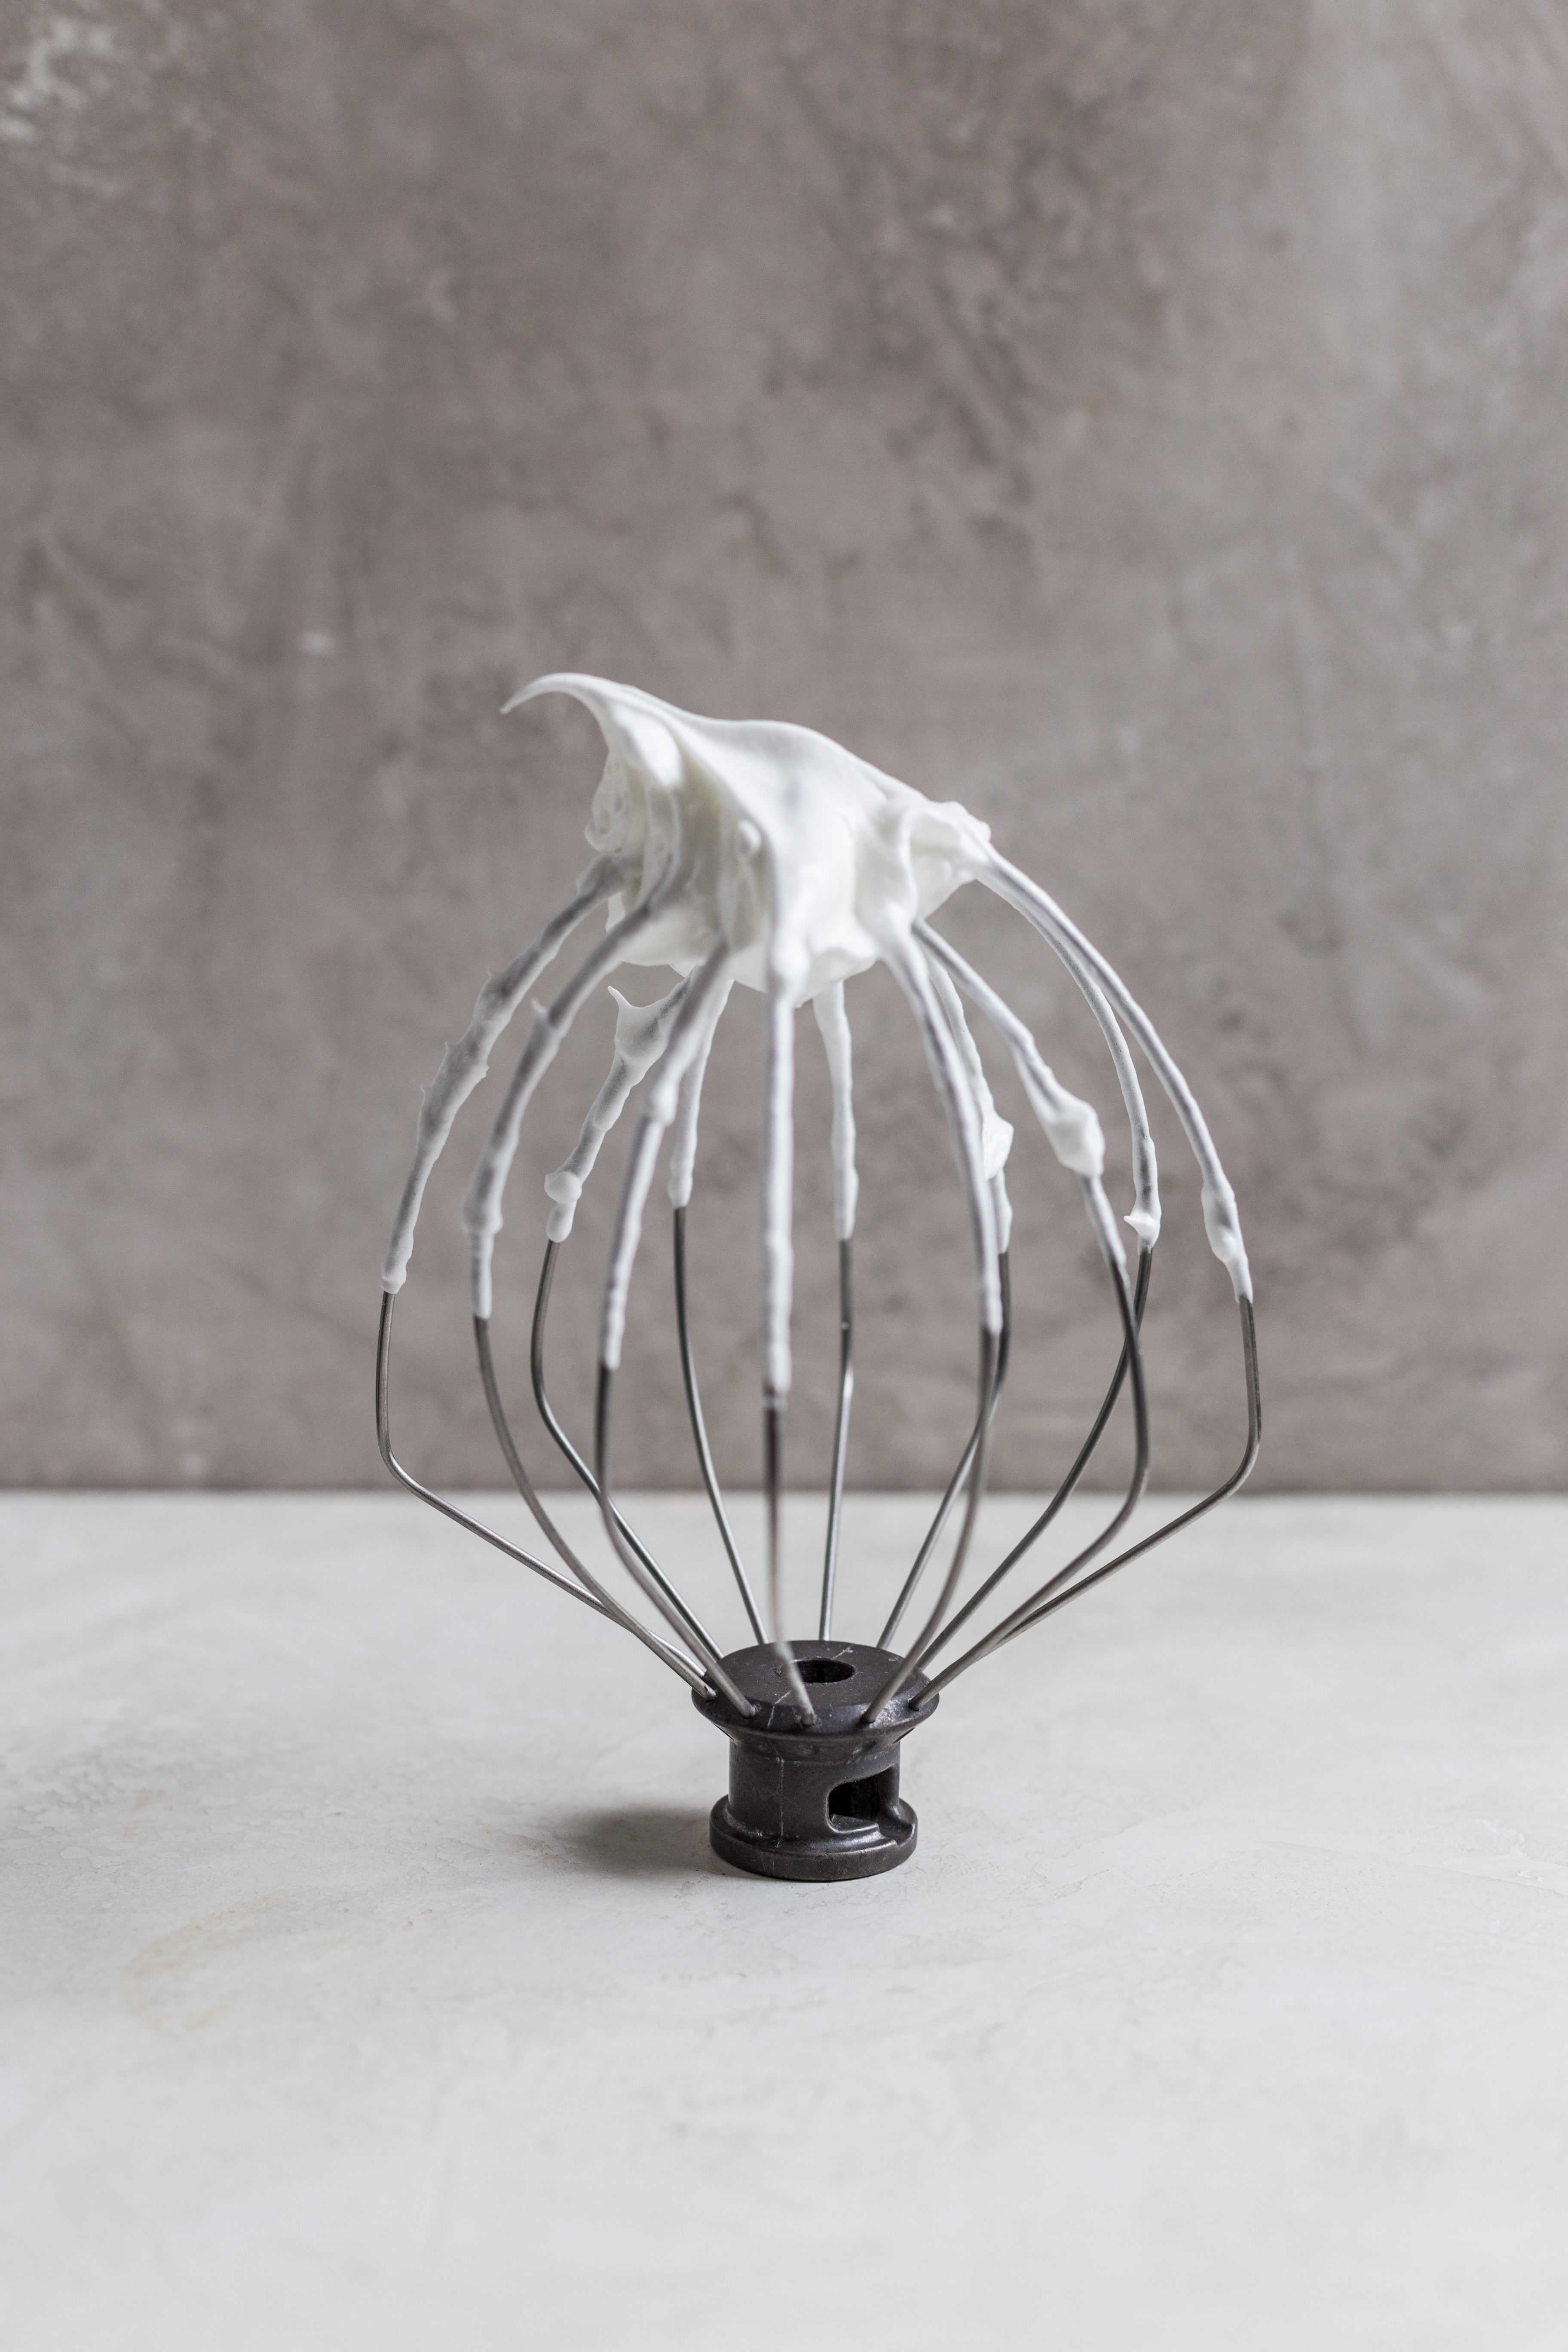
- Using the whisk attachment whip the egg whites on high speed, pouring in the sugar slowly while whipping. Continue whipping until stiff peaks form. You know the whites are ready when you take the beater out, flip it upside down and the tip of the egg white can hold itself up.
- Fold 1/3rd of the egg whites into the chocolate mixture at a time making sure not to deflate them. Fold until there are no white streaks left then continue.
- Pour the batter into the springform pan and bake for 50-55 minutes until little cracks start to form on the top and the cake is no longer jiggly in the middle.
- Cool and dust with confectioners sugar (optional). Leave uncovered until serving.

I love that cracked top – doesn’t it just give the cake wonderful character? And I love that you have put coffee into this cake – absolutely a winner!
Thank you SO much Katerina! Yes I love to add coffee to my chocolate desserts, I feel like it gives it that extra deep flavor!!I am so happy to hear you loved this, thank you so much for your 5 star review!!
This looks so good Sam! I’m so excited to try it sometime!
Thank you so much Grace! Let me know when you make it!!
This is my go-to chocolate cake recipe – so easy to follow and always comes out delicious!! Totally foolproof. Thank you Sam!
Hi Danila! I am so happy to hear that thank you so much!
It’s not complex and easy, though I do sweat a bit making the meringue. It is delicious, and I don’t know why they’re a bit thicker than yours even though I used a 9″ round pan.
As long as it was delicious, it doesnt matter how thick 🙂 Thank you so much for your 5 star review!
Can’t wait to make this!! Do you have any creative suggestions for what to do with the 6 egg yolks? all i can think of is an omelette 😂
I like to save them for lemon curd! I have a recipe on my site if you search lemon meringue cookies.
I must be misreading the recipe, but I thought you add the egg yolks to the chocolate mixture. Do you only add some?
Nope you add all of the egg yolks to the chocolate mixture!
Is there a way to sub oil for the butter in this recipe, or does the shortening need to be butter or margarine?
Hi Beth! I havent had luck swapping canola or vegetable oil for butter in this recipe but I have tried coconut oil and that works great!
Hooooooly cow, Sam! You really outdid yourself with this one. I served it to my family for Passover and EVERYONE loved it. Nobody missed the flour at all.
My grandma wouldn’t stop raving about the “delicious cake.” And everybody else chimed in with how much they loved the taste, very similar to a brownie but not as dense! Truly amazing. Thank you for the great recipe and for making me look like a rockstar baker 😉❤️
AWW Alana! Thank you so much for making this for your fam for the holiday! So glad you guys enjoyed it!! And thank you of course for your sweet comment and review, so appreciate you!!
I have made this probably 6 times since Easter! It’s so yummy and made with things I always have on hand. This is my family’s new favorite. We made a strawberry Grand Marnier sauce and fresh whipped cream to go on top .
omggg that sounds so good, I have got to try it! SO glad you love this recipe, thank you so much for leaving a review and rating!
How long does this store for?
It actually holds up really well for up to 5 days. My best tip is to actually not cover it fully- sounds weird but if you cover it airtight it will get soggy and ruin the crackled top.
I am OBSESSED with this recipe! I make it for Passover but it’s easy enough for any day! You nailed it!
YAYAYAY so happy you love it!!!!
I’m making this this Passover Sam!
Yay! Cant wait to hear how it is Kelly!
Sam, do you have a favorite brand of chocolate you prefer for this recipe? I’m always curious which one to grab! 🙂
Hey Cindy!! Ghirardellhi is usually my go to chocolate for baking!!
Love this recipe, great instructions. It’s for sure one of my first choices when I need a gluten free treat.
Have made it multiple times, always good.
Thank you SO much Laurie! I really appreciate you letting me know, its def a favorite of mine too!! Thank you for the 5 star review!
Hi,
Can you sub the chocolate bar with cocoa? If so by what amounts?
Hi, no that wouldnt work.
This was so simple and absolutely perfect! I added a tiny bit of cinnamon and cayenne. Used vanilla vs coffee. You made this so minimalistic ☺️
Thank you Annette!!
if you use the espresso powder vs. instant coffee, do you need to put boiling water with it, or just put the espresso powder in?
Hi Mindy, I would still put the water in. When coffee is mixed with hot water and then poured into chocolate it helps bloom the chocolate and more flavor will come out. The water being hot is key!
I don’t know but mine was not light and fluffy.
I’m so sorry to hear this one didn’t turn out for you Cathy! It sounds like something might have gone wrong with whipping the egg whites. Did those whip up for you? Sometimes getting any yolk in the egg whites at all prevents the egg whites from being able to whip up.
I made this cake yesterday for my moms birthday who is Gluten Free. Absolutely delicious. Fudgy yet light and fluff. Not too sweet either. I will make this again!
Aww Candice! This makes me so, so happy! Tell your mom happy birthday from me!
I was intimidated to try this recipe since I’ve never whipped eggs before but I’m glad I gave it a go! The tips you included were really helpful. Unfortunately, after baking for 55 minutes, my cake seemed to be a bit soggy? I got that nice crackled top and my fork came away clean. I’m not sure if I should’ve left it in the oven longer or if the cake is meant to be that moist. Perhaps something did go wrong for me when whipping the egg whites or folding them in the batter!
Hey Elise! So glad you went ahead and made the recipe! The cake is light and airy and moist, its not dense like some other recipes. The texture should be spongey 🙂
I am trying to replicate a flourless chocolate cake from a restaurant in my town. It’s my daughter’s favorite cake. The original baker would sell them on the side but she is no longer baking. I asked for the recipe but she said it belongs to the restaurant so she can’t share it.
This recipe is delicious. It’s much lighter than the one I am searching for. It got rave reviews from my family but still isn’t the one. I will keep searching but until I find the perfect match, this will be a great option. I love that I get to use the whole eggs! I hate having yolks left over. I feel pressured to make something I don’t need. Next time I think I will use half dark chocolate.
Hi Nancy! Thanks so much for making this, I am so glad it got rave reviews and everyone loved it! Can you tell me more about why its different than the one from the restaurant? Maybe I can help troubleshoot!
Hi, I would like to make this for someone who is lactose intolerant for his birthday. He’s fine eating dark chocolate but not milk chocolate. If making this with all dark chocolate (like 72%), would you need to increase the sugar amount? We prefer not so sweet desserts, but just want to make sure it will still be flavorful. Thank you. ps. I am too trying to recreate a cake from a restaurant (Bistro Vida in Menlo Park, CA). Wish me luck 😊
Ohhh fun! I don’t think you would have to increase the amount of sugar, especially if you don’t want it on the sweet side. If you can tell me a little bit about the cake you’re trying to recreate, I can help troubleshoot!
I am going to make this cake today. It looks delicious! Can I use regular butter instead of unsalted butter as I don’t have any?
Hi! Sure can, just dont add any extra salt to the recipe 🙂
Such an easy recipe. Can’t wait to indulge!! But, why did it fall after baking?
Hi Marilyn! This is actually a good thing! Since theres no flour in the cake, when its baking in the oven the heat and steam make it rise, then when it comes out it’ll fall and turn into a fudgy chocolate cake. I usually top it with powdered sugar to make it look more rustic 🙂
A comment on the egg yolks. The recipe says to add them to the chocolate, but in one of the comments, you answer a question about what to do with the left over yolks. I included them and the cake looks good, no real cracking of the surface yet. Could this be explained by the incorporation of the yolks?
Hi, nope the yolks are supposed to go into the cake. If the cake didnt crack on top its because it was over baked.
Hi, I seem to be the only one who is confused about this: the one tablespoon of brewed instant coffee. Does it mean to make a cup of coffee starting with instant and and use one tablespoon. And if so does it mean you could use any brewed coffee. Or does it mean use 1 tbs dried instant coffee powder and if so how much water.
Hey Kirsten – its like a tablespoon of cold brew. Dark, black coffee. I usually just add 1/2 tsp instant coffee with some hot water in a small cup to dissolve it and then measure out a tablespoon. No need to make a whole cup.
My sister-in-law wanted gluten-free for her birthday. What used to be just flourless cake is now gluten-free. So I made this cake and it was so good. So chocolatey in a good way. I made a little bit of whipped cream to go on it. I was so good I could make this for everything.
Thank you Denise!!! So appreciate you, happy birthday to your sister in law, so glad you all loved the cake.
That was so good, and quite easy to make! Loved the crunchy top and moist, fluffy cake. Served it with fresh raspberries and whipped cream. It was the perfect dessert for my husband’s birthday dinner!
That sounds delicious Alex, thank you so much for making this, so glad you loved it!! Happy birthday to your husband!
Turned out really well. I completed it with apricot jam and chocolate cream. Will definitely bake this one again.
Sounds delicious Misha, thank you!