Plum Tart- Easy and Impressive!
Despite its beautiful presentation, this plum tart is actually extremely easy to make. With just a few simple standard ingredients you will wow your guests with this gorgeous and intricate looking plum tart. All you really need is a good knife to make this show stopping fruit pie!
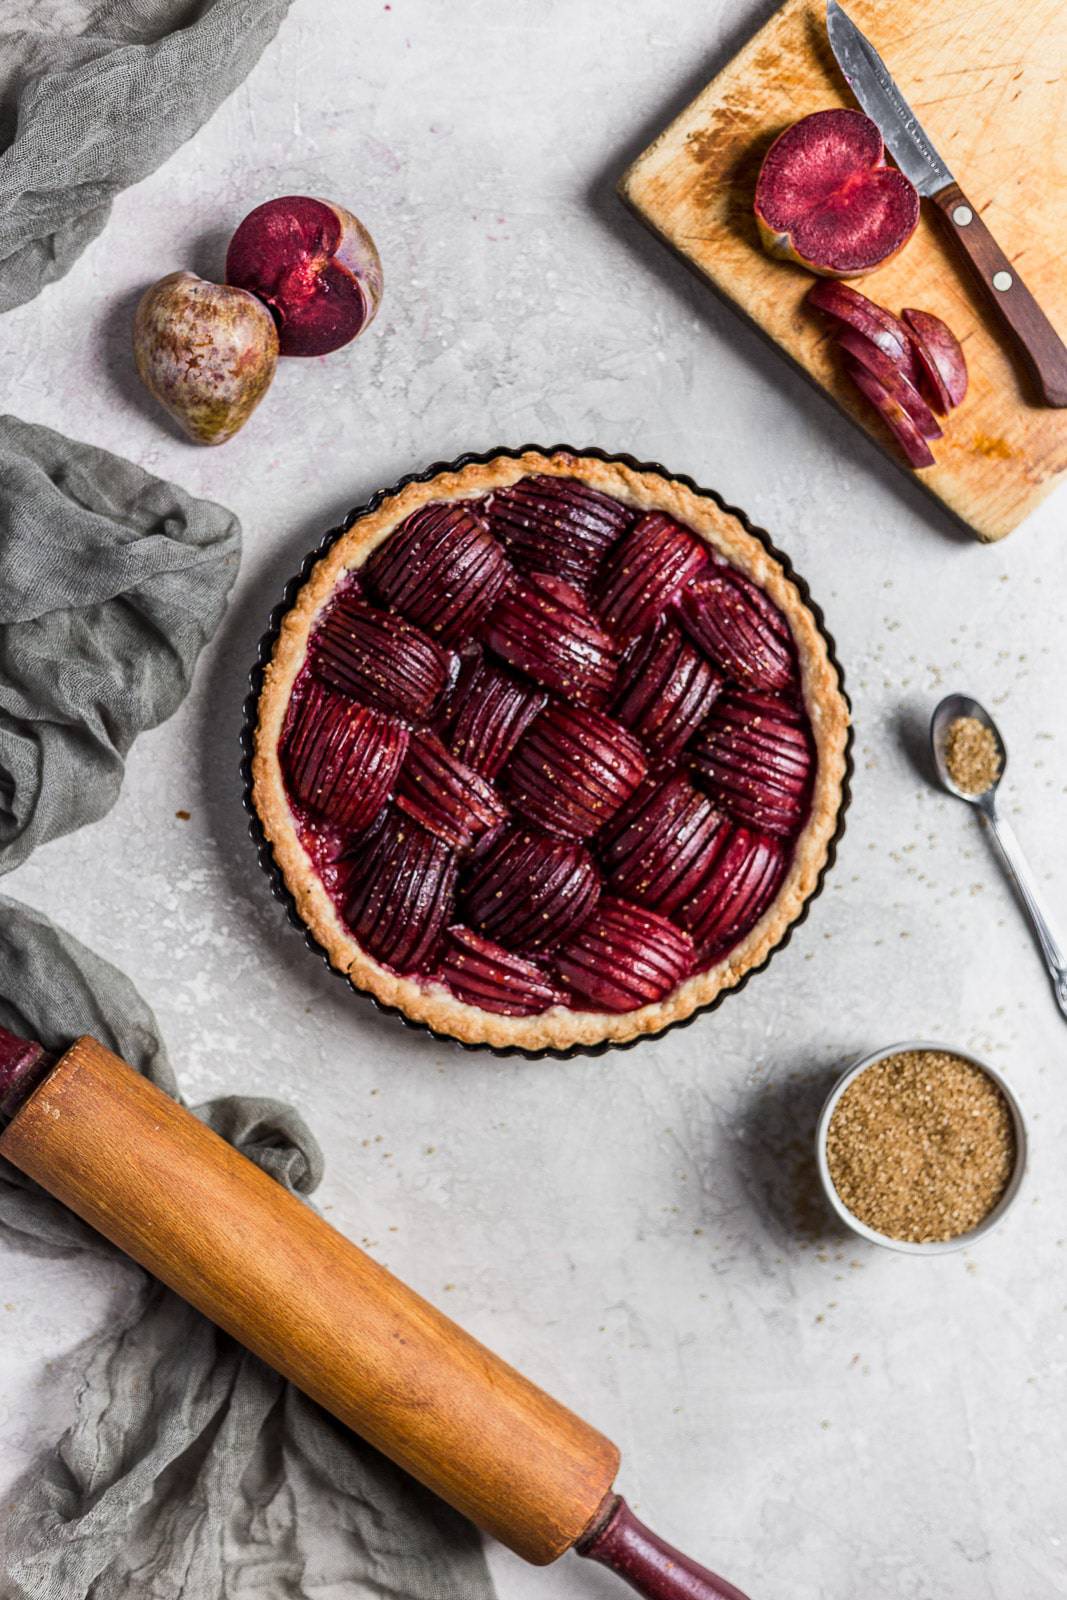
What I love about this plum pie is that it looks outrageously intricate but it is actually very easy to make. As a trained pastry chef, I love making things that look impressive but really took just a few minutes to assemble.
Thats the beauty of this pie. You can also use a shortcut here and use a store bought pie crust, or you can go ahead and make your own flaky pie crust.
Super easy plum tart
Sometimes the simplest things are the best. Like this plum tart. It is only FOUR INGREDIENTS. Did you hear that? FOUR INGREDIENTS is all it takes to make this pretty tart!
How to make:
I started off with a defrosted store-bought pie dough because I am not a fan of making my own, and usually when I want a pie dough I want it now and not in two hours after it has chilled. So store bought is fine. You can let it defrost and then re roll it out into your own tart pan.
Next all you need are some ripe plums, a sharp knife and a steady hand. Slice the plums into thin slices and try to keep the slices together if you want to line them up nicely like I did.

Arrange them snugly in the pie crust lining them up in clusters horizontally and then vertically. Next drizzle some honey on top and dot the slices with little pieces of butter ( 2 tablespoons total).
Then you bake for 20 minutes on 375° and out comes this glorious looking, EASY AS ANYTHING, impressive plum tart.
Garnishing
If you want to garnish this tart you can sprinkle on some turbinado (coarse brown sugar) on top and marvel at your handiwork. But that’s gonna take you up to 5 ingredients and I’m not sure if you’re ok with that.

The best thing about this plum tart is that you can pretty much swap out the fruit in this recipe and use the rest of it the exact same way for other fruit. It will work for:
- apples
- peaches
- pears
I would not suggest this technique for berries though. And I also would not suggest you freeze it. You can though make this vegan by using a butter substitute and swapping out the honey for agave instead. Really this recipe is so forgiving and super easy to make with impressive results. Just wait for all the ooh’s and ahh’s!

AHH I’m excited for you!
Plum Tart- Easy and Impressive!
Ingredients
- 1 pre made or store bought pie crust, defrosted
- 8-10 ripe plums, sliced into ⅛ inch slices, keep slices together!
- 1 tablespoon honey
- 2 tablespoons butter, cut into small dices
- Turbinado sugar for garnish, optional
Instructions
- Preheat the oven to 375° F.
- Arrange the plum slices in clusters switching off between horizontal and vertical. They should fit snugly next to each other.
- Drizzle with honey, and dot with butter. Make sure you dot the butter all around to ensure the plums bake well. Bake for 20 minutes until the pie edges are golden brown and the fruit is dried out a little. Garnish with turbinado sugar if you like!

I made this for Christmas dinner but it was a flop. The fruit was too close together so it didn’t cook through, even though the pastry was very golden and done. And the fruit just fell away from the pastry when cut. It did look really cool though!
Hey Sarah! Thats super frustrating sorry that happened to you- you may not have had enough of the butter spread around or the plums slices were too thick- the butter kinda has to get into the slices of plum to cook them. Thanks for making it though!