• Skip to primary navigation
  • Skip to main content
  • Skip to primary sidebar
  • Recipes
    • Recipe Search
    • Recipe Index
    • Bars & Brownies
    • Breakfast
    • Cakes
    • Cookies
    • Cupcakes
    • Frosting
    • Fruit Desserts
    • Muffins
    • One Bowl Desserts
    • Pies & Tarts
  • About Me
  • Food Photography
    • Work with Me
    • Classes and Workshops
  • Shop

Frosting & Fettuccine

Home » Recipes » Cookies

Jun 15, 2018(last updated October 31, 2021)

Crispy and Chewy Giant Funfetti Cookies

5 from 2 votes
BySam Adler
Jump to Recipe Print Recipe
If you are looking for the perfect cookie, this is it! Crispy on the outside, chewy on the inside, these crispy and chewy giant funfetti cookies are the best of both worlds. #crispy #chewy #cookies #funfetti #giantcookies Frostingandfettuccine.com

Looking for the perfect cookie? This is it! Crispy on the outside, chewy on the inside, these crispy and chewy giant funfetti cookies are the best!

a stack of cookies styled next to a pink background

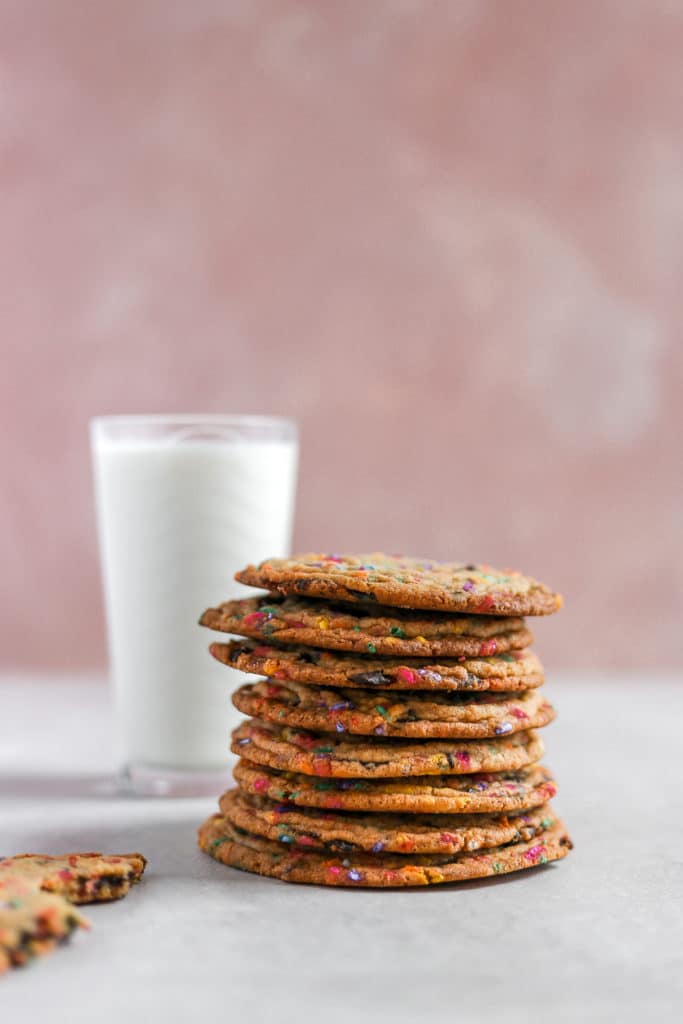
Giant cookies that are crispy and chewy!

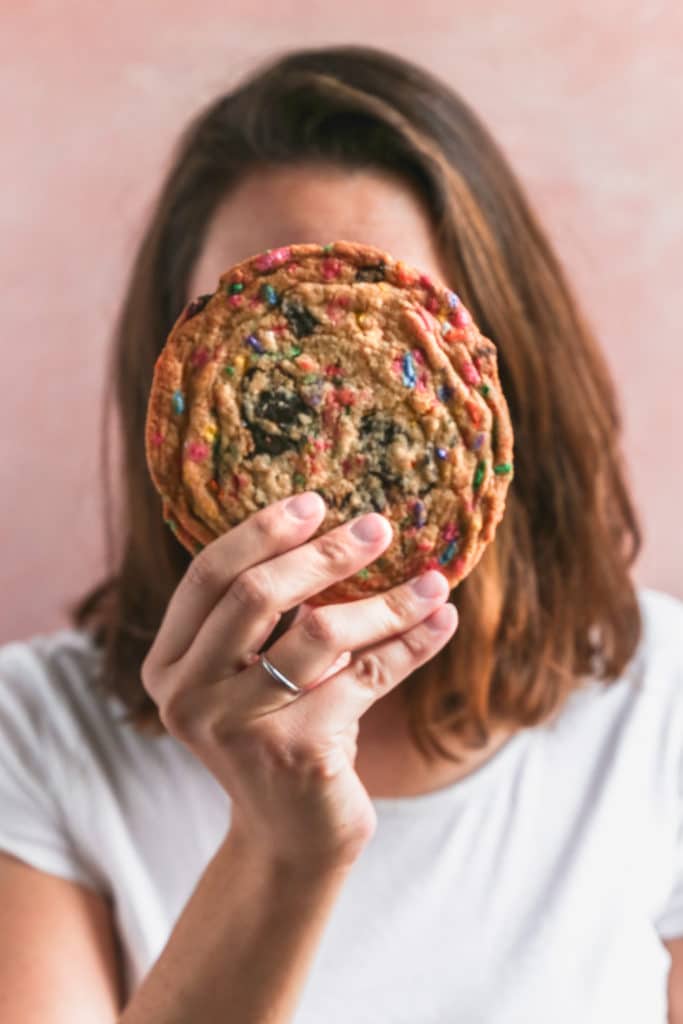
If you are looking for a crispy and chewy cookie, well ladies and gentleman (yes man, I’m pretty sure there’s only one of you here — you know who you are) you have come to the right place. And if you happen to be looking for one that is giant like the size of your face, then today is your lucky day!

These giant cookies are crispy on the outside but chewy on the inside and full of chocolate and sprinkles — aka the perfect cookie.

So how do you make the perfect cookie? You Pan Bang

What is pan banging, you say?

Pan banging is a technique that I learned from Sarah Kieffer. She’s one of those people in the culinary world who’s cookie recipe broke the internet. You couldn’t log onto Instagram without seeing at least 5-10 of these in your feed, not that I’m complaining.

I mean, this is a gift to the world, just look at them.

These were on my to-do list for so long, but to be honest I wasn’t interested so much in finding out how they taste, more so how to achieve this rippled, shar pei face cookie.

I remember reading Sarah’s recipe that says to lift the pan and bang it every 2 minutes after the initial 10-minute marker — I was like what?! Everybody knows you don’t open the oven before your desserts are fully baked, otherwise they will deflate. But then I realized DUH that’s the point.

So how does the pan banging method work?

Basically this technique ensures that the edges of the cookies bake first, then when the middle starts to bake and get puffy, you bang the crap out of it to deflate, and repeat every 2 minutes until fully baked so that it never gets a chance to rise. Result: crispy edge, chewy, gooey inside.

A girl holding a giant cookie up to her face

Creating this giant cookie recipe:

I came up with my own recipe for these giant funfetti cookies and played around with it a lot. The first couple of times I didn’t get enough ripples no matter how many times I banged. I decreased the egg and the flour, made sure I didn’t freeze them for too long or too short — don’t worry it’s only 15 minutes — and tried out different sizes. I also knew that I wanted them to be full of sprinkles and chocolate, but I wasn’t sure how the weight of those ingredients would affect the ripples.

I’m now happy to report that after some rigorous testing and many friends who have selflessly volunteered to taste test even the bad ones, it worked!

So thank you Sarah Kieffer for teaching me this new technique, and thank you friends for contributing to my research — hope you’re not just keeping me around for the baked goods.

A giant cookie with sprinkles and chocolate

What’s in these giant cookies?

The list of cookie ingredients is actually super simple — don’t let the rainbow sprinkles fool you into thinking otherwise. I packed these chewy cookies with the usual suspects like:

  • butter
  • brown sugar
  • regular granulated sugar
  • all purpose flour
  • vanilla extract

I also added a teeny amount of orange juice into the cookie dough (just trust me, it works!).

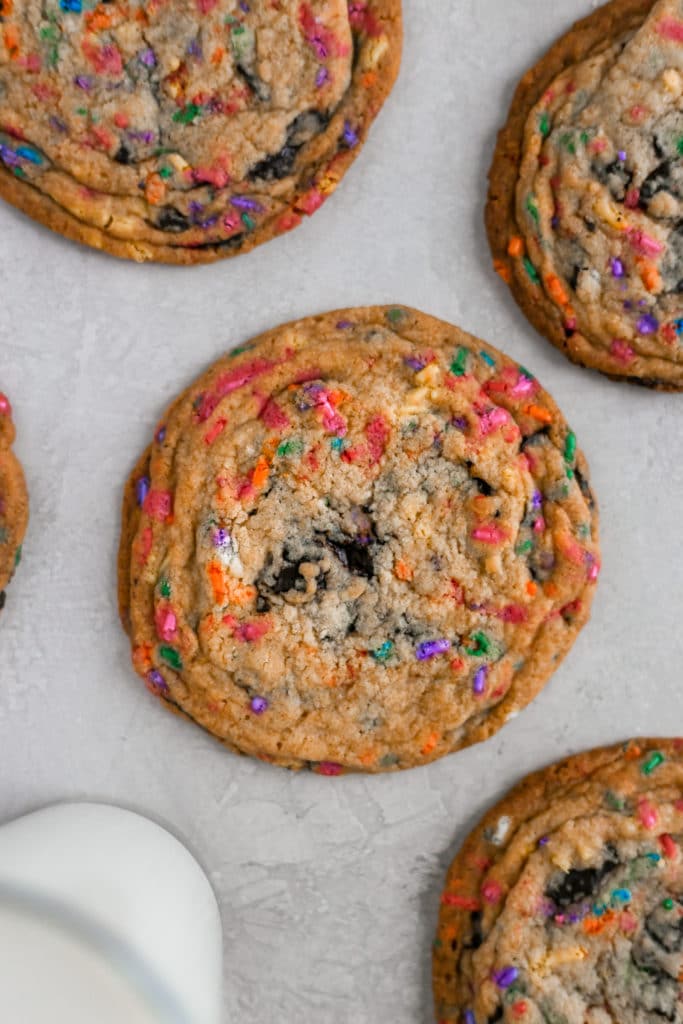
To make these cookies truly spectacular, I added chocolate chunks — NOT CHIPS — to the cookie dough, as well as regular jimmies. I like to chop my own chocolate from a big bar because that way the tiny flecks of chocolate you chop will be all throughout the dough; and you can then chop some larger pieces to top your cookie dough before you bake = those pools of chocolate.

Chocolate chips will not give you the same results as a good quality baking bar chopped up! They don’t spread well and sometimes they are full of other ingredients you just don’t need. Chocolate chunks are the way to go!

All of these simple ingredients come together to make the most incredible chewy cookies.

Half a cookie with sprinkles and chocolate about to be dunked into a cup of milk

How to make giant cookies

Simply combine the wet ingredients, and then pour in the dry (be careful when first mixing in the dry ingredients, the flour has a tendency to blow up in your face). I always always always stir the chocolate chunks and jimmies in by hand, otherwise they break up in the cookie dough.

Once the cookie dough is made, scoop it onto a parchment paper-lined baking tray and freeze for 15 minutes. After the dough balls have had time to chill out, the banging may commence. Bake the funfetti cookies for 10 minutes, then bang. Bake another 2 minutes, then bang. And repeat this process once more for good measure.

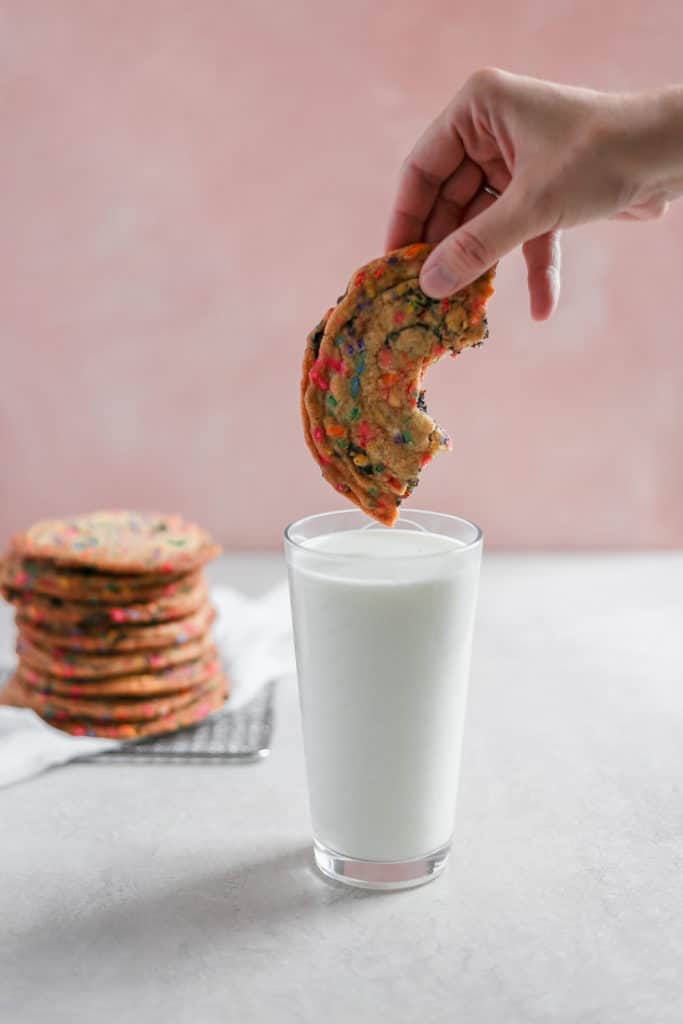
Let the cookies cool a little bit before eating them — they become chewier the longer you let them cool. Store them in an airtight container or air tight bag for 3 days at room temp.

Can I freeze these cookies?

TOTALLY. I would line them up in a ziplock or freezer safe bag and get out as much air as you can. Then freeze for up to two months. Or you can make the dough balls and freeze them for when you need a giant cookie STAT.

How to freeze cookie dough:

Follow the recipe up until the part where you start scooping out the dough. Instead of putting 5 scoops on a baking tray, scoop all the dough and line up the balls 1/2 inch next to each other. They should all fit on one half sheet or cookie sheet. It’s ok if they touch but they are easier to release if they arent.

Freeze the dough balls for one hour on the sheet then transfer them to a ziplock and stash in the freezer for up to 3 months. Bake as needed when you need a fresh cookie, no need to defrost!

a stack of cookies styled on a pink background

Need more cookie recipes?

  • Chocolate Chunk Coffee Cookies
  • Chewy Chocolate Chip Cookies
  • Salted Caramel Chocolate Chip Cookies
  • Cherry Pistachio Oatmeal Cookies
  • Chewy White Chocolate Oatmeal Cookies

This post has affiliate links which means if you purchase something off that link, I make a small commission at no extra cost to you! Thanks for supporting me and my blog! YOU DA BEST!


A girl holding a giant cookie up to her face

Giant Funfetti Cookies

These funfetti cookies are the best of both worlds! Crispy on the outside and chewy on the inside — totally cookie perfection.
5 from 2 votes
Print Pin Rate
Course: Cookies
Cuisine: American
Keyword: chewy cookies, funfetti cookie recipe, funfetti cookies
Prep Time: 20 minutes
Cook Time: 16 minutes
Total Time: 50 minutes
Servings: 10 giant cookies
Calories: 418kcal
Author: Sam Adler

Ingredients

  • 1 cup unsalted butter softened
  • 1 cup brown sugar
  • ½ cup granulated sugar
  • 1 egg large
  • 1 tablespoon orange juice
  • 1 teaspoon vanilla extract
  • 2 cups all purpose flour
  • ½ teaspoon kosher salt
  • ½ teaspoon baking powder
  • ¼ teaspoon baking soda
  • 1 cup chocolate chunks*
  • ½ cup sprinkles classic jimmies

Instructions

  • Preheat your oven to 350°F.
  • In the bowl of a mixer fitted with the paddle attachment, cream the butter and sugars together on medium speed until light and fluffy.
  • Reduce the speed to low and add in the egg, orange juice, and vanilla extract.
  • Mix to combine.
  • Turn off the mixer and add in the dry ingredients.
  • Turn the mixer on low speed and mix until the dough comes together (it will be sticky).
  • Take the bowl off the mixer, and pour in the chocolate chunks and sprinkles, and mix slowly with a spatula.
  • Line two cookie sheets with parchment paper and set aside.
  • Use an ice cream scooper to make even balls of dough and place 5 on each sheet, separated enough to allow them to spread — remember they are big!
  • Place one cookie sheet in the freezer for 15 minutes, then bake for 10 minutes.
  • After 10 minutes, open the oven door, lift the cookie sheet and bang it hard on the oven rack. You can do this once or several times if you like.
  • Bake for 2 more minutes — repeat banging.
  • Bake for 2 more minutes again — repeat banging.
  • Bake for the last two minutes, and remove from the oven.

Notes

*You need to use chocolate chunks not chips for this recipe. The chips are too heavy and don't spread well when baking. Either buy a bag of chunks or a large bar and chop them yourself.

Nutrition

Nutrition Facts
Giant Funfetti Cookies
Amount Per Serving (1 g)
Calories 418 Calories from Fat 171
% Daily Value*
Fat 19g29%
Saturated Fat 12g75%
Cholesterol 65mg22%
Sodium 180mg8%
Potassium 68mg2%
Carbohydrates 59g20%
Fiber 1g4%
Sugar 39g43%
Protein 3g6%
Vitamin A 591IU12%
Vitamin C 1mg1%
Calcium 42mg4%
Iron 1mg6%
* Percent Daily Values are based on a 2000 calorie diet.

I love when you share my recipes!!

2445 shares

Filed Under: Cookies Tagged With: Funfetti

About Sam Adler

Sam Adler is a Le Cordon Bleu professionally trained pastry chef, Saveur Blog Award winner, food photographer, and food blogger over on FrostingandFettuccine.com. She has been featured in numerous online and in-print publications including Taste of Home Magazine, Saveur Magazine, The Feed Feed, and Food Blogger Pro. Sam lives in Hollywood florida with her husband, two young kids, and french bulldog. When she’s not baking and dancing in her kitchen you can find her at her favorite yoga spot.

Reader Interactions

Comments

  1. Carissa Nelson | Spoonful of Easy says

    June 16, 2018 at 11:40 am

    I’ve heard of, but never tried the pan bang — but definitely will! Love a cookie that can be the size of your face, that is my kind of cookie!

    Reply
    • Sam says

      June 18, 2018 at 1:19 pm

      It is so much fun, you must try!!

      Reply
      • Gemma says

        April 2, 2020 at 12:09 pm

        Just did the pan bang and I AM OBSESSED!!!

        Reply
        • Sam says

          April 2, 2020 at 4:53 pm

          Omg HOORAY isn’t it the best!!! I am so glad you liked it Gem!!!

          Reply
    • Evie says

      May 29, 2019 at 1:59 pm

      Hi Sam, love the look of your cookies 😍 Can I ask what I can sub instead of orange juice? Or if I can’t sub then do you mean the juice of an orange or juice that you’d drink? Thank you!
      Evie

      Reply
      • Sam says

        May 30, 2019 at 1:59 pm

        Hi Evie! SO happy to hear that thank you! You can do either orange juice or juice from an orange but if you don’t have you can sub it with milk or a milk substitute!

        Reply
      • Mo says

        June 10, 2019 at 3:53 am

        Going to make a ten tiered cookie cake with this recipe as an alternative birthday cake. I know you say giant cookies but please can you tell me the size. Looking forward to making.

        Reply
        • Sam says

          June 11, 2019 at 1:16 pm

          Hi! That sounds so fun! I would say they are about 5″ around

          Reply
  2. Hannah says

    January 4, 2019 at 11:49 pm

    Tried this recipe tonight and my cookies look EXACTLY like the ones in the picture. This never happens. A delicious chewy but crispy cookie that is visually appealing is a beautiful thing! Also, one thing that I thought was cool—because of the dropping motion, the cookie carmelizes more because the hot butter and sugar are getting spread out on the pan. So instead of having just the outer edge nice and Carmelly, you get the outer edge plus a little extra (because the pan smacking widens the cookie). Don’t smack too hard though, got a little too excited and flipped one batch of those puppies like pancakes. Still good though! Overall 10/10 for this recipe. My new go-to. Allrecipes Classic chocolate cookie recipe—consider this a breakup letter.

    Reply
    • Sam says

      January 6, 2019 at 8:06 pm

      YAY OMG THANK YOU SO MUCH!!! Thank you for making and for such a sweet comment!! Im honored that you broke up with an all recipes recipe for me ahhh! Thank you!!

      Reply
  3. Rachel says

    October 18, 2019 at 6:09 pm

    Had a funny aftertaste

    Reply
    • Sam says

      October 20, 2019 at 10:47 am

      Hi Rachel! sorry you thought so, wondering if maybe all the ingredients you have used are fresh? Either way, thanks for trying them!

      Reply
  4. Rivka says

    October 20, 2019 at 4:01 pm

    Made these a few weeks ago and they were AH MAY ZING!!!! Made them again a day later to bring to a friend with a new baby and they were a hit there as well!!

    Reply
    • Sam says

      October 20, 2019 at 4:31 pm

      AWW Rivka! Im so happy to hear that! Thank you so so much! Such a good friend to bring cookies to a new mama! <3

      Reply
  5. Nicole says

    October 20, 2019 at 7:01 pm

    Honestly, I love baking, I’m not great at it but, this is the best thing I’ve ever been able to pull off!!! My hubby thought I was lying about making them from how good they taste. I used dye free sprinkles, still tasted the same. I’m making more per request of his work friends. So so so good!!! This will be my go-to cookie recipe.

    Reply
    • Sam says

      October 22, 2019 at 10:29 pm

      YAYAYAYAYAYAY You are amazing way to go!! So happy you are enjoying these and I’m sure they look amazing! Thank you so much for your sweet comments!!

      Reply
  6. Nicole says

    October 20, 2019 at 7:03 pm

    I forgot to add that be sure you use bar chocolate instead of chips, it really does make a difference and taste SO much better!! Hello, who doesnt love a good chocolate chunk in cookies

    Reply
    • Sam says

      October 22, 2019 at 10:30 pm

      YAS YAS YAS YAS!!!!

      Reply
  7. Lisa says

    February 23, 2020 at 1:19 pm

    Hi Sam!
    Help! I make cookies quite often but wanted to try this pretty sprinkles recipes. I followed directions, the only difference is I froze it overnight. When I baked, it was super flat, like a Lacey. What do you think might have gone wrong?

    Thanks!!
    Lisa

    Reply
    • Sam says

      February 26, 2020 at 11:38 am

      Hey Lisa!

      Sometimes if the butter and sugars are creamed too long it can result in a flatter cookie- maybe thats what happened? The freezing overnight shouldn’t be an issue. Thank you so much for making these!

      Reply
  8. Katie says

    May 5, 2020 at 7:16 pm

    5 stars
    These are my boyfriends new favorite cookie! I love to try new recipes but he loves these so much he is requesting them weekly :). They’re perfect because they are a great mix of chocolate chip and funfetti. I do less chocolate chunks because I want more of the funfetti taste. They are also the perfect texture of crispy edge and chewy insides. I’ve done the bang technique before, but not quite this many “intervals” and these are just perfect. I read that another reader froze hers overnight and they came out flat. I ended up having to do that the second time I made these because my oven blew up in the middle of the first batch, so the second batch went in the next day. They definitely spread more, and came out flat. It also took longer and more bangs for me to get the center down to even. I think maybe if I had left them out for longer than I had before baking so the middle wasn’t so frozen? Not sure, and they were still delicious but I can definitely say they don’t come out flat when you follow the instructions to only freeze for 15 minutes! Make these, you won’t regret!

    Reply
    • Sam says

      May 8, 2020 at 11:34 am

      Ahh Katie!!! Thank you so much for your awesome review! I am so happy your boyfriend loves these cookies! I hope your oven is okay too! Thanks for letting me know that thats what happened with the frozen cookies, I am so glad you still enjoyed them!!! Thanks again!!!

      Reply
  9. Maria Sharpe says

    March 19, 2021 at 4:03 pm

    question : i plan on making these over the weekend. i usually reduce sugar in most recipes – do you think that will work here (ex 3/4 brown sugar and 1/4 cup granulated)? also any tips for storage to keep them crispy yet chewy? thank you!

    Reply
    • Sam says

      April 16, 2021 at 6:18 pm

      Hi! Thanks so much for your comment- I am not sure if that will work with these but you can try it! To store,I store them in an airtight container lined with parchment paper 🙂

      Reply

Leave a comment & rate this recipe Cancel reply

Do you love this recipe? If so, I would be so grateful if you left a star rating with your comment! Star ratings help other people find my recipes so they can make them too. Thank you for your support!

XO, Sam

Recipe Rating


Primary Sidebar

Search

Hi! Im Sam Adler,

I'm a professionally trained pastry chef and food photographer.
This is a place where you will find easy yet impressive looking desserts. I also share a ton of food photography resources too! What can I say, I love pretty & delicious baked goods! Learn more about me!

  • Facebook
  • Instagram
  • Pinterest

As Featured In:

Logo images of media places Sam Adler has been featured in
Saveur Blog award winner for best food Instagram
FeedFeed

frostingandfettuccine

Finding your style 📸 It’s probably the numbe Finding your style 📸

It’s probably the number one struggle I hear from food photographers. 

❌ Shoot after shoot, it doesn’t feel like your photos are consistent or that there is even a recognizable style there.

❌ You don’t feel as if anybody would see your photos and be like “hey! I know who’s that is!”

❌ You might even feel like your photos are pretty enough but that you learned or experimented with how to shoot in someone else’s style so you don’t really feel like it’s yours.

I GET IT 🙌🏻

✅I didnt know how to use my camera 5 years ago
✅I had no recognizable style
✅Once I thought I had a style, I stuck myself in a box and felt like I could never shoot differently

But after countless hours, investing time and money every day I now have the freedom to know that whatever I shoot will inevitably come out in my own style. 🎉 I shoot in ALLL the colors of the rainbow and it always comes out like me 🙋🏻‍♀️

And this is why in my signature program, The STYLE Mastermind, with it’s combination of coaching + education, I teach you how to find your own unique style, and not how to shoot in mine.

There is *literally* no point in shooting in a style that you don’t love because the whole point of running your own creative business is to do it because you love it.

And when you love your job and it shows through your work, that’s when the clients come in. 💰 💰 💰

Over the last 3 years my program has helped over 90 (!!) students find their unique consistent style, land their highest paid contracts ever, and LEAVE THEIR JOBS! No it doesnt happen overnight, but it does happen.

SO yeah you may be scared outta your mind to take that leap and join but trust me, it may just be the best thing you do for your mindset, creativity, your business, and your style.

PS. THE STYLE MASTERMIND IS NOW OPEN FOR ENROLLMENT! 🎉💵👩🏽‍🤝‍👩🏻 We are only accepting 24 students for this round with 2 spots already taken. Tap the link in my bio to apply and level up your business!!

#photographystyle #foodphotographyandstyling #foodstylingtips #foodphotographytips #producephotography #colortheory #ilovecolor #colorlover #grapes #strawberries #plum #foodphotographyandstyling
3 things I wish someone told me in the beginning o 3 things I wish someone told me in the beginning of my food photography career 📸:

1. Do not be afraid to use shadows! You NEED shadows in your work. They are what create dimension in a photo and what gives it the “pop of the screen” effect. Just because you like to shoot light and bright doesn’t give you an excuse not to use them either. Using shadows doesn’t = dark and moody. So please, if you feel like something is missing in your photos, maybe you need more shadows?

2. Mindset is EVERYTHING. You will have really good days and then really 💩 days too. Knowing how to navigate the ups and downs of entrepreneurship is the everlasting key to your success in the food photography world. 

3. Learn about licensing and usage!!! Like get in with the nitty gritty of it. I cant tell you how much I have given away for less than what I deserve because I didn’t know enough about licensing and usage. 

All three of these things are V important to me in terms of how I run my own business and what I teach to my students.

It’s some of the main reasons why and how students have been so successful. Like 10k+ months, and leaving their 💩 jobs they hate, kind of successful.

Theres a couple more hours left to get on the waitlist for my signature program The STYLE Mastermind for an early bird incentive.

Click the link in my bio to join and get in on it while it lasts!

#foodphotogrgapher #foodphotographers #foodstylist #foodstylists #learnfoodphotography #learnfoodstyling #mentorshipprogram #foodphotographycourse #foodphotographyprogram #photographer #miamieats #miamifoodphotographer #commercialfoodphotographer #commercialfoodphotography #foodstylingandphotography #southfloridafoodphotographer #foodphotographyteacher #foodstylingteacher #photographygoals #foodphotographytips #foodphotographystyling #foodphotography101
One thing I constantly tell my students is to get One thing I constantly tell my students is to get the hell out of their comfort zones- because nothing extraordinary ever comes from it.

Think about it- the things that have gotten you to where you are today, will not get you to where you want to go next. If they did, then you would already be there.

Constantly pushing yourself to the next level of your comfort will though.

Running a workshop in Tuscany and teaching in person was that for me, and it was one of the most magical weeks ever.

So grateful for all the people that traveled across the world to stay with people they never met for 5 days.

If that’s not pushing yourself, I don’t know what is!

If you’re thinking that you need help getting to the next level, then get on the waitlist for the next round of my signature program, The STYLE Mastermind. 

It’s designed to help you find your unique signature style (YES YOU HAVE ONE) and to get paid well in this industry.

The link is in my bio to learn more about the program and join the waitlist!

If you want more, check out my highlights for Testimonials 🙃

#cakephotography #cakestyling #foodphotography
#foodstyling #learnfoodstyling #foodstylist #foodstylingandphotography #cakeoftheday #cakedecorating #cakesofinstagram #cakestagram #vanillacake #girlycake #cakephotography #miamifoodstylist #miamifoodphotographer #miamieats #southfloridafoodphotograoher #commercialfoodphotographer
✨Artichokes ✨ They were allll over Rome- at t ✨Artichokes ✨

They were allll over Rome- at the markets and next to the restaurants- all bundled up and beautiful that I couldn’t resist taking some shots.

For these I wanted to go with a light chiaroscuro effect- using the contrast between light and dark to highlight parts of an image.

I took these artichoke shots in two different areas and also edited them differently. The first to bring out more of the contrast between green and purple and the second focusing more on the green.

I cant decide which I like best- I added the raw images here too so you can see how powerful editing it, especially when you already have the finished image idea in your head!

Which do you like better?

#artichokes #artichokehearts #artichoke #campodefiori #rome #romeitaly #saminrome #rometrip #romefood #romephotography #foodphotography #samsitalypics
In July 2019 while on vacation in Tuscany, I messa In July 2019 while on vacation in Tuscany, I messaged @healthylittlecravings with the idea of running a food photography workshop in Italy. I was hoping she didn’t think I was crazy 🤪, or maybe she was just as crazy as me- because she said YES. Almost 3 years later, after lots of frustration, zoom calls, planning, un-planning, and planning again, it’s finally happening!

I’m proud of us for not giving up, and grateful for the students that have invested their time and money in learning with us- whether they are coming this time or not. 

I won’t be posting anything on my feed bc it’s not where i want to be spending time this week, but I’ll be sharing on stories! And yes we plan on doing this again ❤️ 

#foodphotographyworkshop #tuscanyworkshop #foodphotographers #foodstyling #foodstylists #tuscanytravel #stradatoscana #italytravel #tuscanygram #tuscanyview #tuscanyhills #tuscanylover
Cupcakes. My least favorite thing to shoot- so nat Cupcakes. My least favorite thing to shoot- so naturally I have a BUNCH of cupcake recipes that I need to shoot over the next week or so. I find that when I find a food that I dont love shooting, I force myself to do it over and over until I am more comfortable with it. 

It happened once before with cookies, and now cookies and I are BFFAE.

So get ready Mr. Cupcake- meet your new best friend 🙋🏻‍♀️

#itme

#cupcakes #chocolatecupcakes #chocolatecupcake #vanillabuttercream #vanillafrosting #easycupcakerecipe #cupcakestagram #cupcakesofiinstagram #chocolatelover #foodstyling #foodstylingandphotography #foodphotographyandstyling #foodstylinginspiration #creativityfound #commercialphotographer #bakedfromscratch #bakingfromscratch #heresmyfood #whatsfordessert #foodfluffer #droolclub #miamifoodphotographer #miamieats #miamiphotographer
Load more please Follow me on Instagram!

Categories

Archives

Footer

↑ back to top

About

  • About
  • Web Stories
  • Privacy Policy

Disclosure

As an Amazon Associate I earn from qualifying purchases.

Disclosure Policy

Contact

  • Contact
  • Work with me

Copyright © 2022 Samantha Adler | Frosting & Fettuccine | Support by Foodie Digital

2445 shares