Easy Marble Bundt Cake (One Batter!)
Learn how to make homemade chocolate and vanilla Marble Bundt Cake with one batter and one bundt pan! This moist and fluffy cake is made with both oil and buttermilk, and is even better decorated with powdered sugar or melted chocolate, but the topping options are endless. Perfect for potlucks, birthday parties, or anytime you need a fancy yet easy dessert!
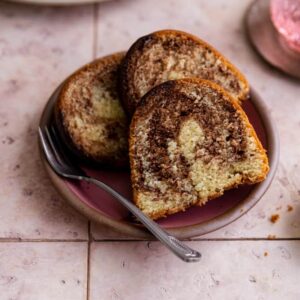
I’m really big on homemade bundt cakes. They are easy to make plus they have a built in decoration! This particular cake may be the best because it combines a delectable vanilla bundt cake and delicious chocolate bundt cake into one beautiful dessert!
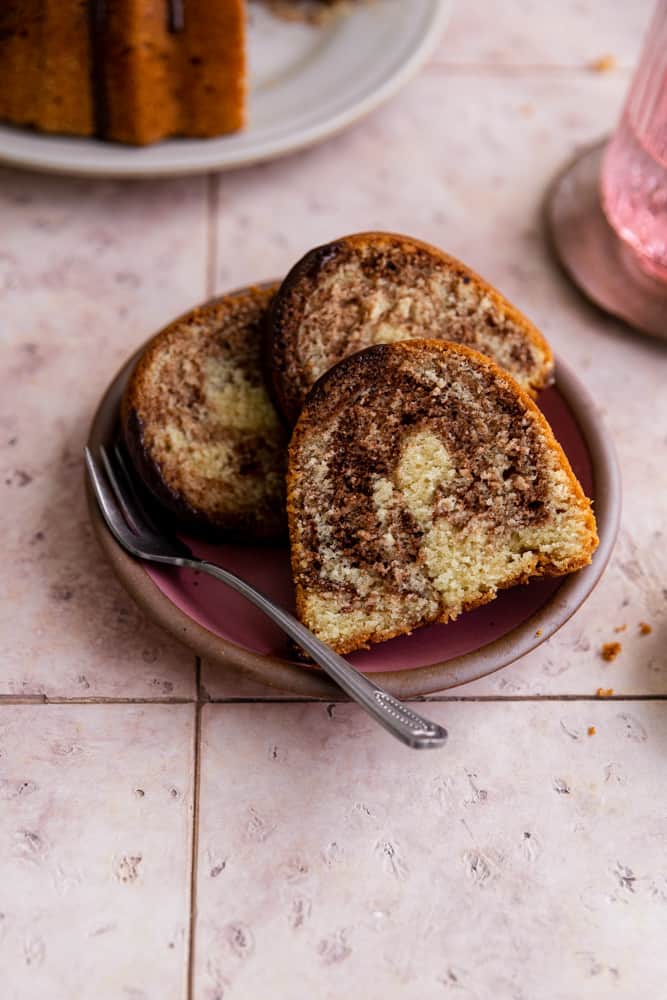
Before we start baking, let’s break down the basics of marble cake. At the heart of every marble cake is a striped, marble-like design created by swirling two different colored cake batters in one pan. As for the flavor, you can “marble” any two cakes together, but this marble cake showcases vanilla and chocolate. You can see how I used the marble effect to in these marble cupcakes.
In pastry school, we were graded on presentation, so pretty cakes are something I tend to think about. That said, this homemade marble bundt cake only looks like it’s hard to make but you really do not need special skills to recreate this chocolate vanilla masterpiece!
This cake will be your go to because you get the best of both worlds in every bite -and you only have to mix one batter! Plus this marble bundt cake with oil is easier to make because there’s no need to soften butter.
If you don’t have a bundt pan you can make this easy layered marble cake which bakes in 9″ round cake pans. Or if you need a smaller cake try this marble loaf cake!
Also make sure to read up on how to easily get a bundt cake out of a pan. These are tips that help me come out with a perfect bundt cake every time!
Reasons to love it
- It’s a 2-4-1! You get two classic cake flavors in one mouthwatering cake.
- It’s failproof. Marbling cake batters is easier than you may think.
- The texture. The texture is pleasantly dense with a moist-fluffy crumb.
- It’s a family favorite. Sharing an easy buttermilk bundt cake with friends and family is never a bad idea. Everyone loves it!
INGREDIENTS NEEDED
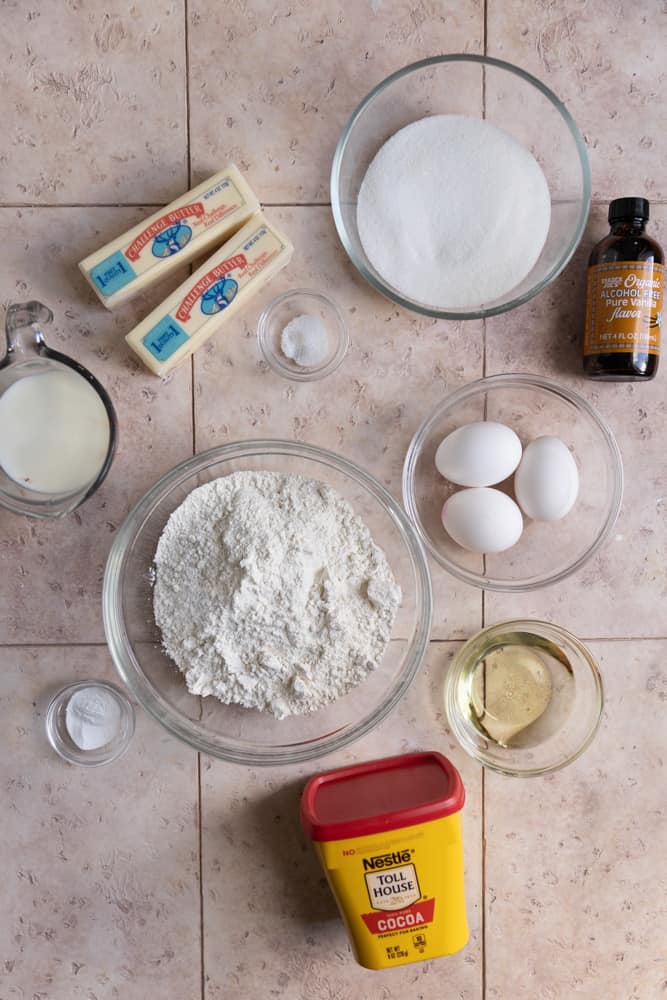
- Butter – The best cakes start with butter, but it must be at room temperature. If you’re short on time, I have a whole post on how to soften butter quickly.
- Sugar – Granulated sugar to sweeten the cake batter.
- Vegetable oil & eggs – This pair of wet ingredients is essential in adding moisture and creating structure and stability. Make sure your eggs (and butter!) are at room temperature, or the batter won’t bake as well.
- All-purpose flour – AP flour is the framework of the batter, creating a strong, fluffy cake.
- Baking powder and baking soda – The leavening agents. They work together to make the batter expand and rise into a soft and fluffy cake.
- Salt – Salt also contributes to how cakes rise while making everything sweet taste sweeter!
- Buttermilk – Incorporating buttermilk into cake batter gives a delightfully subtle tangy taste and makes the cake extra moist and tender.
- Vanilla extract – For added sweet and creamy flavors. Quality pure vanilla extract is best here.
- Unsweetened Cocoa Powder – Stir cocoa powder into a portion of the vanilla batter and voila you have the chocolate part of the cake!
Buttermilk instead of whole milk
Buttermilk is really the shining star in my bundt cake recipes. It is thick and creamy and adds the right amount of moisture to the batter.
I don’t recommend using whole milk instead of buttermilk- if you don’t have buttermilk, there’s a fun trick to make your own.
First, measure 1 cup of whole milk, then remove one tablespoon and replace it with a tablespoon of lemon juice or white vinegar. Let the mixture sit for 10 minutes -and voila, buttermilk!
HOW TO Make a Marble BUNDT CAKE
Prepare to bake a bundt cake: Preheat your oven to 350F and spray a 10-cup bundt pan generously with baking spray.
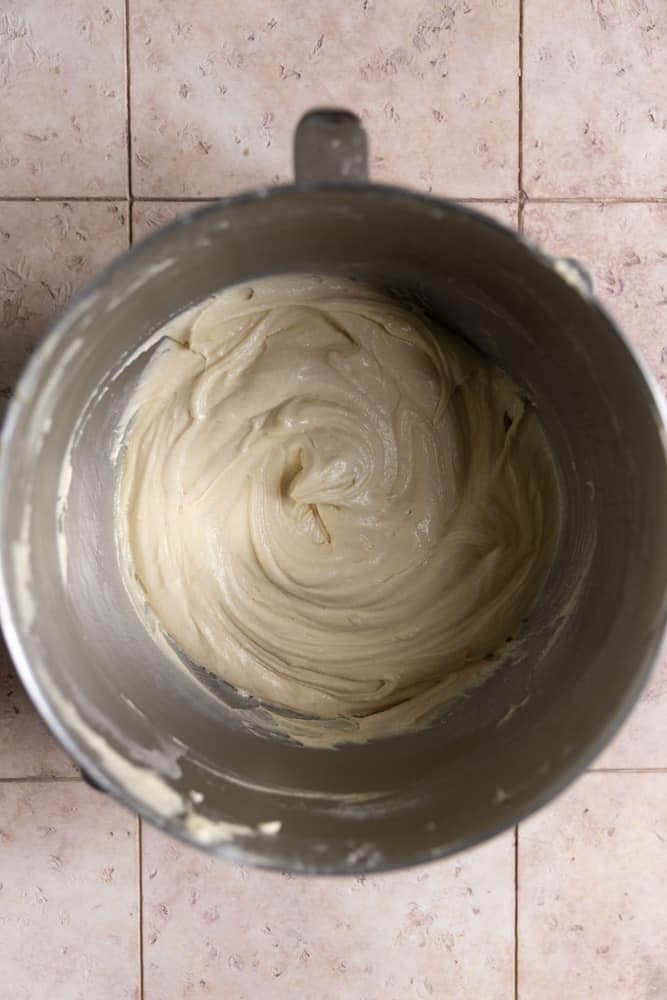
Combine wet and dry ingredients separately: In a mixing bowl with a hand mixer or a stand mixer fitted with the paddle attachment, cream softened butter and sugar on low-medium speed. Combine with vegetable oil, then add one egg at a time and mix until smooth. Mix the flour, baking powder, soda, and salt in a separate bowl.
Make vanilla cake batter: Combine the buttermilk and vanilla extract in a liquid measuring cup and set aside. Alternate between adding in the dry ingredients with the buttermilk, starting and ending with the dry ingredients.
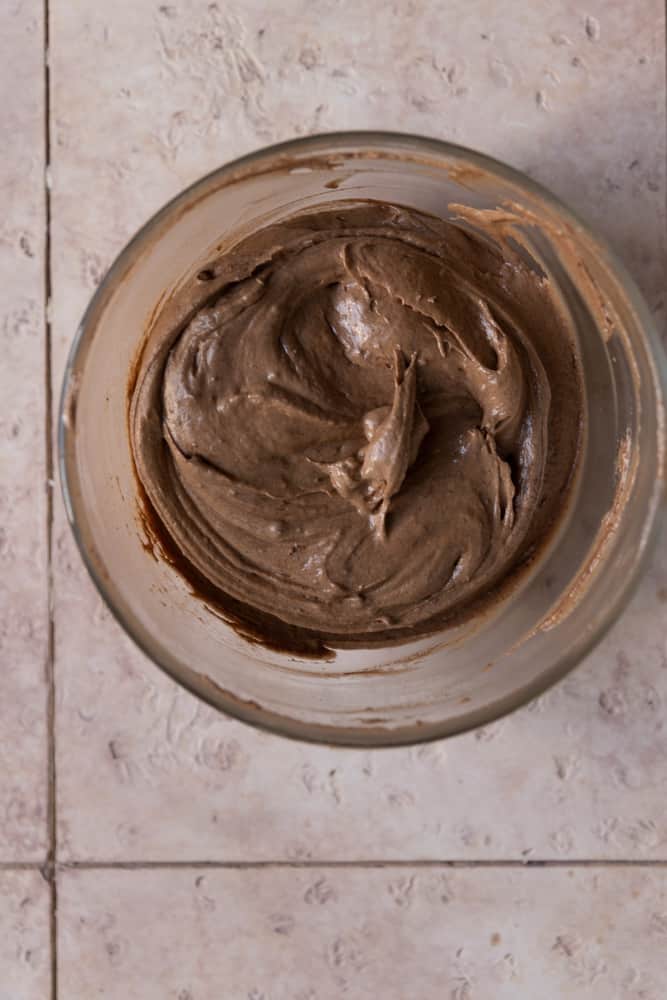
Make chocolate cake batter: Transfer one cup of the vanilla cake batter to a separate mixing bowl. Add add the cocoa powder and a little milk. Stir to combine.
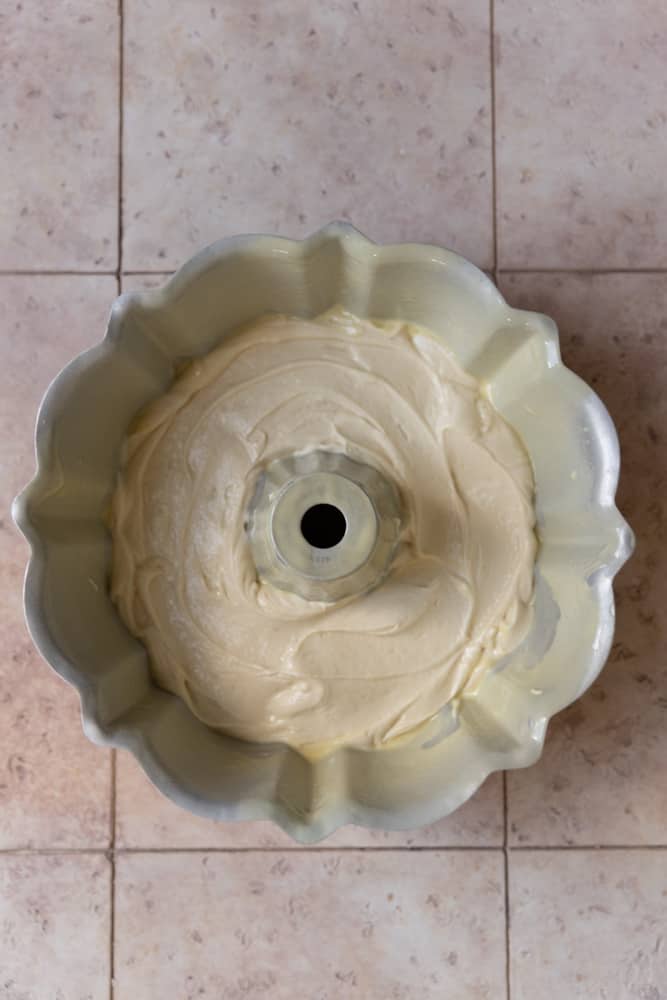
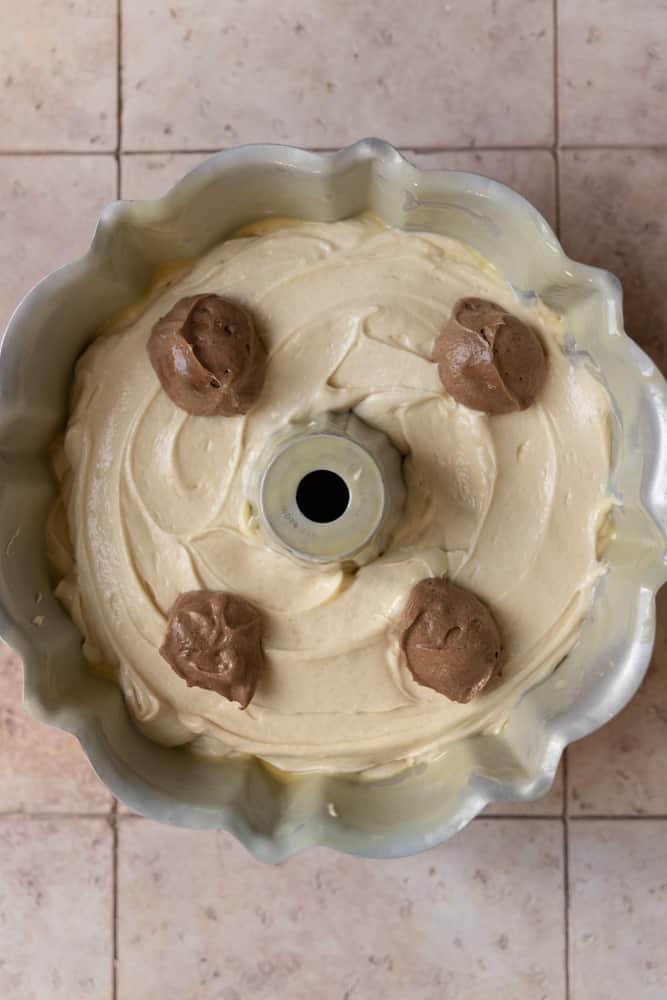
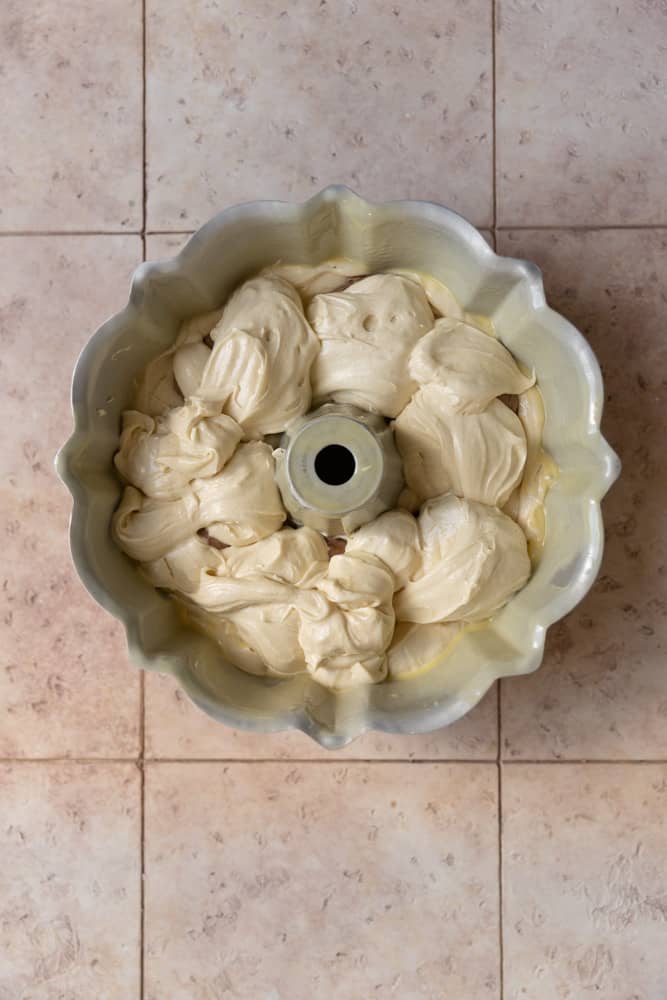
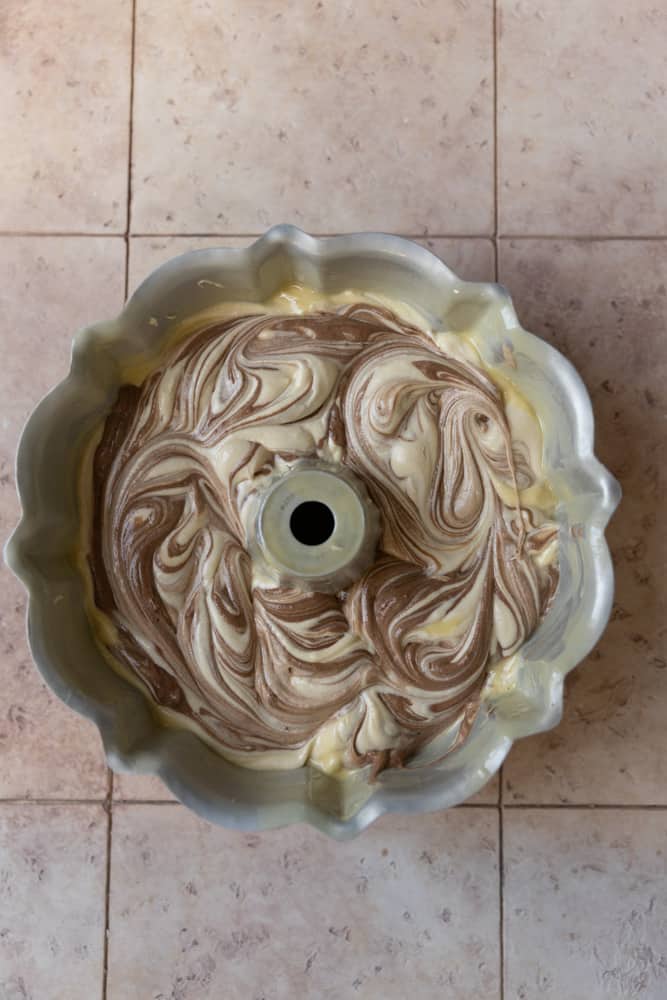
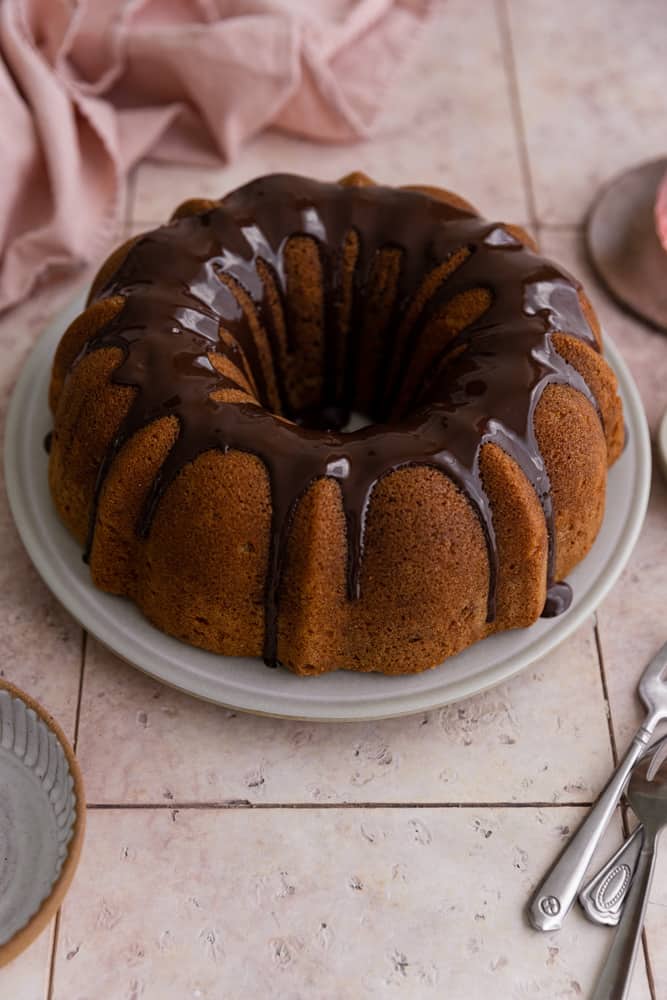
Pour and swirl cake batters: Add a thin layer of vanilla batter to the bottom of the bundt pan. Using an ice cream scoop, add scoops of chocolate batter, then top with vanilla and continue until the batter is used up. Then take a butter knife and delicately swirl the two batters together.
Bake and cool: Place in the oven and bake until the cake is set and the sides pull away from the pan. Cool in the pan before turning it onto a wire rack and cooling completely.
Decorate: Sift powdered sugar over the top and garnish with fresh fruit or drizzle extra melted chocolate down the sides. Those are two of the MANY topping/frosting options you have to choose from.
How to tell if its done
I’ve never had a bundt cake finish baking before 50 minutes, so don’t check on it till then. The cake is done when you insert a toothpick and just a couple crumbs come off. The crumbs should be slightly moist- not totally dry, because then you’ll have a dry cake!
The top will also be firm and the cake will start to pull away from the pan.
If your cake is dry
Oh no! If your cake tastes dry, the cake was either over baked, or you used too much flour. Next time, measure your ingredients with precision using a kitchen scale. If you do not have a kitchen scale, spoon the flour into the measuring cup and level it off.
Also make sure to take it out at the correct time. Like I mentioned above, if the toothpick has no crumbs or has dry crumbs the cake can be over baked.
RECIPE Tips
- Ensure all refrigerated ingredients are at room temperature, so the cake bakes evenly.
- Take your time pouring each batter. Adding each flavor to the pan one ice-scream scoop at a time may seem tedious, but it results in a gorgeous, swirled checkerboard pattern.
- If possible, use a nonstick light-colored bundt cake as they distribute heat consistently, resulting in an evenly baked caked.
- When swirling, don’t go too crazy and swirl too much otherwise the batters will blend together. A thin knife works better than a skewer.
STORAGE AND FREEZING
Storing: If you do not plan to serve your marble cake immediately, hold off on toppings and garnishes and keep it in an airtight cake dome or wrapped securely in plastic wrap at room temperature for up to 5 days.
Freezing: You can also freeze the whole cake. Make sure it’s wrapped tightly in a couple of layers of plastic wrap and then foil. Keep frozen for up to 2 months. Thaw in the fridge overnight before decorating and serving.
WAYS TO ENJOY
I like keeping it simple with sifted powdered sugar, fresh fruit, or melted chocolate. Here are a few more ways to decorate a marbled cake.
- Brown Sugar Buttercream
- Chocolate Buttercream
- Caramel Buttercream Frosting
- Chantilly Cream
- Mascarpone Frosting
Moist Marble Buttermilk Bundt Cake (One Batter!)
Ingredients
- 1 cup butter, (227g)
- 2 cups sugar, (400g)
- ¼ cup vegetable oil
- 3 eggs, large room temperature
- 2 ¾ cup all purpose flour, 330g
- 1 tsp baking powder
- ½ tsp baking soda
- ½ tsp kosher salt
- 1 tbsp vanilla extract
- ¾ cup buttermilk + 1 tbsp separated, room temperature
- 2 tbsp unsweetened cocoa powder
Instructions
- Preheat the oven to 350 F. Heavily spray a 10 cup bundt pan with baking spray.
- In the bowl of a hand or stand mixer fitted with the paddle attachment add the 1 cup butter and 2 cups sugar and mix on low-medium speed for 2 minutes.
- Add the ¼ cup vegetable oil and mix again until combined. Add the eggs one at a time on medium speed, mixing in between.
- In a separate bowl combine the 2 ¾ cup flour, 1 tsp baking powder, ½ tsp baking soda, and ½ tsp kosher salt and mix lightly.
- In a measuring cup add the 3/4 cup buttermilk and vanilla extract and set aside.
- Alternate adding the dry and wet ingredients (buttermilk and vanilla) by thirds starting and ending with the dry ingredients.
- Separate one cup of the batter and add the 2 tbsp cocoa powder and remaining 1 tbsp buttermilk. Stir to combine.
- Add a thin layer of vanilla batter to the bottom of the bundt pan, then alternate adding scoops of the vanilla and chocolate batters into the bundt pan using an ice cream scoop until all the batter is used up.
- Using a skewer or knife, swirl the batters together.
- Bake for 50-60 minutes or until the cake is set and the sides are pulling away from the pan.
Garnish
- Dust with powdered sugar and fruit, or melt 4 oz chocolate with 1 tsp oil and drizzle all over the cake.

I love Bundt cakes! This is the best recipe I have found to date. It is not “brick heavy” and comes out beautifully in my new Nordic Ware bundt pan. The batter was silky smooth. I followed you rip on how to soften butter in the microwave and it worked great. Also, I made my own buttermilk per your instruction and that turned out great also. This cake came out tender, well formed and so delicious. I will be making this again for sure. Would love to see more recipes for the smaller 6cup Nordic Ware bundt pans.
Thank you SO much for this detailed review and 5 star rating Arlene! So glad the other tips helped you! Good to know about the 6 cup bundt, ill look into that. So glad you enjoyed the cake, thank you so much for taking the time to let me know!
What other oils can I use, avocado, coconut? And can I use those to oil the pan? Do you also flour the pan & shake out after? Thank you.
Hi Lynne! My favorite way to grease a bundt pan is with baking spray that has flour included in it so something like Baker’s Joy. You can alternatively use avocado or coconut oil to oil it and then sprinkle flour and shake it out but because bundt pans have intricate designs, I find that the spray works better getting into the nooks and crannies for an easier release.
I love the recipe
But just can’t find the part where to mix in the 3/4 cup buttermilk ????
1 tbsp in the cocoa mix but I don’t see the 3/4 cup anywhere mixing in to the batter.
Hi Jutta! In the recipe card you mix the buttermilk with the vanilla in a measuring cup- these are the wet ingredients.Then you alternate adding them with the dry ingredients by thirds. Hope that was helpful!! Thank you for the 5 star review, so glad you love this recipe!
Hello. When does the butter mixture combine with the flour mixture? Thanks
Hi after you cream the butter, sugar, and oil, then add eggs and alternate adding the dry ingredients (flour) with the wet ingredients.
OMGOSH THIS IS THE BEST, Thank you so much my family loves it ♥️
Thank you SO much Sharon!!!! I so appreciate you letting me know your family loved this and for the 5 star review, yay!
Excellent recipe. My family loved it too. So tasty and soft. Definitely keep the recipe to make more of this.
Wohoo! So glad to hear it Josephine, thank you so much!
Great recipe. Came out delicious. I didn’t have buttermilk so I substituted with Greek yogurt mixed with a bit of milk. Thank you.
Thank YOU so much for coming back and leaving a review Ima. It completely makes my day. I’m also marking down that the greek yogurt substitute worked for you! That’s so good to know!
Tried and tested. Very good cake!
This cake came out soooo moist and delicious. I made a chocolate ganache and dripped it over the cake. Thank you for the recipe.
I’m so glad you loved the cake. That chocolate ganache sounds like the perfect finishing touch. I really appreciate you taking the time to rate and review the recipe! You just completely made my day Aisha!
This cake is great! Exactly what I was looking for in a Bundt cake.
Will definitely be making this one again.
Thank you, Sam!
Thank you so much Peter! So glad you loved this! I appreciate the 5 star rating!
Easy to make and came out perfectly! The instructions were clear. The cake was a hit! I made a lemon glaze for it and served with blueberry compote. I am going to make this again and again. Thank you!
Woohoo! Thank you so much Sarah! So glad everyone enjoyed it, so appreciate you letting me know how it came out! Thank you so much for the 5 star rating too!
Can I use oil instead of of butter or like half butter half oil?
I havent tried it, it would probably alter the texture and wouldnt come out the same way.
Just made it! Way too sweet and greedy for my liking! I put only 1.5 cups of sugar and still tooooooo sweet I think 1 cup is enough and probably just 1 cup of butter too.
thanks for trying it!