• Skip to primary navigation
  • Skip to main content
  • Skip to primary sidebar
  • Recipes
    • Recipe Search
    • Recipe Index
    • Bars & Brownies
    • Breakfast
    • Cakes
    • Cookies
    • Cupcakes
    • Frosting
    • Fruit Desserts
    • Muffins
    • One Bowl Desserts
    • Pies & Tarts
  • About Me
  • Food Photography
    • Work with Me
    • Classes and Workshops
  • Shop

Frosting & Fettuccine

Home » Recipe Search » Fruit Cakes

Nov 26, 2019(last updated October 31, 2021)

Pear Cake with Crumb Topping

BySam Adler
Jump to Recipe

This pear cake is an elegant yet easy dessert. Red wine poached pears are nestled in a light cinnamon cake with crumb topping. This recipe will earn you all those ooh’s and ahh’s when you bring it out to your guests!

A slice of a cake that has a pear baked inside on  a white plate.

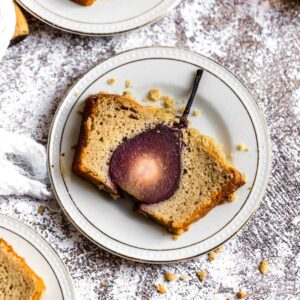
Surprise! There is a red wine poached pear hidden inside this cake!

Pear Cake with Crumb Topping

On the outside this cake looks like any other cake with a crumb topping. Imagine bringing it to your table of unassuming guests, and slicing into it revealing the hidden ruby colored fruit inside.

OOHH AND AHH they will say.

Especially after they taste it. The cake is light, moist, has a hint of cinnamon, and passed the mother in law test so you know its good.

How to Make This Surprise Pear Cake

The first step in making this cake is to poach the pears. The poaching liquid is a combination of semi sweet red wine, orange juice, vanilla, cinnamon, and sugar.

I suggest using Anjou pears because they hold up nicely after being poached. Other kinds of pears like Bosc don’t hold up as well and may turn mushy.

How to Poach Pears

First combine all the poaching ingredients in a medium sized pot. It’s best to use a pot with tall sides so that the poaching liquid can surround the pears. Bring the red wine mixture to a boil first before you start peeling your pears otherwise they will turn brown before adding them.

3 peeled pears on a tray with parchment paper

When your poaching liquid is bubbling, start peeling the pears. Cut off the butt end of the pear so that it will stand still in the pot. You can leave the stem on, it adds a pretty touch to the cake!

Add the pears into the bubbling poaching liquid and bring the heat down to a simmer. Cover and let the pears poach for 10 minutes, then rotate the pears in the pot to make sure all sides get poached. Cook for another 10 minutes.

You can cook the pears standing up, or on their sides, just make sure that every side gets poached!

Remove the pot from the heat and let it cool. You can stick the pot in the fridge to let it cool down, or leave it at room temperature. This step can be done up to 2 days in advance too. The pears will absorb more of the poaching liquid the longer you leave them in!

Prepare the Cake Batter

You will need two medium sized mixing bowls. Combine the dry ingredients in one bowl and whisk lightly. Combine the wet ingredients into another bowl and whisk that lightly. Then add the wet ingredients into the dry ingredients and mix until evenly combined.

Line or spray a loaf pan with baking spray. Take the poached pears out of the liquid and pat them dry. Line them up in the baking pan and evenly pour the batter into the pan.

3 poached pears in a loaf pan covered in cake batter

It’s easier to pour the batter in alternatively on the sides so you that the pears don’t move around in the loaf pan. You want to keep them in the middle. It’s ok if the stems or a little bit of the top of the pear stick out.

Bang or shake the pan lightly so that the batter is evenly displaced.

Prepare the Crumb Topping

In a small bowl, combine the dry ingredients with the butter or butter substitute. Pinch the mixture together with your fingers until the mixture resembles sand. It’s ok to have larger chunks of butter not mixed in.

cinnamon topped pear cake in a tin sittng on cheesecloth on top of a wooden cutting board.

Sprinkle the crumb topping on top of the cake (the more the merrier in my opinion) and then bake!

How to Slice This Pear Cake

Make sure that the cake has cooled down. It won’t slice nicely if it is still hot, and you want that pretty slice of pear in each cake slice! Using a sharp knife in a back and forth motion slice the cake. Don’t just cut straight down, the slice won’t cut nicely!

The inside look of a pear baked inside a cake.

How to Store

If you are making it in the morning and serving it either that night or the next day, you can leave it on the counter. Store it in an airtight container or wrap the top of it in the loaf pan real well with tin foil.

If you are making it a couple days in advance (up to 2 days) store it in the fridge. Sometimes cakes with fruit are best stored in the fridge to retain their freshness.

I do not suggest freezing! This cake is best made fresh.

A slice of a cake that has a pear baked inside on a white plate.

If you want to make it easier and do some steps ahead, make the poached pears and leave them in the fridge until you are ready to bake the cake.

Then when you’re ready to serve put on your poker face and get excited for the surprise!

For more easy yet impressive desserts try these:

  • Dairy Free Chocolate Ganache Tart
  • Easy Cranberry Pie
  • Easy and Chocolatey Red Velvet Cake
  • Chocolate Chip Blondies

A slice of a cake that has a pear baked inside on a white plate.

Pear Cake with Crumb Topping

This pear cake is an elegant but easy dessert. Red wine poached pears are nestled in a light cinnamon cake with crumb topping.
No ratings yet
Print Pin SaveSaved! Rate
Course: Cakes
Cuisine: American
Keyword: how to use pears in dessert, pear desserts, red wine poached pears, what dessert to make with pears
Prep Time: 1 hour hour 25 minutes minutes
Cook Time: 35 minutes minutes
Total Time: 1 hour hour 55 minutes minutes
Servings: 8 people
Calories: 619kcal
Author: Sam Adler

Ingredients

For the poached pears

  • 750 mL bottle semi sweet red wine 1 bottle
  • ¾ cup orange juice
  • 1 cup water
  • 1 tablespoon vanilla extract
  • 2 cinnamon sticks sub 1 teaspoon ground cinnamon
  • ½ cup granulated sugar
  • 3-4 Anjou Pears small

For the cake

  • 1 ½ cups all purpose flour
  • ¾ cup granulated sugar
  • 1 1/2 teaspoon baking powder
  • ¼ tsp baking soda
  • 1 1-1/2 teaspoon ground cinnamon
  • ¼ tsp kosher salt
  • 2 eggs large
  • 3/4 cup sour cream or dairy free sour cream
  • 1/3 cup vegetable oil
  • 1 teaspoon vanilla extract
  • ½ cup whole rice, or soy milk

For the crumb topping

  • 1/2 cup all purpose flour
  • 1/4 cup brown sugar
  • 1/8 cup granulated sugar
  • ¼ -½ teaspoon cinnamon
  • ¼ cup butter cold, diced small

Instructions

Prepare the pears:

  • In a medium pot with tall sides over medium heat, combine wine, orange juice, water, vanilla, cinnamon sticks, and sugar. Stir until the sugar has dissolved and bring to a boil. 
  • Start peeling the pears only when the poaching liquid is boiling. Peel the pears and slice off a little bit of the bottom so that they will stand up straight in the loaf pan. 
  • Place the pears inside the pot (either standing or on their side) and reduce to a simmer. Cover and cook for 10 minutes, then rotate the pears and cook 10 minutes more. Place in fridge to cool down fast. You can leave the pears in the poaching liquid for up to 2 days. 
  • Preheat the oven to 350° F and prepare the cake batter. 
  • In a medium sized bowl combine the 1 ½ cup flour, ¾ cup sugar, 1 ½ teaspoon baking powder, ¼ teaspoon baking soda, 1 teaspoon cinnamon and ¼ teaspoon salt. Whisk to combine.
  • In another bowl combine the 2 eggs, ¾ cup sour cream, ⅓ cup oil, 1 teaspoon vanilla extract, and ½ cup milk. Whisk to combine.
  • Pour the wet ingredients into the dry ingredients and whisk until evenly combined.
  • Spray or line a loaf pan with parchment paper. Remove the cooled pears from the poaching liquid and pat dry with a paper towel. Place the pears in a row in the middle of the loaf pan standing straight up.
  • Pour the batter in from the sides alternating between the two. The pears might try to slip around but just move them back into the middle. Shake or tap the loaf pan gently to make sure the batter is evenly dispersed.

Prepare the crumb topping.

  • In a small bowl combine ½ cup flour, ¼ cup brown sugar, ⅛ cup granulated sugar,½ teaspoon cinnamon and ¼ cup chopped butter. Pinch the mixture with your fingers to create coarse crumbs kind of like the texture of wet sand. It’s ok if there are larger pieces. Sprinkle over the cake and bake for 30-35 minutes. The cake is done when the edges start to pull off from the sides and the top is golden brown.

Notes

You can make this cake dairy free by using butter and milk substitutes.
 
You can discard the poaching liquid or reduce it into a syrup by bringing it to a boil then reducing it to a simmer until it reduces by half, about 15 minutes. 

Nutrition

Nutrition Facts
Pear Cake with Crumb Topping
Amount Per Serving (1 g)
Calories 619 Calories from Fat 198
% Daily Value*
Fat 22g34%
Saturated Fat 14g88%
Cholesterol 124mg41%
Sodium 306mg13%
Potassium 352mg10%
Carbohydrates 82g27%
Fiber 4g17%
Sugar 51g57%
Protein 8g16%
Vitamin A 516IU10%
Vitamin C 15mg18%
Calcium 122mg12%
Iron 3mg17%
* Percent Daily Values are based on a 2000 calorie diet.

I love when you share my recipes!!

139 shares

Filed Under: Fruit Cakes Tagged With: Cinnamon

About Sam Adler

Sam Adler is a Le Cordon Bleu professionally trained pastry chef, Saveur Blog Award winner, food photographer, and food blogger over on FrostingandFettuccine.com. She has been featured in numerous online and in-print publications including Taste of Home Magazine, Saveur Magazine, The Feed Feed, and Food Blogger Pro. Sam lives in Hollywood florida with her husband, two young kids, and french bulldog. When she’s not baking and dancing in her kitchen you can find her at her favorite yoga spot.

Reader Interactions

Comments

  1. Hana Itzhaki says

    December 13, 2019 at 2:00 pm

    Hi! The directions say to add water to the poaching liquid but it isn’t listed in the ingredient list. Just wondering how much I should add?

    Reply
    • Sam says

      December 14, 2019 at 8:05 pm

      Hi! Thanks so much for catching that its 1 cup! I will add it!

      Reply

Leave a comment & rate this recipe Cancel reply

Do you love this recipe? If so, I would be so grateful if you left a star rating with your comment! Star ratings help other people find my recipes so they can make them too. Thank you for your support!

XO, Sam

Recipe Rating


Primary Sidebar

Search

Hi! Im Sam Adler,

I'm a professionally trained pastry chef and food photographer.
This is a place where you will find easy yet impressive looking desserts. I also share a ton of food photography resources too! What can I say, I love pretty & delicious baked goods! Learn more about me!

As Featured In:

Logo images of media places Sam Adler has been featured in
Saveur Blog award winner for best food Instagram

samadlerphotography

Sam Adler | Food Photography & Styling
Not my usual style but since it was a holiday week Not my usual style but since it was a holiday weekend I thought it was fitting! Also yes I know the cheese is not melted but this was the way the client wanted it, so that’s the way we did it! This shoot got its inspo from a show on tv- can you guess what it is!? 

Also- I’ll be going live again with Jamie from @foodbloggerbossco today at 1 pm EST! We figured we had such a good time last week we’re gonna do it again! We’re trying to make this a weekly thing where we answer and talk about 1 question pertaining to food photography and or blogging for 10-15 mins. So welcome to our next ten minute talk! See you soon!
Save this Live with @foodbloggerbossco and watch i Save this Live with @foodbloggerbossco and watch it later! Inside we talked about how I grew my traffic 5x over a year- things that worked and things that didn’t! Bottom line- don’t give up! My traffic was at 15k a little over a year ago and now hovering around 165k!! If I can do it so can you! 🎉
Going LIVE at 1pm EST today with @foodbloggerbossc Going LIVE at 1pm EST today with @foodbloggerbossco to talk about how i set up my baking food blog frostingandfettuccine.com to run on its own during maternity leave and how it’s been has been bringing me my highest income to date! 

🚨spoiler alert*🚨this did not happen overnight!

Success with anything is really about consistency, strategy, and implementation. Excited to share all the juicy details with you so soon! 

#foodblogger #foodphotographer #foodblogging #foodphotographyandstyling #foodstyling #bakingrecipes
My latest, most delicious recipe- meet ✨💚Aver My latest, most delicious recipe- meet ✨💚Avery Silas 💚✨ 2 months old now! Needless to say our lives have changed a lot recently and we are all still adjusting! Chase has basically turned into a teenager 🤯🥹 and Adrienne is a full blown hippy, flower child, and mini #swiftie - lol to her fake hair, braid that stayed in for 6 weeks and the tattoo on her arm (🆘 😂). And bc not everyday is all perfect photos and happy kids I threw one screaming pic in there for good measure 😂. 

I literally have no idea how to use this app anymore so my only plan is to have fun on it bc if im not having fun then what’s the point. Thanks for all your messages and congratulations and giving me the break and space I needed. It’s good to be back! 

#maternityleave #workingmoms #newmom #2monthsold #southfloridafoodphotographer #floridafoodphotographer #newbaby #babyboy
👋🏻 2022! Will be celebrating this year on th 👋🏻 2022! Will be celebrating this year on the couch with this in my lap. No sharing allowed! Those 3 spoons are all mine 😂😂 

🍾🥂HAPPY NEW YEAR 🍾🥂
.
.
.
#newyearseve #2023goals #cookieskillet #skilletcookie #giantchocolatechipcookie #chocolatechipcookies #chocolatechipcookie #cookiephotography #foodphotographyandstyling #foodstylingandphotography #foodphotographer #foodstylist #foodstylists #castironbaking #castironskillet #castiron @lodgecastiron
Recap of all the cookie boxes!!! This year’s @ta Recap of all the cookie boxes!!! This year’s @taylorswift theme has got to be my fave (see my last reel for the explanation of each cookie!) but I have so much fun every year making these! Which one is your fave?! 

#cookieboxes #cookiebox #cookiegifts #cookiegiftbox #holidaycookies #taylorswift #TaylorSwiftcookies #homemadecookies #customcookies #cookiedecorating #cookiesofinstagram #cookiedesign #cookiephotography #holidaycookiebox #holidaygiftsets #holidaygifts #ediblegifts #swiftie #swiftiesforever #taylornation @taylornation
Load more please Follow me on Instagram!

Categories

Archives

Privacy Policy  | Disclosure Policy


Support by Foodie Digital

Footer

↑ back to top

About

  • About
  • Web Stories
  • Privacy Policy

Disclosure

As an Amazon Associate I earn from qualifying purchases.

Disclosure Policy

Contact

  • Contact
  • Work with me

Copyright © 2023 Samantha Adler | Frosting & Fettuccine | Support by Foodie Digital

139 shares