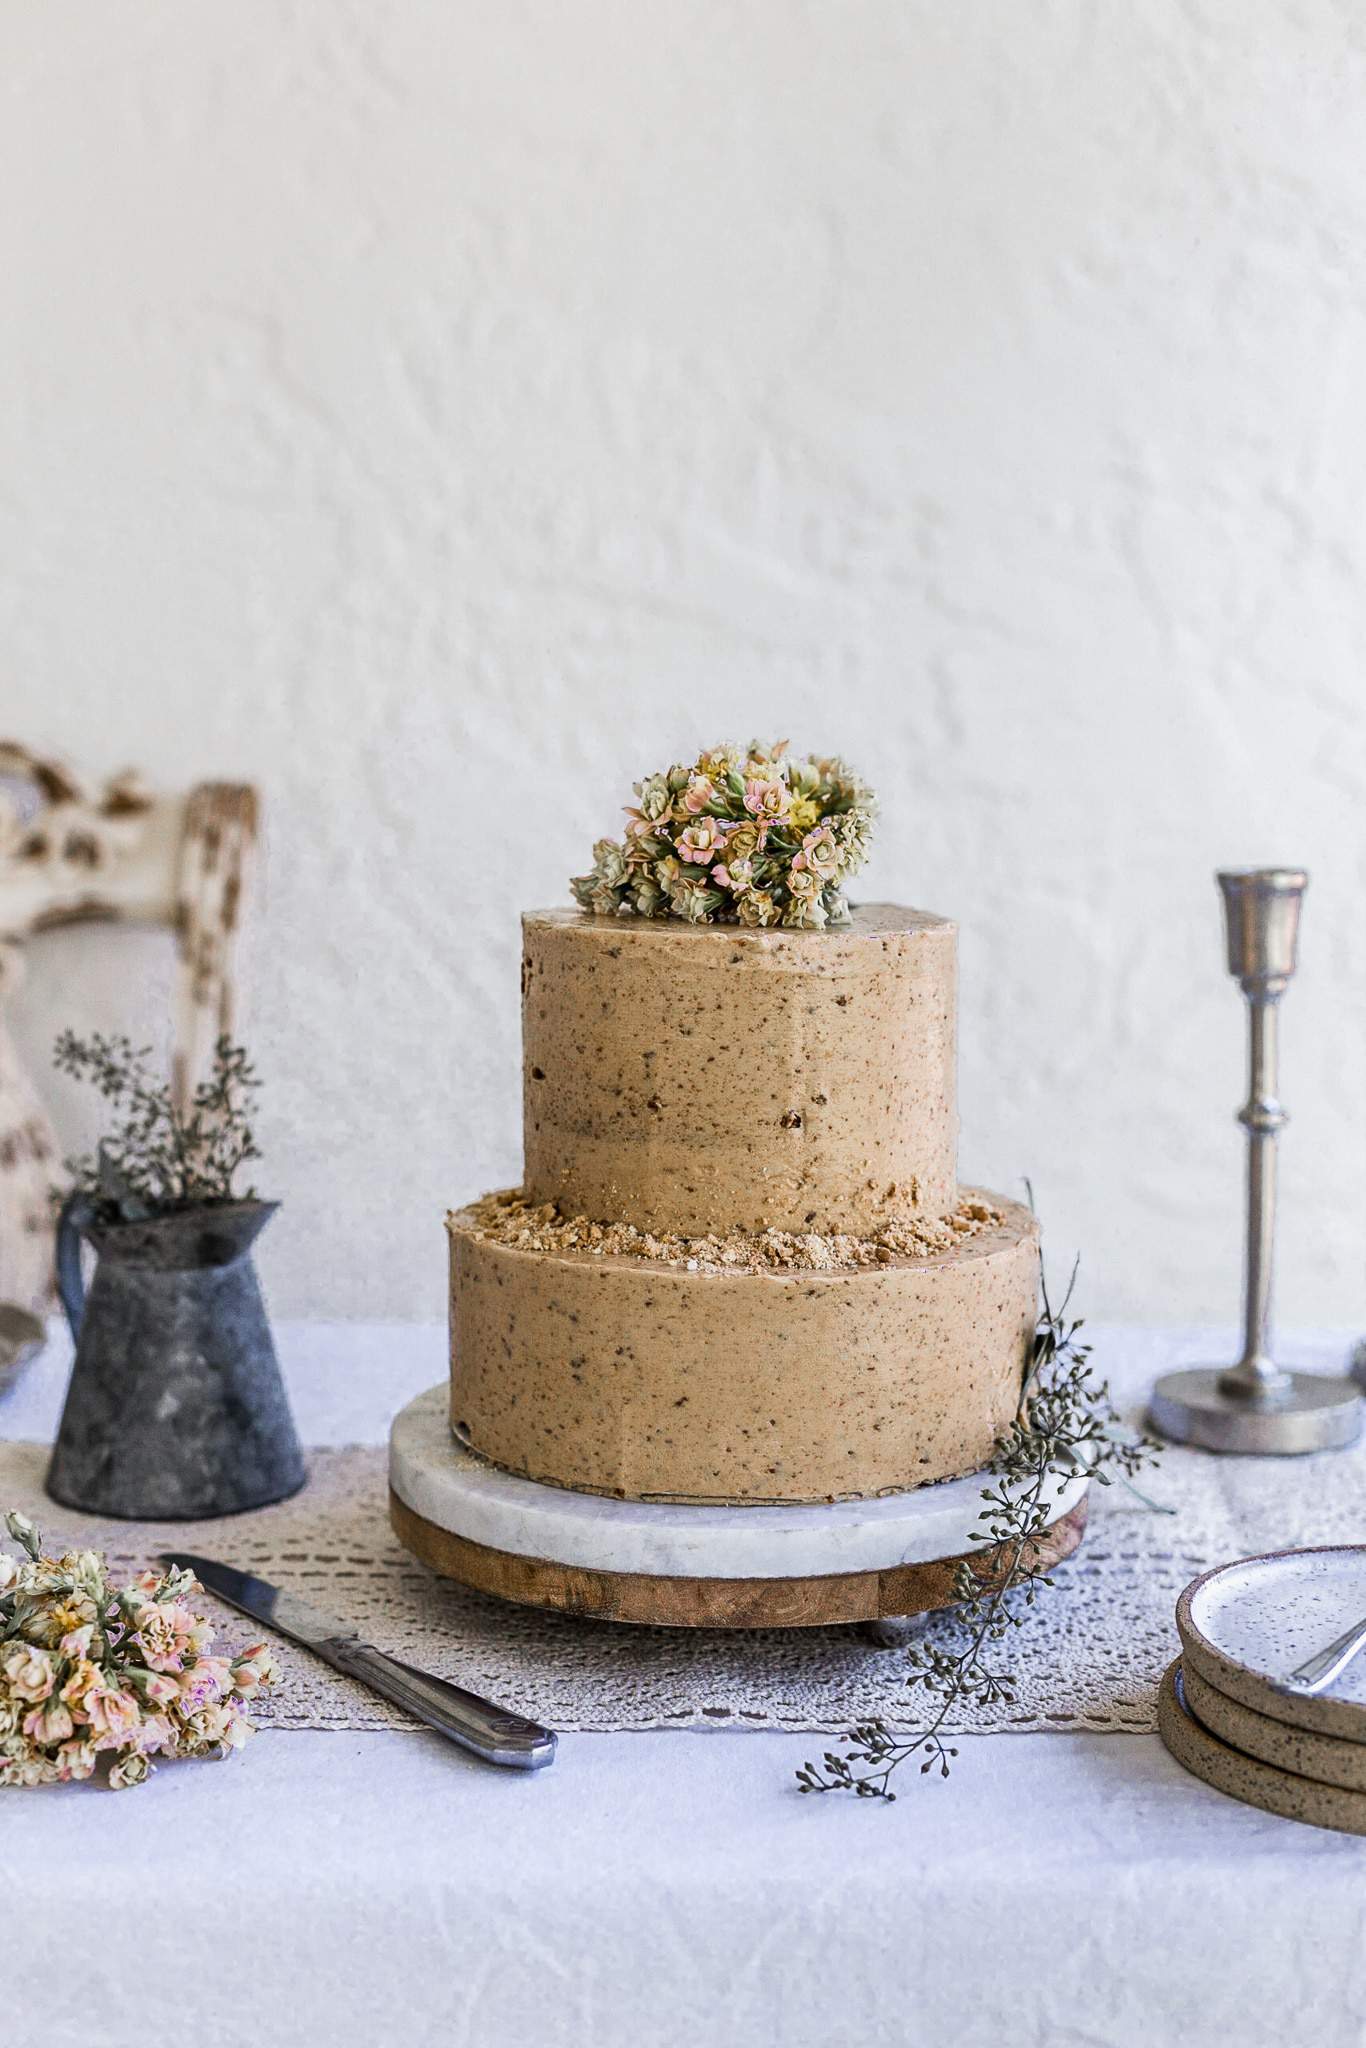
How to Bake & Stack a Two Tier Cake
How do you stack a two tier cake? This simple step by step tutorial answers all your questions about how to bake, fill, stack, and decorate a two tier cake from start to finish! It’s not as hard as you think!
Stacking a two tier cake starts with baking a cake that has the stability to be stacked. That means you need a cake that can hold the weight of a cake on top of it.
A light and airy cake like an angel food cake is not your best choice for a stacked cake because it is likely to collapse or droop under the pressure.
As a trained pastry chef and owner of a home based custom cake business for 5 years I have made lots and lots of cakes! If you love decorating cakes make sure you read my 10 ways to make your cakes look more professional, and how to decorate a cake with flowers!
For ease of reading, this post has been separated into different sections:
- What kind of cake, buttercream, and pans to use
- Cake size
- The difference between tiers and layers
- Tools you need to stack a cake
- Assembling the cake layers
- Frosting the cake
- How to have smooth cake edges
- Stacking a two tier cake
- What to do if you mess up
- How to decorate
- How to deliver a cake
What kind of cake is best?
A more dense cake is a great choice, but it doesn’t have to be your only choice. You can make a more fluffy cake recipe and still be able to stack it as long as you bake your layers thick enough.
One of my favorite recipes to use to stack a cake is this easy one bowl vanilla cake recipe. It is a little more on the dense side but the flavor is so good and it stacks beautifully! This is the recipe you will find in the recipe card below.
I also have this chocolate cake recipe but it is a little more on the fluffy side. If you’re a beginner at stacking two tier cakes, I would say start with the vanilla recipe!
The recipe that I used for this tutorial is my cookie butter cake recipe. It’s sturdy enough to be stacked, and SO insanely delicious!
What buttercream recipe should I use?
Go with this classic American buttercream recipe. It pipes really nicely and will also crust up perfectly for stacking. You will have to double the recipe to have enough to stack a cake. Or triple it if you like a lost of frosting.
Baking pans to use
These wilton baking pans are my absolute favorite baking pans to use wether or not I am stacking a cake. They are durable, retain heat really well, and since the sides are straight, you always get good straight sides when baking.
I have them in all four sizes- but when you stack a cake you need multiples of the same size pan. So that means 3 8″ round cake pans and 3 6″ round cake pans. Sometimes Michaels has a sale and you can get the pans for really cheap, so be on the lookout!
I always like to bake and stack my cakes in 3 layers because it gives the cake height which makes is more professional looking.
Disposable Aluminum pans
I don’t love using disposable aluminum pans for stacking. I know they are the cheaper option but they really aren’t very sturdy and won’t yield the best results. Invest in good baking pans and you’ll use them for years!
Cake Size You need
A two tier cake means you need two cakes (composed of layers) in two different sizes. The standard size is usually a 6″ cake stacked on top of a 8″ cake and it feeds about 40-50 people depending on how big you cut the slices.
Remember it may not look like it can feed that many people but stacked cakes are taller than regular cakes which means you can cut the slices thinner and still have a nice slice of cake. Sometimes I’ll cut a slice and because it is so tall, then cut it in half to serve.
The difference between tiers and layers
This confuses people sometimes.
Tiers and layers are two different things. There are multiple layers of cake inside one tier. A tier of cake is composed of multiple layers of cakes. Does that make sense?
Each tier of the cakes I make usually have three layers of cake in it. Sometimes my 6″ cakes will only have 2 layers if they are really thick and the height is there without needing an extra layer of cake.
Tools you’ll need to stack your cakes:

- Baking Pans (see above)
- a cake leveler or long serrated knife
- cake turntable
- offset spatula
- cake boards in multiple sizes (see below)
- bubble tea straws
- scissor
- bench scrapers
- clean spray bottle
- buttercream– have this at the ready!
- piping tips and bags for decorating (optional)
Notes on the tools you need:
Cake boards- Using two different size boards when frosting and filling is helpful because it will allow you to lift the cake up and move around. Also it will catch any frosting that falls so the turntable doesn’t get messy.
You want to have one that is 2 inches larger than your cake, so in this case a 10″ and one that is the same size as your cake, an 8″- for the bottom cake.
As well as an 8″ cake board and a 6″ cake board for the smaller cake.
So let’s recap, you need:
- 1, 10″ cake board
- 2, 8″ cake boards
- 1, 6″ cake board
If you are planning this for a fancy party or want the cake to be presented on something nicer than a cake board then you can buy one of these cake drums and use it to act as your 10″ cake board.
A cake drum is different than a cake board.
A cake drum is thicker, nicer, and more sturdy, and is usually what cakes are presented on for parties and things if not on a cake stand.
A cake board is just a round piece of cardboard that is not as sturdy as a drum. So if you are making this to deliver or for somebody, I suggest making it on a cake drum.
Assembling the cake layers
Start with a flat top
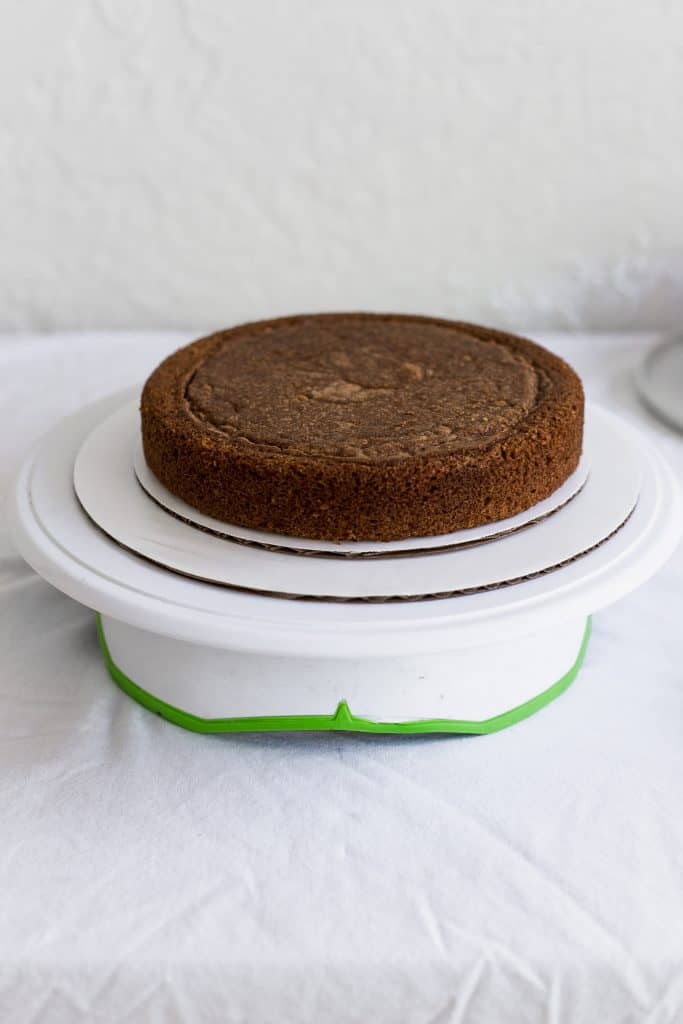
When the cakes are cool you will need to cut off the tops to make them flat because you can’t stack a cake that doesn’t have a flat top.
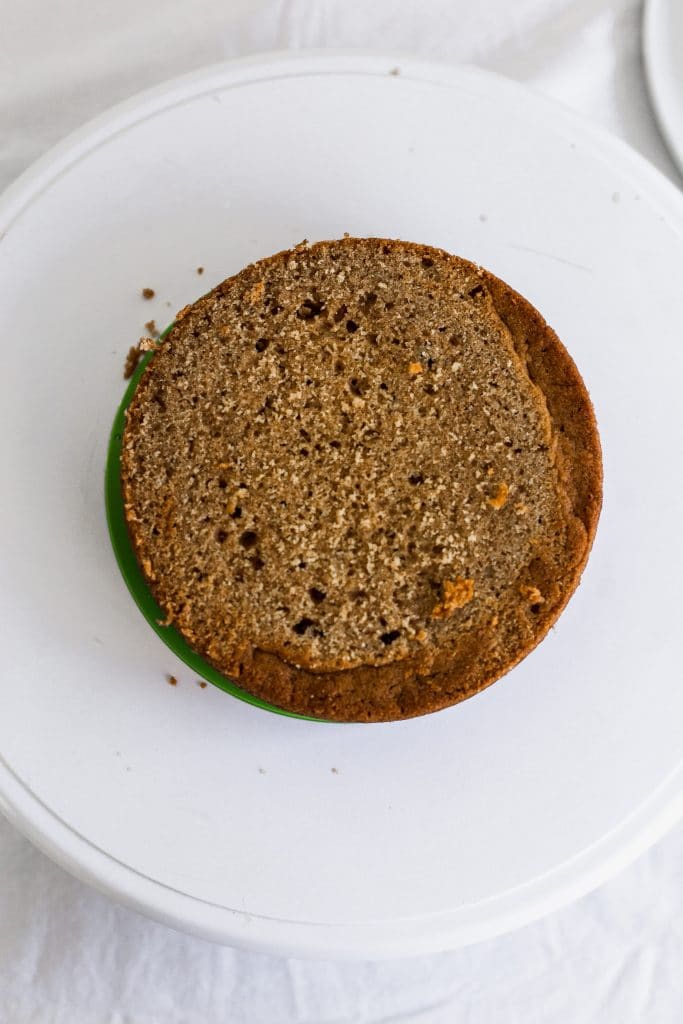
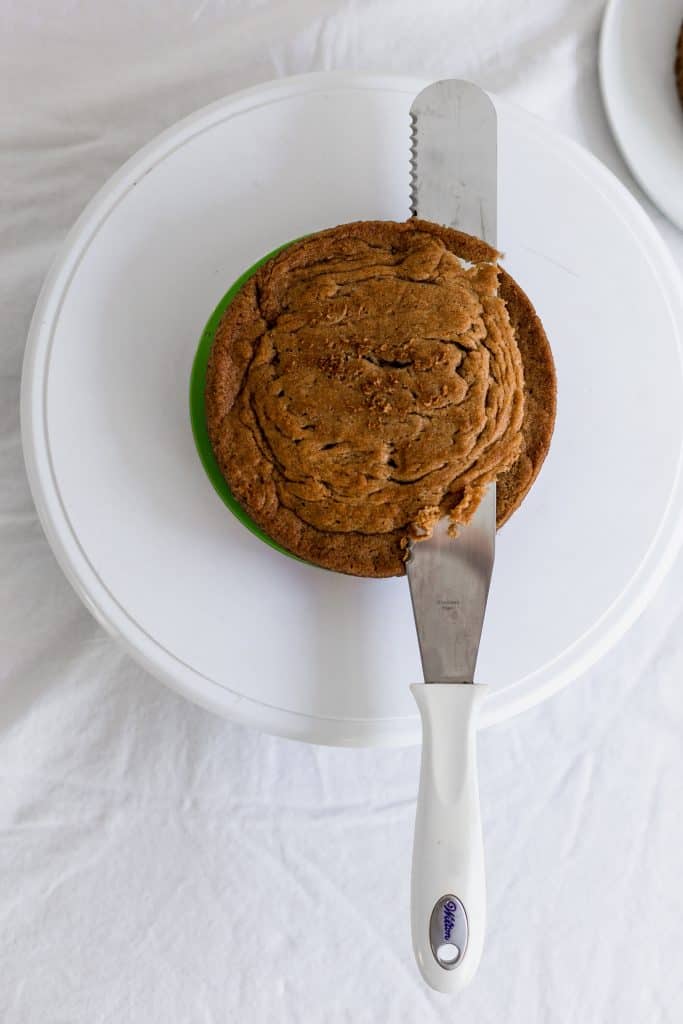
You can use these baking strips to bake your cakes flat, or some other hacks swirling around the internet but I prefer to just cut off the domed top. Keep the scraps too! They make for a tasty breakfast treat.
I use either a cake leveler or a long serrated knife. If you are a beginner I say go with the cake leveler, it is SUPER easy to use. It’s basically like a saw for your cakes. The only thing with it is that if the outside of your cake is a little crisp, the initial cut into the cake is a little hard. But it is totally doable and the best way to start!
Now you should have between 5-6 cake layers with flat tops.
You will need a turntable, offset spatula, some cake boards, and buttercream.

Start filling
Place a 10″ cake board on the turntable. Dab a little but of buttercream in the middle of the cake board- just a tiny bit.

Then place the 8″ cake board on top and press down to seal.
Smooth about 1 tablespoon of buttercream over the 8″ cake board and place your first layer of your 8″ cake on top.
Fill the cake with buttercream:
You can either use a piping bag, or you can just use your offset spatula to spread an even layer of buttercream over the cake layer. If you are using piping bag– pipe a border of buttercream around the cake 1/4 inch in and then fill from there.

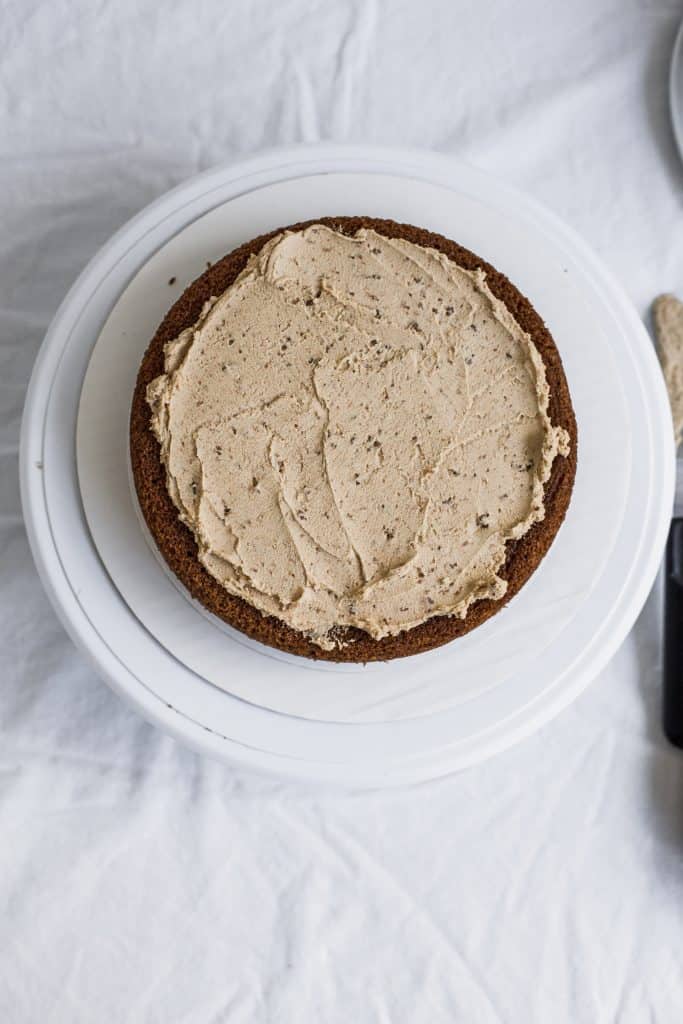
If you are using the spatula, start by placing down about 1/4 -1/3 cup of buttercream in the center, and work your way out. Stop 1/4 inch from the border.
Once you have an even layer of frosting, take another cake layer and flip it over so that the bottom is now the top. Place it down over the layer of buttercream. Yes, the cut side should be the side on top of the buttercream.
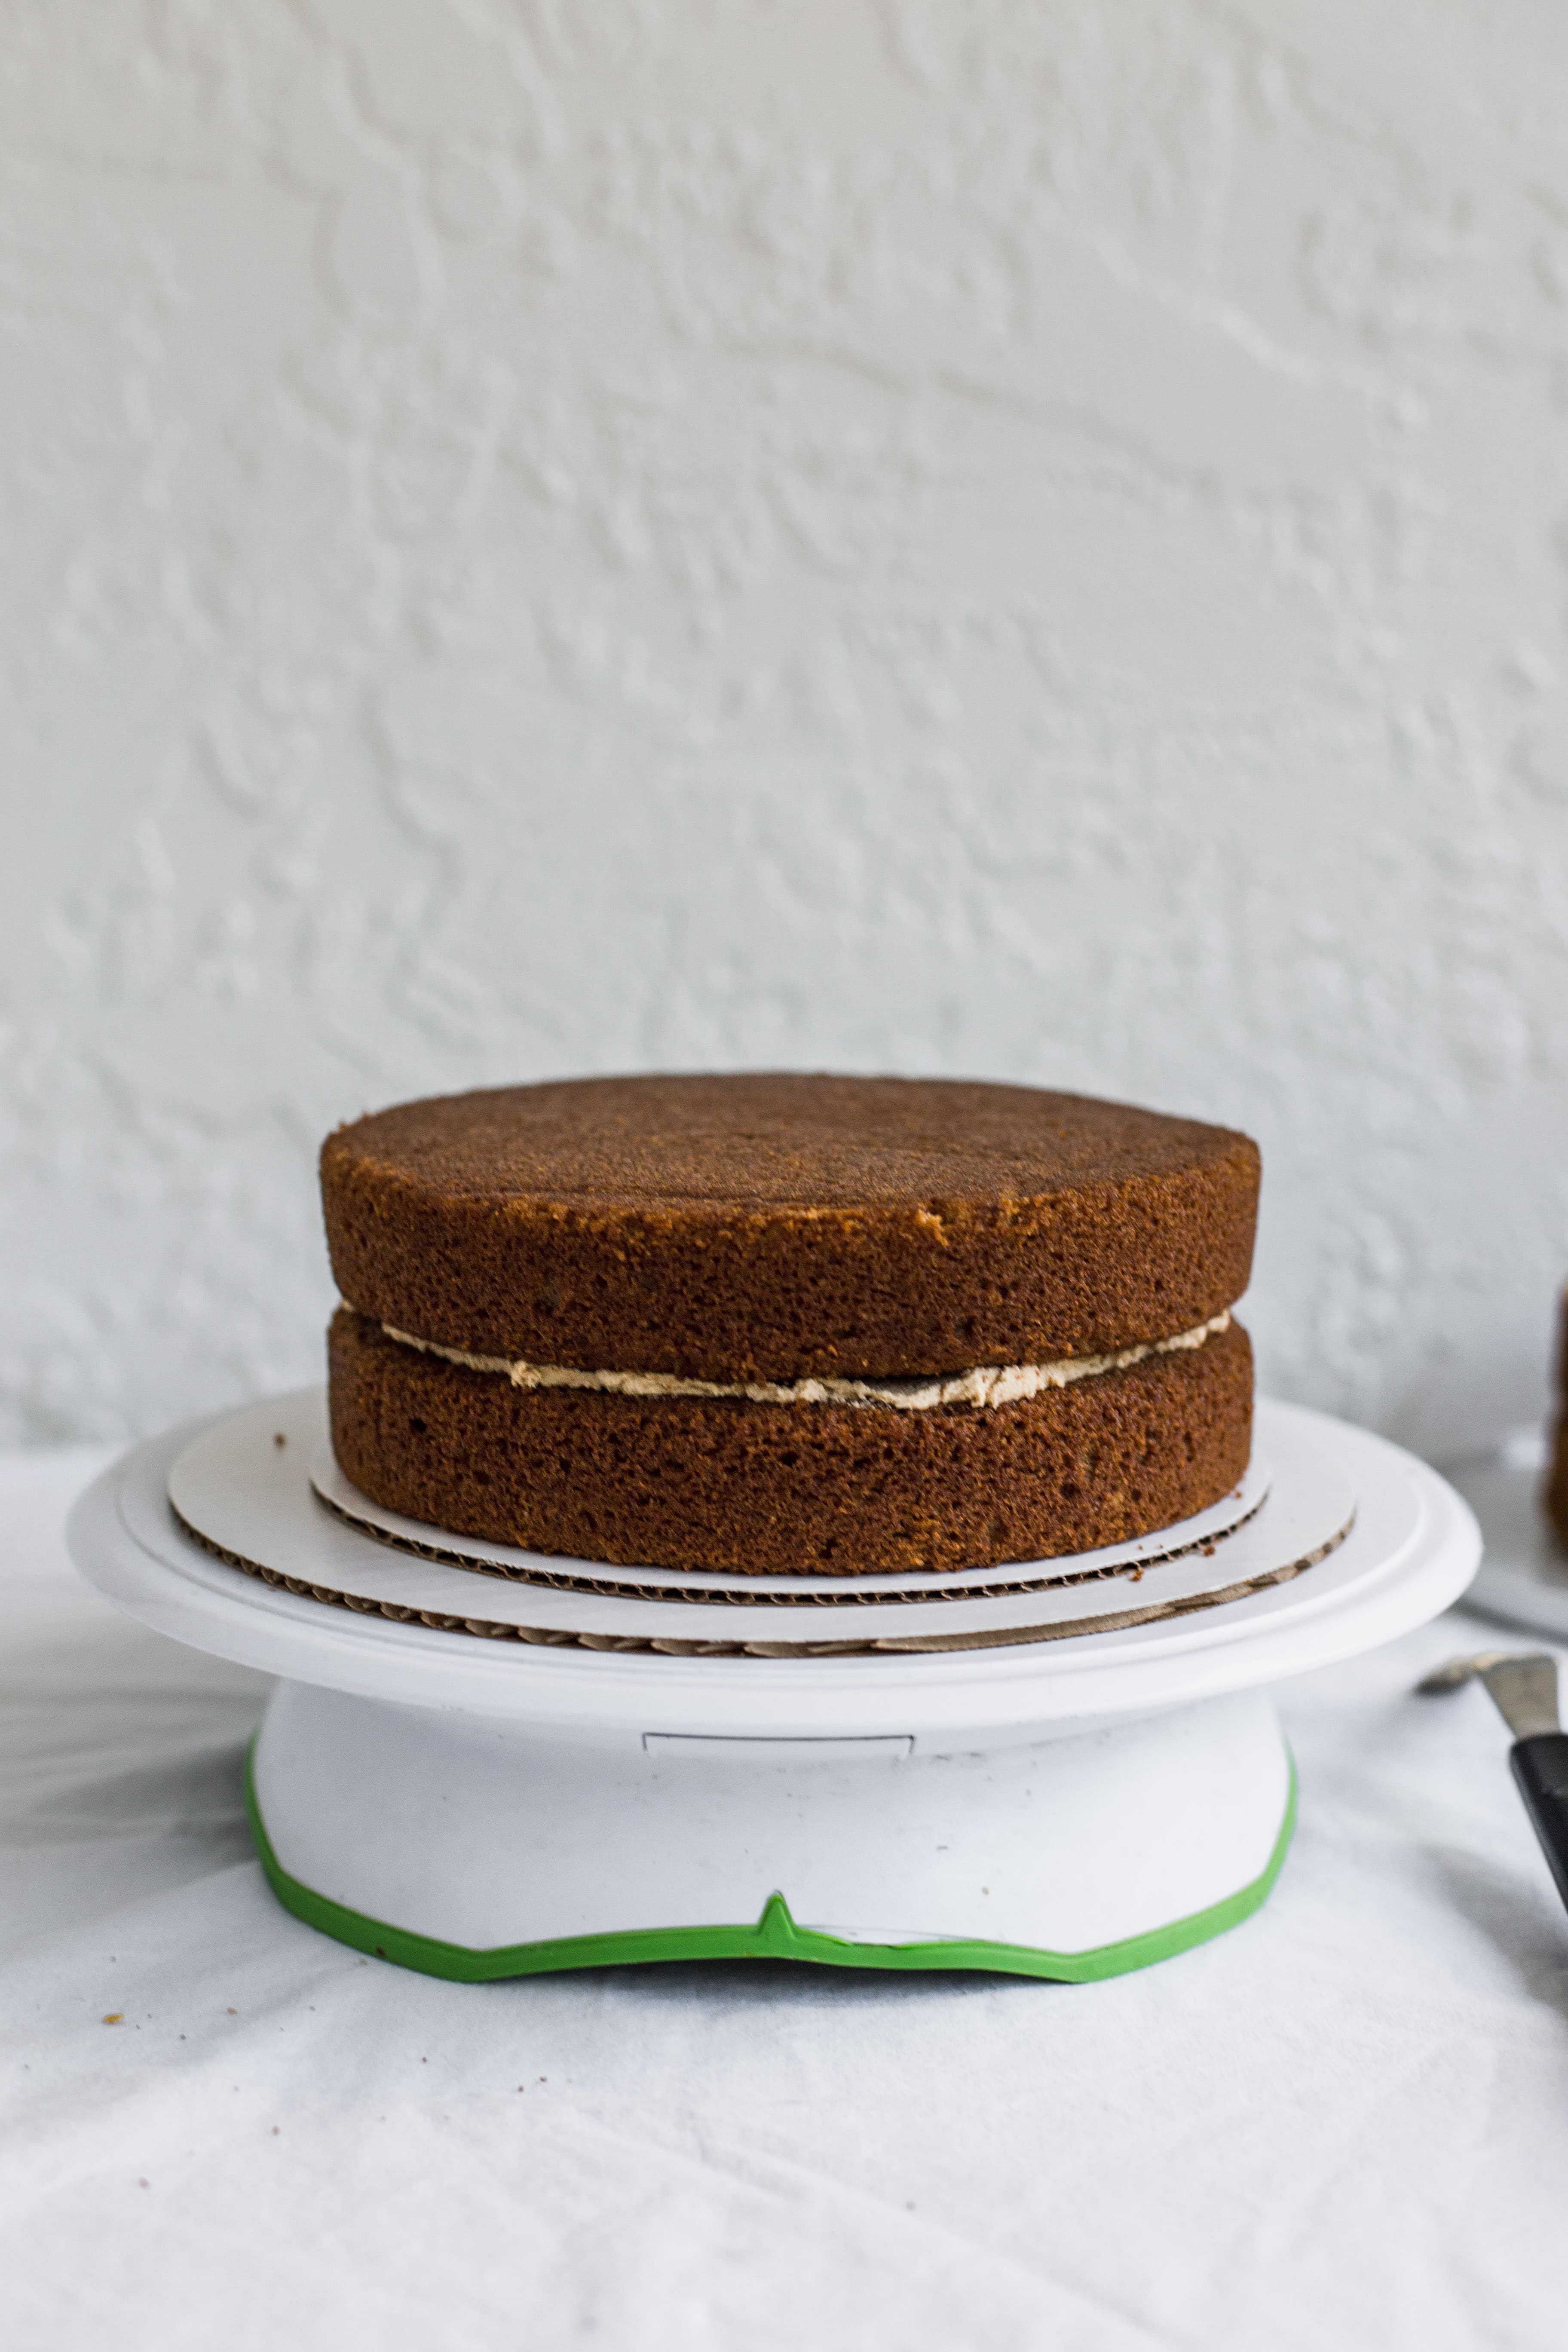
Doing that ensures you have more of a flat top!
Repeat the process of filling with buttercream and laying the last layer just like you did before with the bottom of the cake flipped over.
Frosting the cake
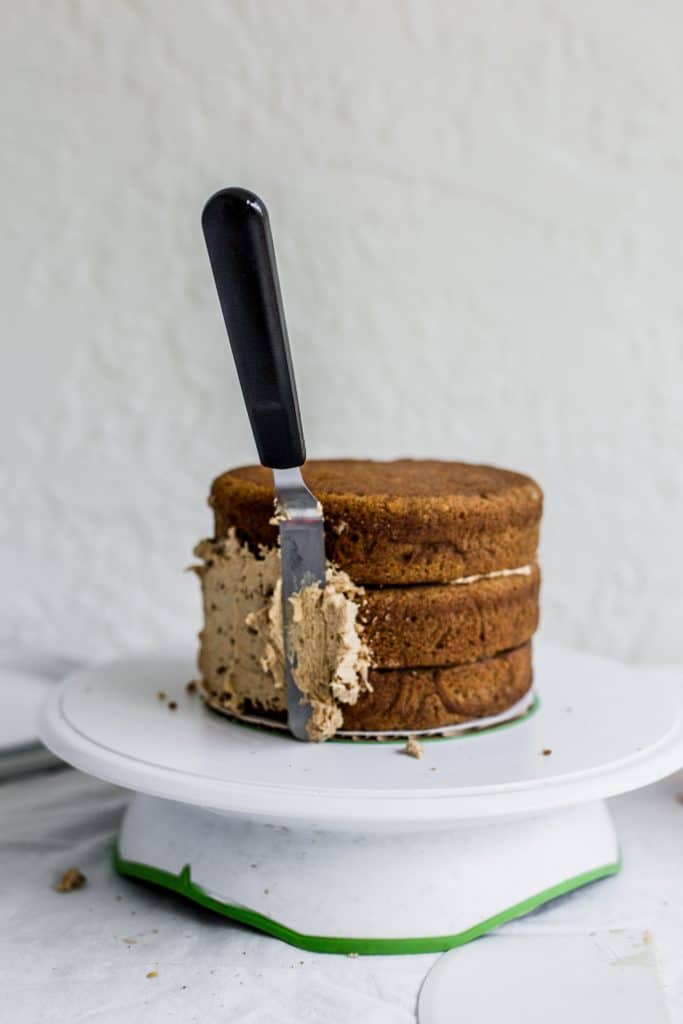
First we are going to start with a crumb coat.
A crumb coat is exactly what it sounds like- a coat for crumbs haha. No really, its just a light coating of frosting over your cake to seal in the crumbs so that when you add another layer of frosting, the crumbs won’t be seen or make your cake look messy.
Crumb coat your cake
Using an offset spatula, scoop up some frosting and smear it on the sides of your cake, turning your turntable as you go. Work your way from bottom to top, covering the cake with just a light coat of frosting.
Tip!
Make sure to scrape off the back of your spatula onto the sides of the bowl before going in for another scoop fresh buttercream- this will leave those pesky crumbs from getting into your buttercream!
Pick up the cake, and this is where the larger cake board comes in handy- and place it in the freezer for 15 minutes to seal the crumbs.
Repeat this process with an 8″ cake board, a 6″ cake board and your 6″ cake layers.
When your 6″ cake is ready to go into the freezer, take the 8″ one out. Now its time for the top coat of frosting.
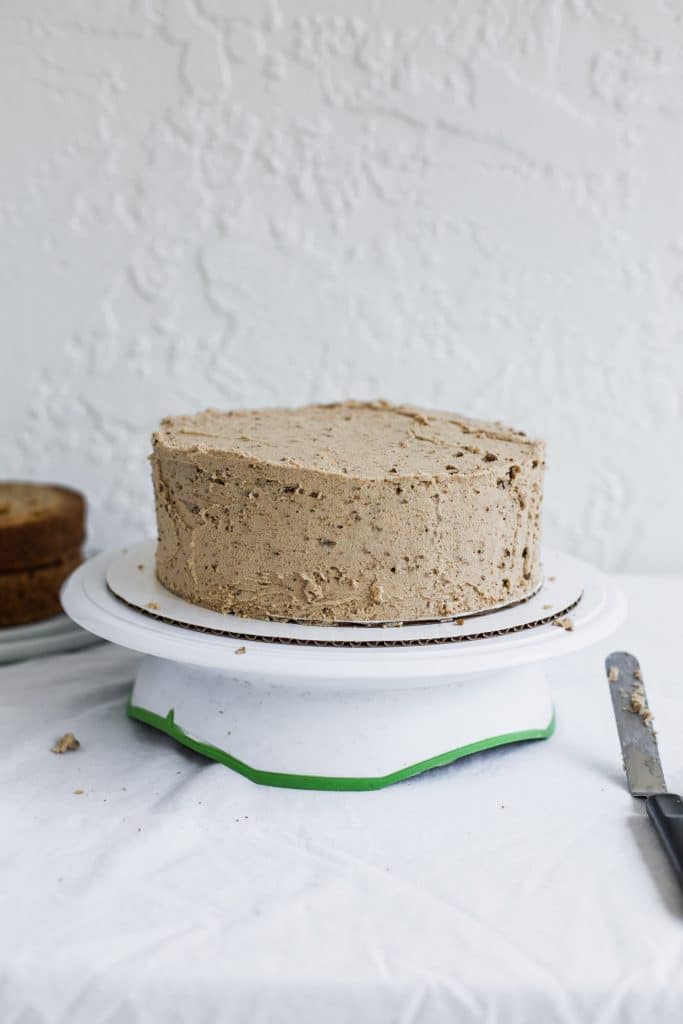
Frosting Top Coat
Essentially its the same thing you did before with the crumb coat, just with more frosting.
I like to start on the sides from the bottom and work my way up with my spatula, going around and around, spinning and spreading as I frost. Don’t worry if you’re making a mess or if it is not perfect- this takes a lot of practice!
When the cake is covered (you don’t want to see any spots of cake) and you get up to the top, stop and switch from the spatula to the bench scraper.
How to hold the bench scraper:
Making sure your wrist is straight and the bench scraper is straight against the cake- hold it in one place and spin your turn table.
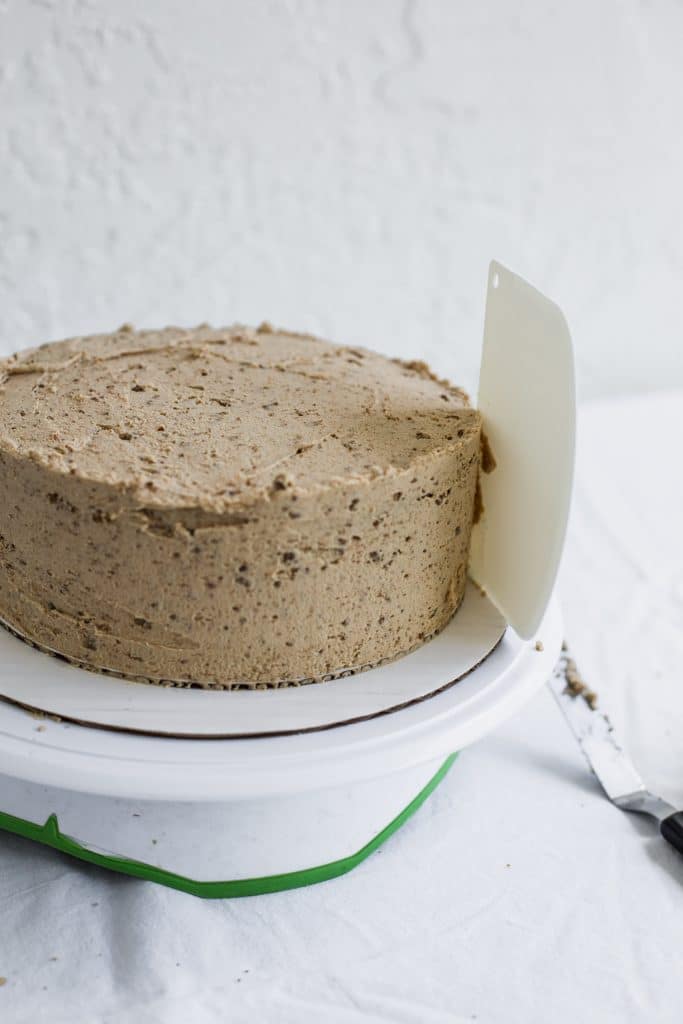

If you notice some places need more frosting, add in a little bit and continue spinning with the bench scraper up against the cake. It will even it out.
The cake sides should be more or less smooth now. Don’t worry if its not perfect or if it takes you a few tries. It really does take patience and practice.
Now though there should be a lip of frosting at the top of the cake that is taller than the cake. Leave that alone and fill in the top of your cake with more frosting.
Now using your bench scraper or spatula on an angle- smooth that lip from the outside of the cake to the inside.
How to have smooth cake edges
To create REALLY smooth edges, I am gonna tell you a trick I learned while working in a cake decorating shop.
Fill a food safe, clean water bottle with clean water and lightly spray your just frosted cakes. YES YOU HEARD ME RIGHT.
Spray your cake with water and then take the bench scraper and lightly go over all the bumps and edges. Then watch them disappear. Do this on the turntable one cake at a time, spinning as you go.

Go ahead I’ll wait.
Repeat with both cakes!
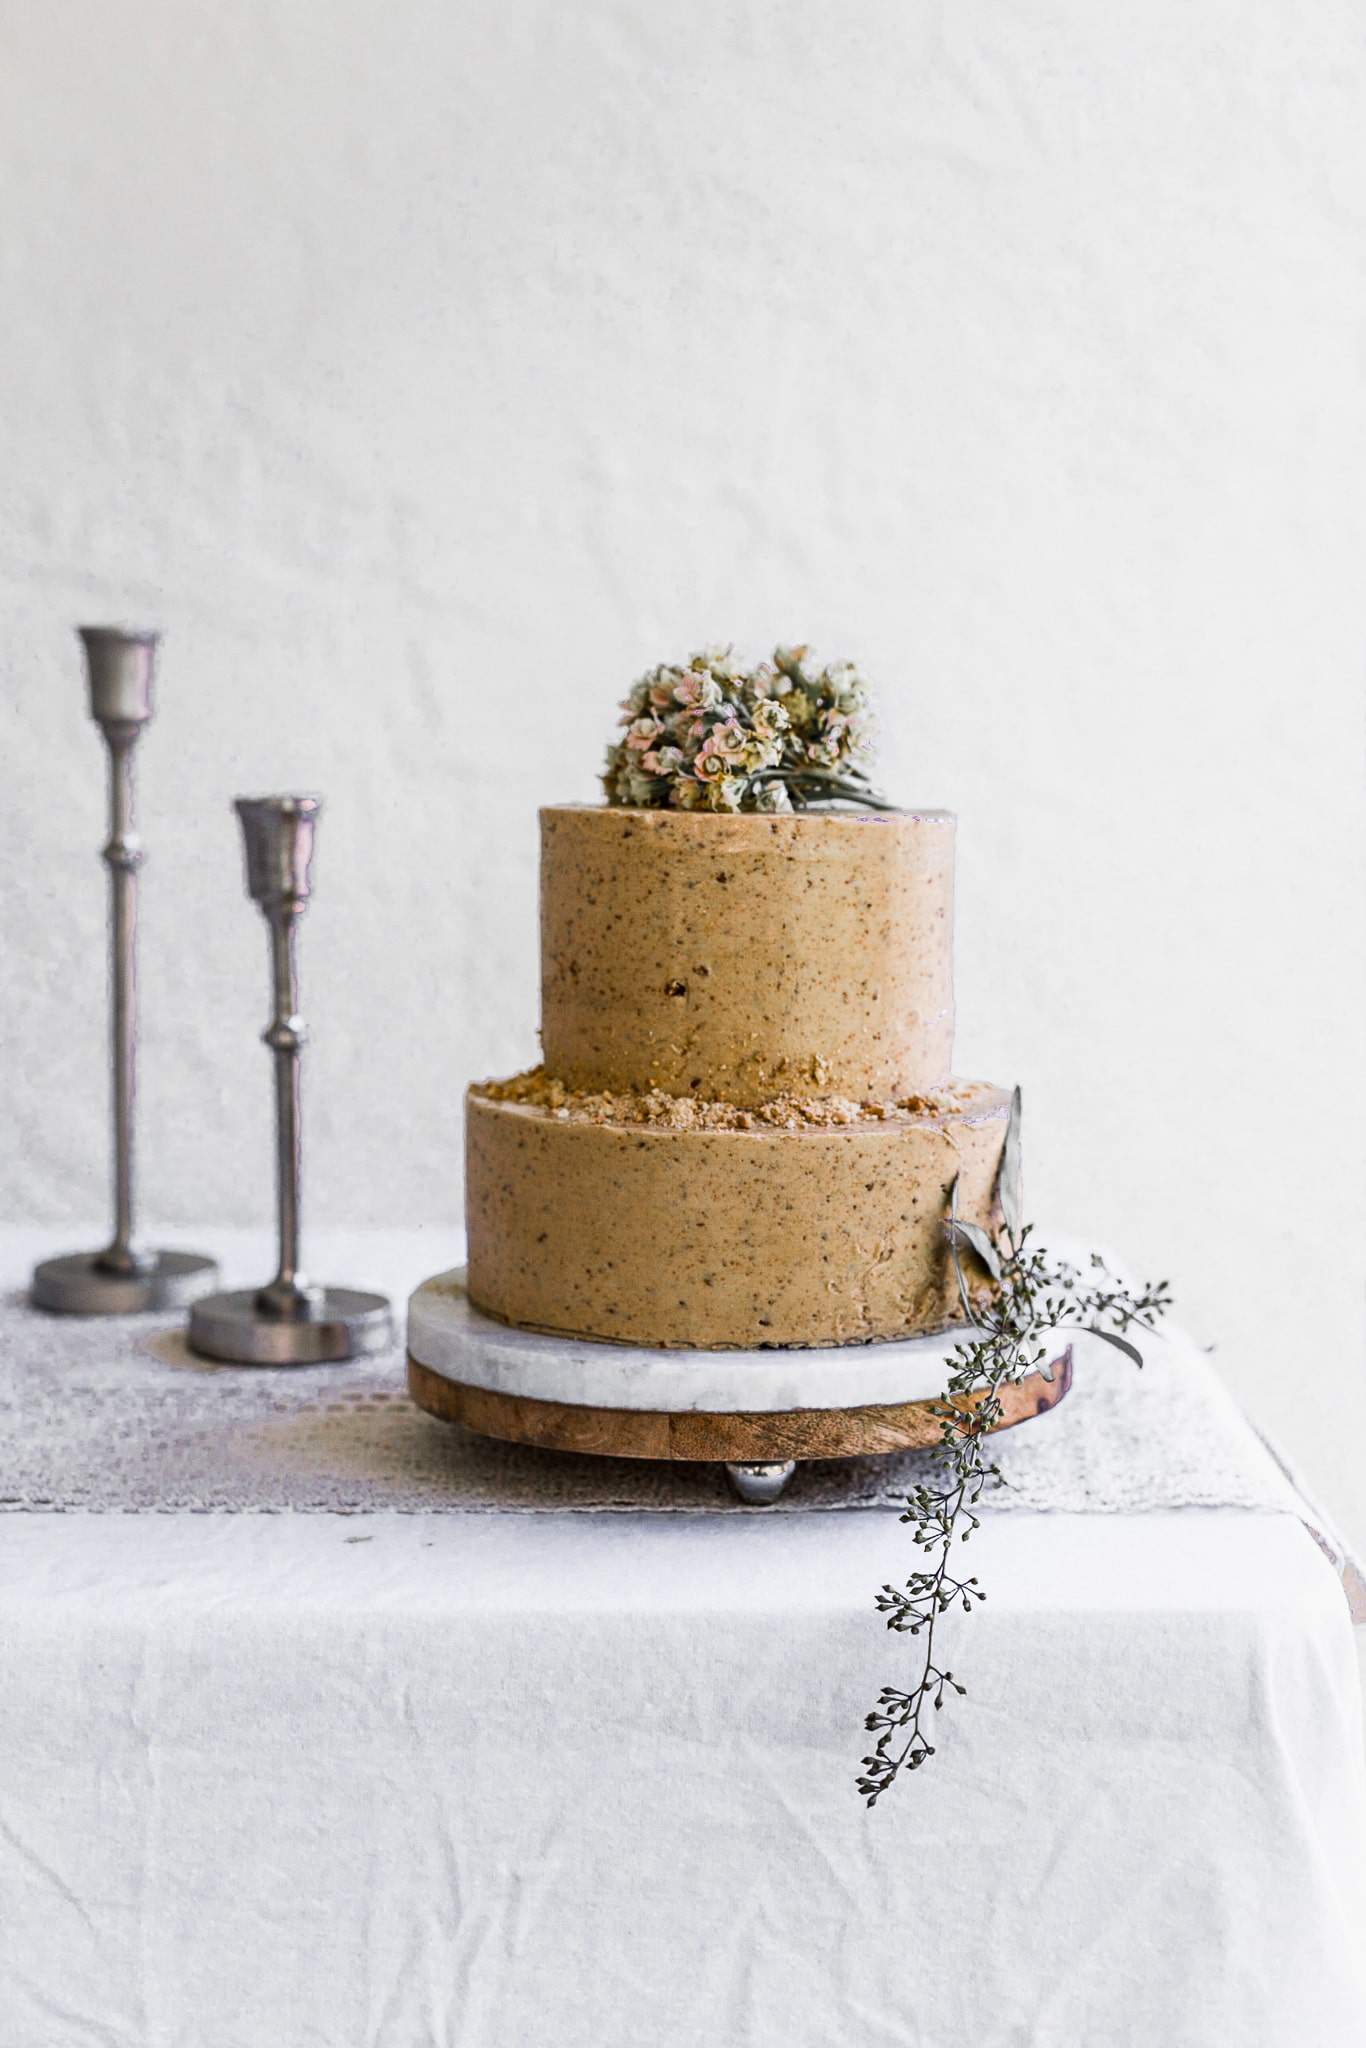
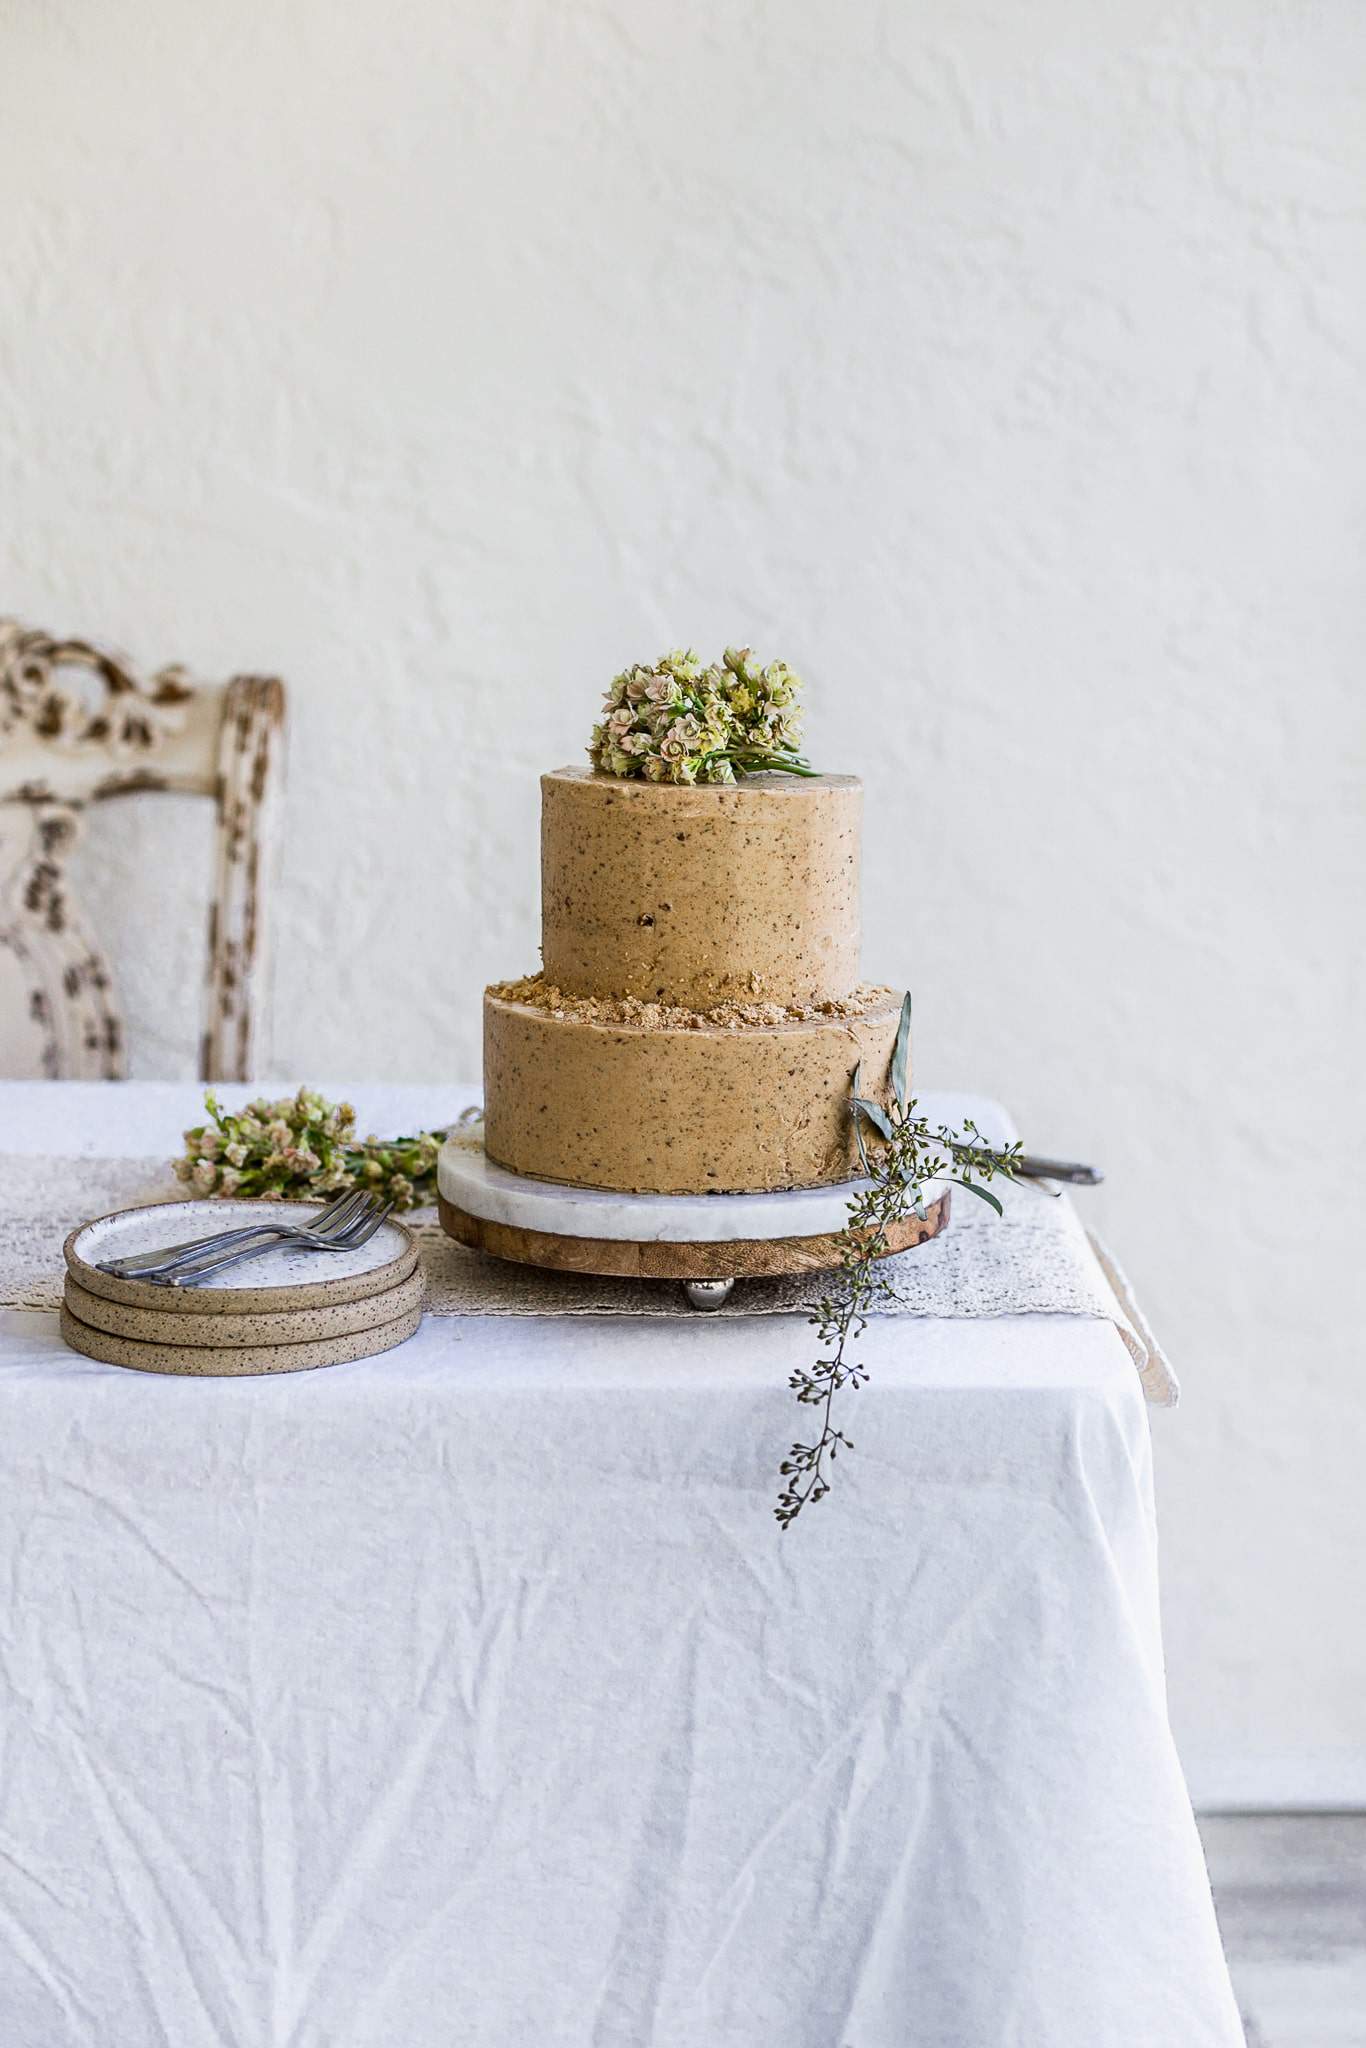
OK so now we have two beautiful cakes. 1 8 inch cake with 3 layers and 1 6 inch cake with either 2 or 3 layers.
LETS GET THIS STACKING STARTED!!
Stacking a two tier cake
You will need:
- Bubble tea straws or wooden dowels
- Scissors
- Belief in yourself that you can do this
Let me first start off by saying that regular straws will not work. You need the thick bubble tea ones like these. I prefer these over the wooden dowels. They are thicker, easier to cut, and don’t run the risk of getting wooden shards in your cake.
I also suggest that if you want to present this cake on a cake stand, you should move the 8″ cake to it now.
This is another reason why we use the 10″ cake board. Because now you have the 8″ one underneath, you can slip the cake off the 10″ board and onto a cake stand.
How to move a cake from cake board to cake stand
Using a large offset spatula (or the small one if that’s all you have) stick it between the 10″ and 8″ cake boards and carefully lift. Have your other hand at the ready to lift it up and shift the weight into your hand. Then place it on the cake stand.

This picture shows how to lift it using the spatula just with a smaller cake.
Now were ready to stack a two tier cake!
The bubble tea straws are going to be what is supporting the weight of the top tier on top of the bottom tier. Because of this, they need to be strategically placed.
You want to make sure that they are evenly placed under the weight of the top tier. Place the straws too close to each other and the weight won’t be evenly distributed. Too far, and you will see the straws coming out from the top of the bottom tier.
You have to make sure that the straws are placed under the top tier so that it can support the top tier and no-one knows it!
I like to place 4 evenly distributed straws in a square shape and then sometimes one in the middle of that if my cake is 10″ or larger. Since this is an 8″ cake we are going with 4 straws. This makes sure that the top tier’s weight is balanced.
How to place the straws on the bottom tier
Poke each straw into the cake until it hits the bottom, then mark where the top of the cake is either with frosting or eyeball it. Pull the straw back up and cut off the top with a scissor. Push the straw back in. Make sure that it is either level with the top of the cake or a little bit under.
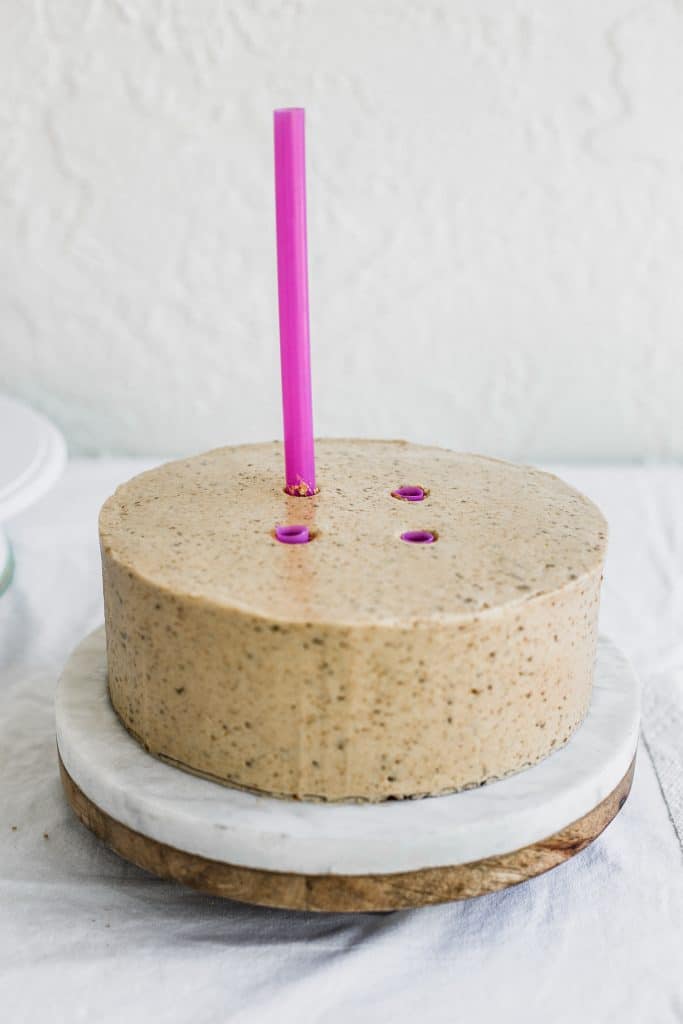
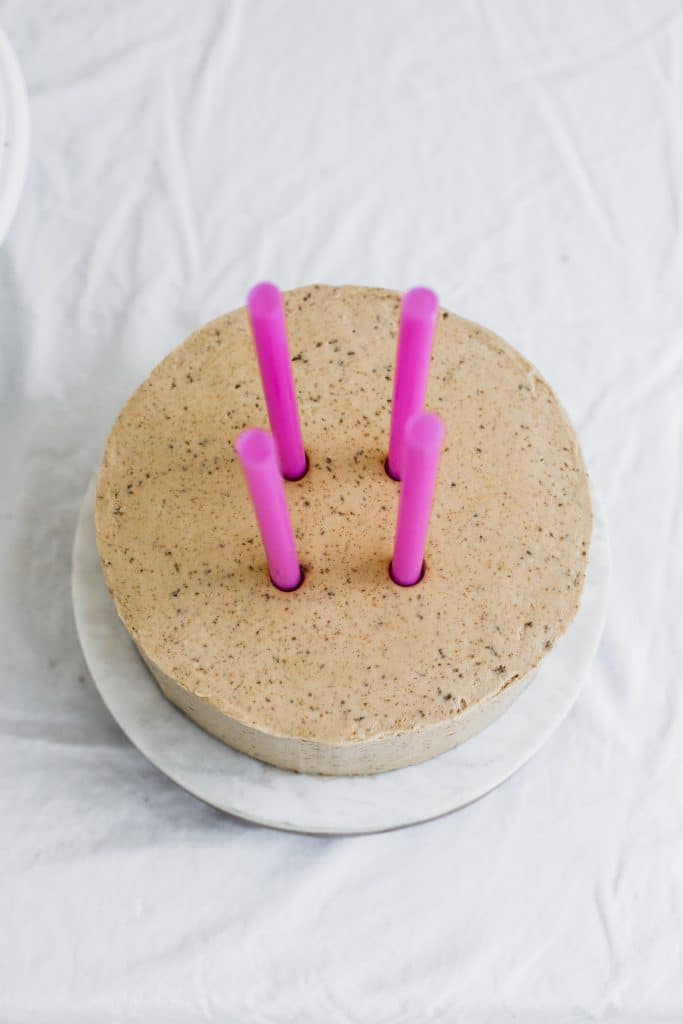
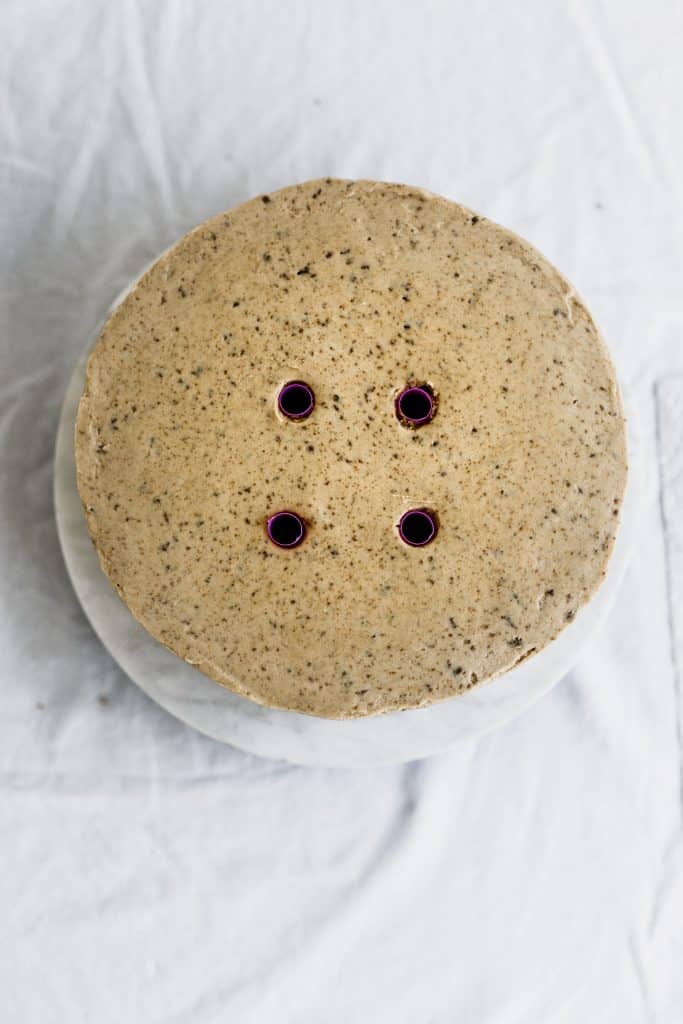
You do not want the straw to be taller than the cake otherwise your top tier will not be able to sit flush with the bottom tier.
Repeat for all 4 straws. Make sure they are all flush with the cake.
Now spread a layer of buttercream over the straws to hide them. This will also allow the top tier of the cake to stick to the bottom tier.

Stacking the top tier
Now for the fun part. Oh did I say fun? I meant terrifying haha. YES this part is scary but you can do it!
Time to get that top tier on top of the bottom tier. Here are some tips before you get started:
- If the buttercream is hardened, it will show less fingerprints if you mess up.
- If its fresh buttercream and hasn’t hardened yet, put it in the freezer for 10 minutes before you stack.
- Know that if you mess up there are always ways to fix something!
Ok lets do this!
Using your offset spatula, separate the 8″ cake board from the 6″ board that the cake is sitting on.
You are going to keep the 6″ cake board attached to the cake. With two hands, hold the cake underneath with just your finger tips. Bring it to the bottom tier and look overhead to where you want to place the cake.
Bring it as close as you can to the bottom tier without touching it and then drop it into place. If your straws are lined up correctly (which they should) then it will hold the weight of the cake!

Alternatively you can lean one side of the top tier on the bottom tier where the straws are, and then drop the other side on top, but I find that it can mess up the bottom tier of buttercream if it isn’t hardened that much.
If you choose to go the second route, then do it from the back so that if you mess up, it messes up the back of the cake.
THERE YOU GO YOU DID IT.
You stacked a two tier cake! Breathe a sigh of relief!!
What to do if you mess up
First of all it’s ok!! The most common place people mess up is the gap between the top and bottom tiers.
This is a super simple fix. You can pipe a border or design around the meeting point, or add another decoration like flowers, sprinkles, or cookie crumbs.
Also know that we are our worst critics, so something that may seem horrible to us (like a thumbprint) may not even register to someone who sees the cake for the first time.
Ways you can decorate a cake:
- Sprinkles
- cookies
- dessert sauces- drip them along the edges
- macarons- buy them in different sizes and place them on top.
- fresh fruit- make sure to keep it in the
Delivering a cake
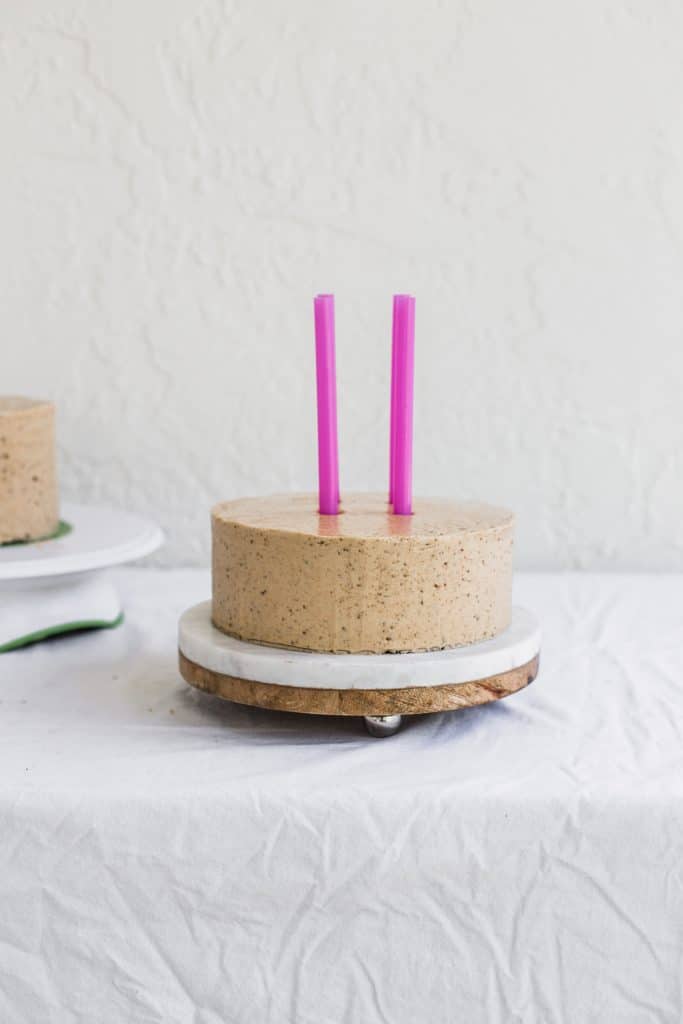
If you are delivering a cake, then you need to make sure this cake is extra sturdy. One way to do this is by inserting a large dowel from the top of the second tier AFTER it is stacked.
This dowel should go through the top of the top tier, cut through the 6″ cake board and into the 8″ cake.
This will give the cake extra stability and make sure it wont topple over. Make sure you do this first before adding any decorations because you will have to hide the hole in the top tier.
I recommend using a wooden dowel for this this time and not a straw because the straws are not long enough. You can sharpen the dowel on the bottom to make sure it cuts through the cake board. Or you can buy cake boards that have a center hole for this very purpose.
WHEW this post was long!
Even though I don’t sell cakes for a living anymore, it’s nice to share my experience and info I learned along the way.
I hope it can help explain the things you need, and need to do, to stack a two tier cake!
If you liked this post or ever try to stack your own cake, I would live to hear about it in the comments below!
Thank you for following along and if you have any questions, ask away!
If you liked this post, you might like these:
- How to decorate a cake with flowers
- 10 ways to make your cakes looks more professional
- One bowl Vanilla Cake
- Classic American Buttercream
Heads up! This post contains affiliate links which means if you purchase something off of these links, I make a commission at no extra cost to you. I love all these products and wouldn’t recommend them if I didn’t! Thanks for supporting my blog!
How to Bake and Stack a Two Tier Cake
Ingredients
For Vanilla Cake
- 8 eggs , large
- 2 egg yolks
- 2 cups vegetable oil
- 3 cups granulated sugar
- 1 cup brown sugar
- 5 cups all purpose flour
- 4 tsp baking powder
- 2 tsp kosher salt
- 1 1/2 cups milk
- 4 tsp vanilla extract
Equipment
- 3 6" cake layers
- 3 8" cake layers
- 1 turn table
- 1 Offset spatula
- 1 6" cake board
- 2 8" cake board
- 1 10" cake board
- 5 bubble tea straws
- 1 bench scraper
- 1 food safe spray bottle
- 1 round tip
Instructions
Bake the cake
- Preheat your oven to 350° F and spray 3 8 inch round cake pans and 3 6" round cake pans with baking spray or line with parchment paper.
- In the bowl of a stand mixer fitted with the paddle attachment or in a large bowl- combine eggs, yolk, oil, and sugars and mix well until combined.
- Combine the flour, baking powder and salt in a bowl and slowly add to the mixture on low speed.
- Slowly add in milk, and vanilla and continue mixing until a smooth batter forms, about 1-2 minutes.
- Evenly pour the batter into the pans and bake for 28-30 mins for the 6" and 35- 40 mins for the 8" The cake is done when a toothpick is inserted and comes out clean and when the edges are pulling away from the sides and are golden brown.
Fill and frost the 8" layer
- Using the cake leveler or a long serrated knife, level off the cakes so they have a flat top.
- Place a 10" cake board on the turntable, and a dab 1 tsp of buttercream in the middle and smooth it out. Place the 8" cake board on top and press it to stick to the 10" board. Smooth 1 tbsp buttercream on top of the 8" cake board, then place your first 8" cake layer on top.
- Using either a piping bag with a round tip or an offset spatula, place down 1/4 cup of buttercream on top of the cake, starting in the middle and smoothing to the outside. Leave 1/2" from the sides so it doesn't overflow over the cake. If using a piping bag, pipe a border around the cake and then fill the middle.
- Take the next 8" cake layer and turn it upside down so that the bottom is now the top. Place it on top of the filling. The cut side down should be on top of the buttercream. Repeat the process of filling the cake layer with buttercream and topping it with the last 8" cake layer.
- Using the offset spatula, and the turntable frost the entire cake (spinning as you go) from bottom to top for a light crumb coat. Place in the freezer for 15 minutes to seal in the crumbs.
Fill and frost the 6" layer
- Repeat the same steps as above for filling and frosting the 6" layer. Start by spreading 1/2 tbsp frosting over the 6" cake board and end by putting the cake in the freezer for 15 minutes. You should now have 1, 8" cake layer, and 1, 6" cake layer
Top coat frosting
- Using the offset spatula again, frost both of the entire cakes using more buttercream this time. When the cake is mostly covered with buttercream, switch to the bench scraper and smooth out the sides and tops of the cakes. Don't worry if it isn't perfect.
- Fill your water bottle with clean water and lightly spray one cake at a time on the turn table. Using the bench scraper again, smooth out any cracks. Repeat for the second cake.
Stacking
- Using bubble tea straws or wooden dowels place 4 straws in a square shape in the center of the 8" cake making sure that they are being placed under where the 6" cake will be. Push each straw into the cake, then mark the straw where it hits flush with the cake and cut off the rest of the straw. The straws should be the same height as the 8" cake or a little under, just not higher.
- Spread a thin layer of buttercream over the straws.
- Using the offset spatula, lift the bottom of the 6" cake and hold it with 2 hands from the bottom. Center it above the 8"cake, get as close as you can and drop it into place on top of the 8" cake and straws.
- Continue decorating as you please! YOU DID IT!

Thank you for sharing this, but I’m a little confused about which pans to buy. You said that you don’t like using aluminum pans because they aren’t sturdy and won’t yield the best results, but the Wilton pans you linked are aluminum pans. Did you link the wrong items?
Hi Shannon, thanks so much for your comment, I meant I don’t like disposable aluminum pans! I will edit that, thanks!
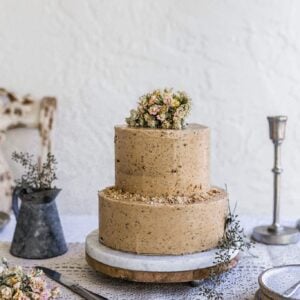
Hello. Can you please tell me the pan sizes in the mocha colored cake above. And both tiers are 3 layers? As the top, smaller tier looks taller.
Thank you.
Hi they are 8″ cake pans for the bottom and 6″ for the top!
Hi Sam. This article is beautifully explained. Thank you so much. I am a new baker and have an order of the same cake sizes (2 tiers) but it’s a fondant cake. Should I still follow the same rules for a fondant cake?
I’d also like to know how many cake layers the bottom and top tier of your cakes has? The top cake looks taller.
Thank you.
Love from South Africa 🇿🇦
Hi Vanessa! Yes follow the same instructions for fondant! There are 3 layers in each cake but the top tier are just a bit thicker!! Happy Caking!
I tried to make the cookie butter cake. TWICE! It was really oily and took forever to cook. Both times I followed directions exactly. It sank in the middle as soon as I removed it from the oven. I tried it again and the same thing happened. Why? Has anyone else experienced this? I made the chocolate cake recipe and it turned out great.
Hey DeAnn! Thats super frustrating, I’m not sure why that happened- haven’t ever had that problem, wish I could be there in the kitchen to help. What size did you bake the cake in?
Hello Sam!
This article is so detailed and straightforward…thank you so much!
I studied basic baking a year ago and now I have an order for a two tier wedding cake and this exactly tailored as to how i am going to do it.
Again, Big thanks!
Mr. Dennis M.
from Saudi Arabia
You are so welcome Dennis!! Good luck!! Thank you for your kind comment!
Hello Sam
Is it just me? I am seeing only 2 8″ layers not 3 in the pics of assembling the cakes. Your description says to use 3 8″ and 3 6″. What am I missing?
Hi Teresa! Yes you are correct- the picture only shows 2 8″ layer cakes because the particular recipe I used for this cake made high cakes so I didnt feel there was a need for the third layer. If I used my vanilla or chocolate cake recipes I always bake them into 3 layers. Hope that helps!
Yes it helps thank you! I always have an issue with how many layers then I got all confused!! Haha my cake turned out great. Thank you for your reply 😊
YAY GREAT!!!!!
Hi,
Would it be possible to provide the ingredient quantities and cook instruction for this recipe for one 8 inch cake the ingredients quantities and cook instructions for one 6 inch cake? Many thanks Helen
Hi Helen, unfortunately I dont have the measurements for those but you can split the recipe in half 🙂
Thanks Sam. I will try that. If I split the recipe in half roughly how deep would I need to fill the cake tins. Many thanks. Helen
Hi Helen! I would fill between 1/2-3/4 of the way full and check after 30 mins. Let me know how they come out!
Hi, does it matter whether or not to use a 2 inch or 3 inch depth cake pan? Thank you so much!
Hi Amanda! The pans that I use are 2″, if you use 3″ the cakes will just be a bit taller, the same techniques apply though!
Sam,
Thank you so much for all the detail! I am doing a 12″ cake with a 9″ on top, do you have a suggestions on how full to fill the pans (i.e. 1/2, 2/3, 3/4 full)? And does this recipe make 3- 8in layers and 3- 6in layers?
Hey Macey! So glad this post was helpful! To fill the pans, I would fill 2/3 of the way. Yes this recipe should make 3 8 “layers and 3- 6” layers!
Hi Sam! My plan is to use the above recipe but only bake two 8″ cakes and 2 6″ cakes, and then I’ll cut them each in half to make layers.
Unfortunately I only have one of each kind of cake pan (and they are springform and probably taller than 3″). I will need to bake them in batches, but do you see any problem with using all of the batter in this recipe and hoping for taller but fewer cakes?
HI again Vivian! I don’t see a problem with that but you will have to bake the cakes longer than what is stated in the recipe. They will probably take closer t0 40-45, maybe even 50 minutes of bake time. Please let me know how it turns out!
Hi Sam, the ingredient list says baking powder but the instructions say baking soda. Which should I be using?
Hi Vivian! Thanks os much for catching that, you should be using baking powder! I updated the recipe 🙂
How full do I fill the cake pans with batter?
Hi! Fill them about 2/3 of the way 🙂
Hello! Thanks so much for this post! I’ll be making a 3 tier cake, with an 8 inch, 6 inch, and 4 inch cake tiers. Should I dowel through the 6 and 8 inch tiers after I stack them to support the 4 inch top tier? Or do you think since the 4 inch is so small it wouldn’t really need the support? Thanks so much!
Hey Emilie! So glad you found this post helpful! You should definitely stabilize the 4″ if you are transporting the cake, but you dont have to go all the way through to the bottom 8″ tier. Going through to the 6 would be fine. Alternatively if you are transporting the cake it might be easier to stack the 8 and 6 inch ones, drive to the location, then put the 4″ one on while you’re at the location. That way you wont have to stabilize it! Hope this was helpful! Please let me know if you have any other questions!!
Hello, thank you for all the details. My question is, how do you bake layers of various sizes? So, only 3 x 6″ cakes, then when they are done do 3 x 8″ cakes? Or can you mix them in the oven together? I always have always avoided opening the oven toward the end of baking, so am worried about the bigger layers if I take the smaller one(s) out earlier.
Great question! Yes I usually bake the same size cake at the same time in the oven and then will bake the others. So all 3 6 inch at a time and then the 8 inch-because you are right, otherwise it could mess up the cakes if you open the door when baking in different sizes. Please let me know how it works out!!
When stacking the cakes, do we leave the cake board under them or do we stack the cake without the cake boards? Also are the straws necessary to hold the cake up or would it be ok without them?
Hi Brittany! Yes you leave the cake boards in, it helps with stability and yes the straws are absolutely necessary as it will hold the cake level and keep it from toppling over. Hope that helps!
So thorough! You answered all the questions a novice would have. Thank you for the clear instructions with a sprinkling of humour. I feel ready to do my first two-tier cake.
YAY Laleh! Cant wait to hear how it turns out!!
Hello,
This recipe is great. Sadly, I burned one of my layers. Do you know the measurements to mix another cake batter for just one or two layers? Thank you.
Hi Savanna, ahh burned cake is no fun! I dont have the measurements for that but I would just halve the recipe and freeze the extra.
Hello,
Visually, do you think a 10 inch bottom tier and a 6 inch top tier would look weird? I’m decorating with fresh flowers but I wasn’t the bottom tier to look wide enough to make the cake ‘pop’ at the wedding but would like the top 6 inch tier to give that now elongated look. Never actually used these sizes together before and worried it might look weird.
Hey Chantel! yes it would look a bit off. If you want the 6″ cake to be elongated then I would just stack another layer on top of the 6″ cake to make it taller and use an 8″ bottom.
Hi Sam, I was wondering if I can make a marble cake with this recipe. Could I add cocoa to a portion of the batter? If so, how much cocoa would I need and would I need to add a sweetener to it? I can’t wait to try making this cake. Thanks:)
Hi Eileen, I dont have the option to do that with this specific recipe but you can make my marble cake instead! It has a 5 star rating 🙂
Hello there I love this reciepe I’m just wondering does it matter how deep the cake tins are? I have a 6inch, 3 inch deep cake tin and my 8 inch one is 2 inch’s. I’m just worried about height of the cake could you advise me please
Hi! I would bake them in the deeper one just to make sure.
Thank you so much for such a detailed post! It’s exactly everything I needed to know! I’m about to make a cake for my brother’s wedding and was trying to figure out how to transfer from the turntable and what to put it on!
YAY Francesca, thank you so much for this comment, I hope you had a wonderful time at your brothers wedding. Congrats!
Aaaargh
I am having a dummy run making a tiered cake.
Followed the recipe ingredients using baking powder then the method uses baking soda!!!
Binned the flour and baking powder etc to use soda now I don’t know which is correct.: powder it soda.
Please advise
Jennifer
Hey Jennifer- AH! so sorry about this, thank you for catching it- the correct ingredient is baking POWDER. Changing it now, so sorry about that!
This cake sounds great i just wondered if this would be enough batter to make 3 ten inch layers. And half it for 3 eight inch layers thanks
I would probably double this recipe to make the 3 ten inch layers.
Thank you will give it a try
I cannot express my gratitude for this post and the recommended vanilla cake/frosting recipe attached. I’m considered the “designated baker” but my “specialty” is cookies. I’m terrified of cake baking, cake decorating, all of it. But that didn’t stop my friend from requesting that I make her son’s birthday cake! Two tiers, five layers total, I didn’t know how I was going to do it!(Instert stressed tears here) I am a difficult student and I struggle to process new information, but let me tell you, THIS is FOOL PROOF! If I can make a beautiful cake from following these steps, I promise, anyone can! I wouldn’t have been able to get through it without you. Thank you, thank you, thank you!
And that vanilla cake recipe?! People who don’t even care for sweets couldn’t get enough of it! There’s no compliment better than, “Wait…you MADE this?!” You’re a hero, Sam!
AH Rachel! Thank you SO much for letting me know this post was so helpful!!! You are brave for doing something scary, you are such a great friend! Honestly comments like this is what keeps me going and why I love sharing my recipes. I never know if things are helpful or not so this just made my day! Thank you so so much, I am so glad we did this together 🫶🏻
Hi Sam your directions are very helpful. I just need to know what happens to the icing on the first (bottom layer) when you stack it with cardboard attached to the smaller top tier? I will be making 2 12” and 2 9” with buttercream roses on the bottom layer. Thank you for your advise.
Hi Cathy, happy the post is helpful- as for the bottom layer of frosting do you mean under the cake board or the sides? Im not sure I understand the question can you help me?
Hi Sam, Thanks for responding, sorry for the confusion, under the cake board. I’m afraid the icing will stick to the cake board. One other question since the bottom is 12” and the top is 9”, should I use 6 cake rods for supporting the top tier.
Hi Cathy, its ok if the frosting sticks to the cake board, youll still be able to get slices off of it. You want it to stick a little bit so it doesnt slide all over the place. And yes, I would use 6 too. Cant wait to here how it goes!