20 Minute Fudgy Chocolate Brownie Cookies
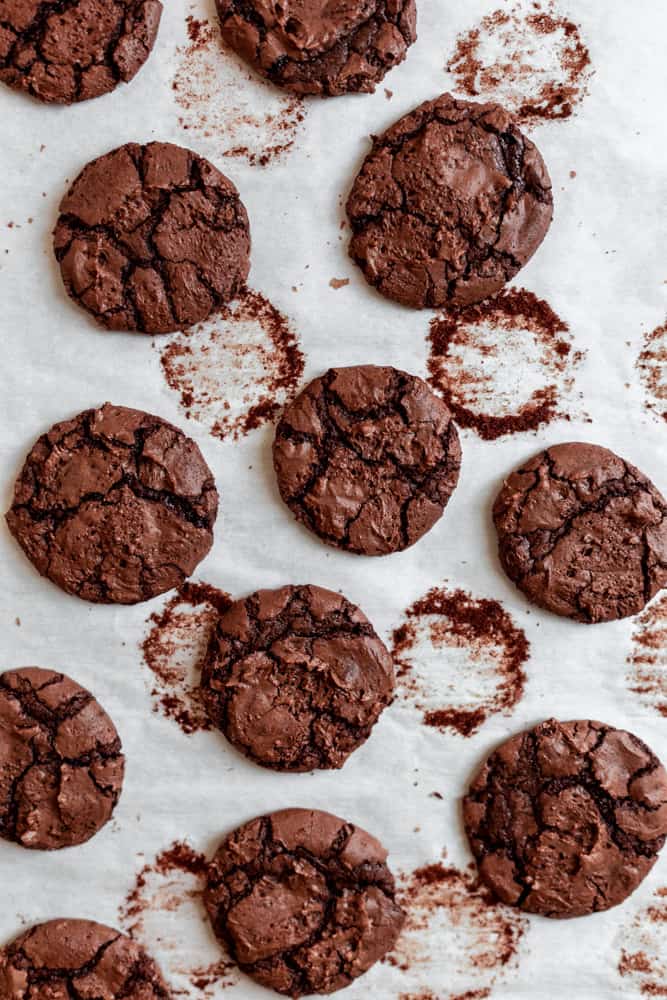
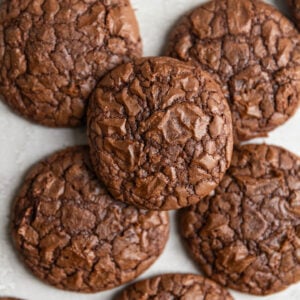
These Chocolate Brownie Cookies are SO super fudgy! With almost two hundred 5 star reviews, I know you will absolutely love this cross between a cookie and a brownie! These cookies are chocolatey, chewy, require no chill time, and only take 20 minutes to make from start to finish! Plus they have that beautiful shiny top you will love too!

What’s my favorite thing about these cookies? It’s not just that they are super fudgy, chewy, and chocolatey or that they have a crackly top. It’s that they have absolutely no chill time!!
Did you hear me? NO CHILL COOKIES! That means you can prepare and bake these cookies in less than 25 minutes! I tested this recipe only a couple times before getting it right. As a trained pastry chef I have tested some recipe 6 or 7 times but this one only took two!
My second favorite thing about these is that they are just like homemade brownies but in cookie form- just like these cosmic brownie cookies!
Speaking of brownies- if you havent tried my one bowl brownie recipe you are missing out! They are the best brownies for chocolate lovers because they have fudge centers but crisp edges. Dont forget to top your brownies with this brownie frosting if you like extra chocolate.
Another thing I love about these (I know so many reasons) is because they only have a few ingredients but create SUCH a delicious cookie. You might want to double the recipe- you have officially been warned!
Let’s get to baking!
Best chocolate to use
The best chocolate to use here is Semi Sweet Dark Chocolate- I like getting a bar of baking chocolate but you can use chocolate chips too. Semi sweet here is the because its not too sweet like milk and not too bitter. Def the way to go!
Whipping the eggs
There a few non negotiables here that you need to pay attention to- to make sure these come out perfect. First you have to use a stand or hand mixer, whipping by hand won’t get the results you want.
The most important part of making these cookies is the way you blend together the sugar and eggs because they need to be whipped together really well to incorporate a lot of air. Doing so will create the crinkle tops and make this brownie cookie recipe taste like a chocolate chewy brownie.
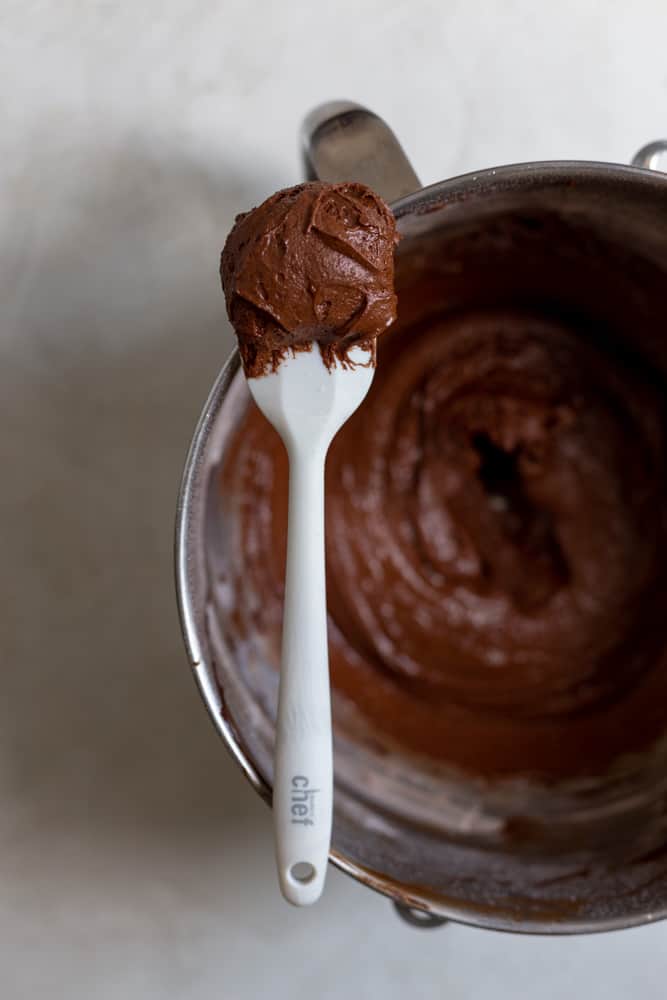
The batter for these cookies is super loose so don’t get scared and feel like you did something wrong. It won’t ball up like a chocolate chip cookie dough recipe. It will look more like brownie batter.
Recipe Tips
- Make sure the eggs are at room temperature. If the eggs are too cold the cookie batter will be too cold and will not bake correctly.
- Make sure you correctly measure your ingredients. Measure the dry ingredients with a kitchen scale or spoon flour directly into your measuring cup and then level it off.
- For a deeper chocolate flavor you can add 1/2 tsp espresso powder to the flour mixture.
Troubleshooting
If your cookies don’t have shiny crinkle tops It’s probably because the eggs were not whipped well enough to incorporate the air that creates this kind of crinkled top. Another reason could be because the eggs were too cold.
These cookies are thin flat cookie so they shouldn’t rise much. If they didnt rise at all, check your baking soda to make sure it’s still good.
Cooling and Storing Cookies
Cooling– Let the cookies cool for 10 minutes on the rack. Then transfer them to a wire rack to cool completely.
Storing– Store these cookies in an airtight container or air tight plastic bag for up to 3 days at room temperature.
Freezing
You can freeze these cookies in an airtight container, or in an aluminum tin double wrapped in plastic or tin foil for up to 2 months.
20 Minute Fudgy Chocolate Brownie Cookies
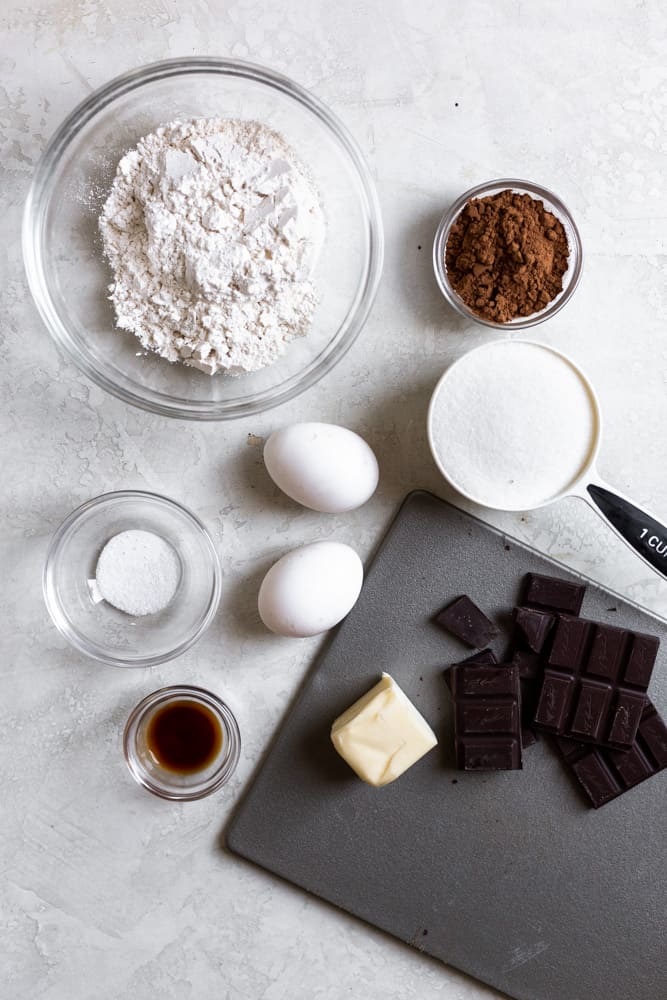
Ingredients
- 1/4 cup (56.75 g) unsalted butter
- 4 ounces (113.4 g) semi sweet chocolate, about 1/2 cup
- 2 (2) eggs, large
- 1 cup (200 g) granulated sugar
- 1 teaspoon (1 teaspoon) vanilla extract
- 1 cup (125 g) all purpose flour
- 1/4 teaspoon (0.25 teaspoon) kosher salt
- 3 tablespoons (3 tablespoons) cocoa powder
- 1/8 teaspoon (0.13 teaspoon) baking soda
Instructions
- Preheat your oven to 350°F and line 2 cookie sheets with parchment paper. In a microwave safe bowl, melt the 1/4 cup butter and 1/2 cup chocolate together 30 seconds at a time until melted. Set aside to cool.
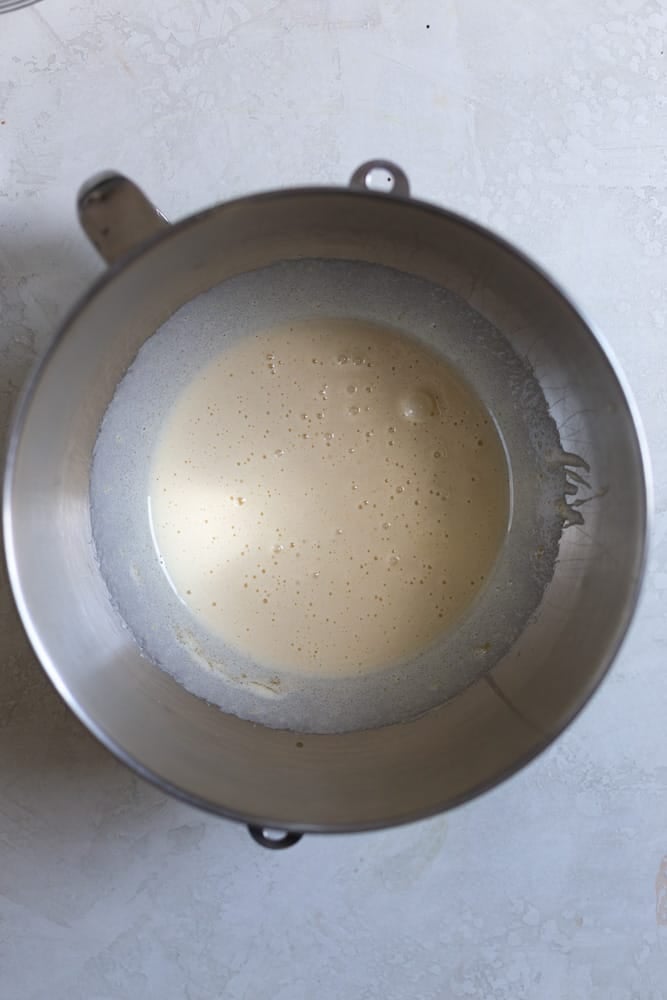
- In another bowl, beat the 2 eggs, 1 cup of sugar, and teaspoon vanilla with a hand or stand mixer fitted with the whip attachment. Mix on high for at least 3-5 minutes. The mixture should look light and airy. I do not recommend mixing this by hand. The air incorporated by the mixer is what you need to create the crinkle brownie like tops.
- Add in the chocolate and butter mixture and mix until combined. You can use a spatula at this point or mix on low- medium speed with your mixer.
- Add in the 1 cup flour, 1/4 teaspoon kosher salt, 3 tablespoons of cocoa, and 1/8 tsp baking soda. Mix until combined on low, or by hand. The dough will be loose and look more like brownie batter than cookie dough.
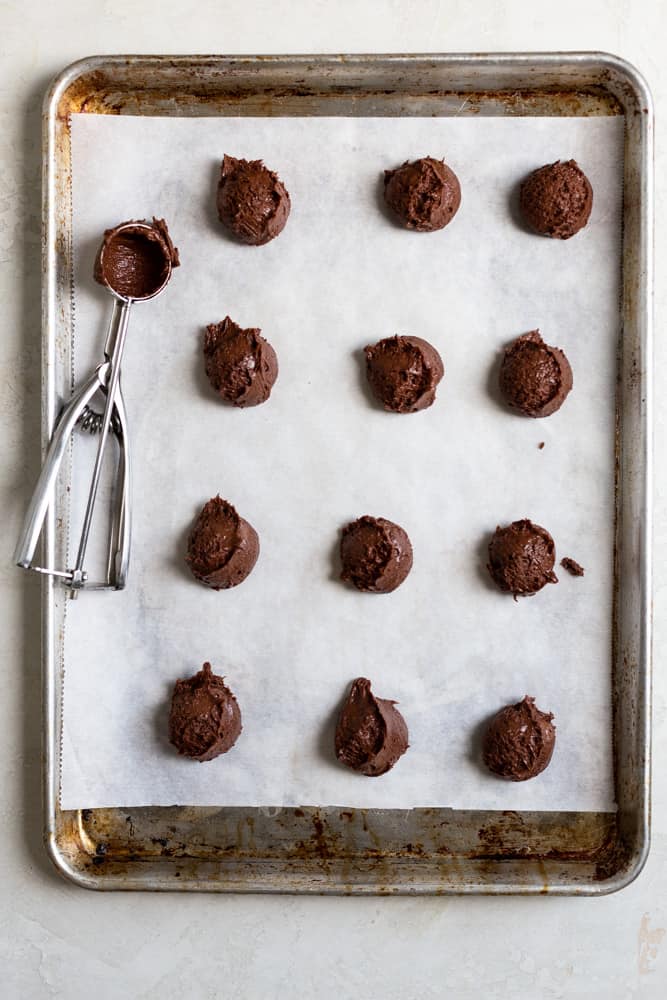
- Using a mini ice cream scoop or a small spoon, spoon the cookie dough onto the sheet trays leaving 2 inches in between the cookies to allow them to spread.
- Bake the cookies for 10 minutes. They should have crinkles in them and the edges should look crisp. Cool on pan for 10 minutes then transfer to a wire rack.

Hi! I rly love this recipe and it’s amazing every time I make it. My friends also really love it, but one of them recently realized she can’t have much gluten, ( not celiac) so I was wondering if you have a gluten free version.
Thank you so much! I am not sure if it will work with gluten free flour but I dont see why not, I would try it with a 1:1 GF flour substitute and see how it comes out!
Hi! I love King Arthur measure for measure gluten free flour and it works charmingly in cookies!
Thanks for chiming in Christy!
Delicious chocolate cookies that hold up well during travel. It did take me longer than 20 minutes to bake these since I had to bring my eggs to room temperature. Well worth the wait.
Thank you so much Susan!!
I am making them currently for the first time and I followed the measurements but when I go to scoop them on the tray it is not a dough at all and has the consistency of batter lioe actual brownies and I don’t know if this is what it is supposed to be like because it’s not thick like dough and it doesn’t hold its shape it just expands on the tray
Hi Nastasia! Yes you can see in the post that these are more gooey than regular cookies, thats what helps them bake up so fast!
I lovvvvveeeeee these Brookies they are so yummy and delicious the taste m kes you feel like you are laying in a delightful little cloud they are SOOOO good
Omg thank you so much! Your description is accurate! haha thanks again!
I made these today. They are amazing. Soft and fudgy. I followed the recipe exactly. I will be making them again.
So glad you loved these Cathy, thank you!
So simple and tasty!
Thank you so much Alicia!
So delicious, quick and easy to put together, decided to make them into peppermint/chocolate fudge ice-cream sandwiches! Definitely a keeper recipe. Big thank you!!!
Ohh! How perfect for the season! Thank you so much!
If you freeze the cookies do you do so before or after they are baked?!
I would freeze after
These cookies are absolutely delicious and so easy to make! They’re a chewy, chocolate delight! The first batch disappeared in no time. I’ll be making another batch again soon.
Thank you for sharing this recipe.
So happy you love these Jill! Thank you so much for making them!
Hi Sam! You may have answered this question, but there are so many comments to go through.
How long can I wait to bake the cookies after I make the cookie dough? Should I refrigerate the dough if I need to delay scooping then baking the cookies?
BTW…I added semi-sweet chips to the dough and baked them 8-1/2 minutes. They were even better than my first 2 batches! THANKS!
This is a great question Jill. I would refrigerate them if you cant bake immediately but then let them come back to room temp before baking. They might not spread as much if they are too cold. So happy to hear that its even better with chocolate chips- I have got to try that!! Happy holidays!!
I have made these every year at Christmas (and sometimes more often!) They are so easy and soooooooo good! I have my kids help too. It is true that you need to beat the eggs for 5 min. I got lazy one time and I could tell the difference. Still good, but doesn’t have the crunch texture that you want. Also only bake them for the 10 min. The first time I thought there is no way they are done so baked for a few more minutes and then burnt the bottoms! The point is they are like a brownie on the inside, not like a regular cookie. These are such a big hit across everyone who tries them (as long as you follow the recipe and trust the process lol).
Hi Julie! Thank you so much for this review, you made my day! I so appreciate this being on your christmas bake list, im honored! And yes to trust the process haha small tweaks really make a difference in the cookie. Thank you so much for contributing!
Just tried these, and omg Sam 🤤 delicious !
Youre the best, thank you!!
I make these cookies frequently very easy recipe.
Today I made them and doubled the recipe–family favorite.
I freeze the cookies once they have cooled and when defrosted, they are still chewy!
So good to know! Thank you so much Diane. Makes my day to hear you make these all the time!
Cookies were super good! But I don’t want to sound dumb but I had to cook them for 8 extra minutes which I know isn’t a big deal but I was wondering if this is normal or is my oven just weird?
So weird! Yes def could be an oven thing, I would check it with one of those heat proof thermometers that stays inside your oven. Glad you liked them though!
Hello,
Can i decrease the sugar quantity?
I wouldnt, I’m sorry!
I love the recipe it was amazing. I have one question.Can i decrease the sugar?thankyou so much for the recipe
Hi Nir! so glad you loved this recipe, thank you so much for letting me know! I havent tried to decrease the sugar- its what helps give structure to the cookie, if you try it let me know!
I’m so glad my daughter picked this recipe! Of course we had to do quality control. Do not regret doubling the recipe! Just try it!
Haha thank you so much Tina! So glad you loved these easy cookies!
Absolutely love this recipe! It’s so fast and easy to whip up! So so delicious! I did have one question though. I typically make a double batch of these (they are a huge crowd pleaser!) and for some reason the first round are always crinkled perfectly, but the next trays have more of a dry crust. I always beat the eggs for the full 5 minutes, so I’m pretty confident it’s not that. Could it be that I usually scoop one tray out at a time? Or do you have another idea? Thank you!
Hmm this is so interesting. Im wondering if maybe its because the batter for the second batch is sitting for longer. Baking soda activates the second it hits wet ingredients so it could be that if its sitting for longer before baking it could have an effect on the cookies. That would be my guess. If you have a convection bake setting on your oven I would maybe try that to bake two trays at a time but it would be an experiment,I cant say for sure that it would work 100%. So glad you love these brownie cookies though, thank you so much for making them!
I really wanted to love this, I really did. But they ended up super dry and without a very pronounced chocolate flavor. I’d love to try again with any advice.
Hey Joey, I am not sure what happened here- it could be they were over baked or that there was too much flour added. Also I would use a high quality cocoa powder like Ghirardelli!
I only got 16 cookies using a cookie scooper. Amazing cookies though but would have to double the recipe for 24.
Hey Rachel, what size cookie scoop were you using? I use a small one for this recipe thats about 1.5 tbsp.
These are really great, but be sure to have some cold milk available to accompany them. Very easy to make, and I was pleasantly surprised at how easily they scooped out of the mixing bowl. My famioly has a new favorite cookie!
So great to hear Jerry! They are definitely delicious with a glass of milk. Thanks for making this!
They turned out great! I’m going to make these more often.
So glad you loved them Afra, thank you!
Amazing! Super easy! So yummy!!
Thank you so much Carole!
first of all love these cookies so so much!! i’ve made them five times now and they’re wonderful. i get the shiny top and cracks and everything but they always come out very puffy and not really spreading out and i can’t seem to figure out why. any tips? i follow the instructions exactly but they still do it
Thanks for making these so many times! If they arent coming out flat, I would bang them against the counter as soon as they come out of the oven. Yes, literally smack the pan on the counter and it will help to delfate them a bit, have to do it as soon as it comes out or it wont work! Lemme know!!
I made it with salted butter because that’s all we had…still tasted incredible. I don’t know if they keep well because they didn’t survive in the house that long.
Haha amazing! Thanks so much Matt!
Hi can you freeze the batter( in scoops) to use later . When I can I like to make multiple batches and freeze for quick use later one
Hmm I havent tried to do that but I think if you bring it back to room temp it would be ok.
Hi. Thank you for a fabulous recipe! I’ve made these a few times and everyone loves them. I was wondering if I could add some raspberries, either fresh or dry freezed to them for something a bit different. If so, how much? Thank you.
Hi Homa! So glad you loved these, yay! I havent tried it with raspberries but I would use freeze dried so it doesnt give off excess moisture. I would try with just a couple tablespoons of freeze dried but it might alter the texture so just beware 🙂
The recipe specifies 1/4 lb unsalted butter and then states in parentheses that 1/4lb is equivalent to 56g… But 1/4 lb butter is actually 113g… Can you clarify? Do I use 1/8th lb(56g) or 1/4 lb (113g)…??
Hi! It’s 1/4 cup not 1/4 pound. The recipe is correct. 56 grams.
Great recipe, as always. Brownie glaze on outside. Cake/cookie softness on the inside. Add 1/4 cup mini chocolate chips and thank me later.
So glad Brian, thank you!!
Hi! Would love to bake these but wondering if the oven temperature given is for regular oven or fan oven? Also if you could by any chance provide the temperature in degrees C (for a fan oven) I’d really appreciate it, as I’m from the UK my oven is in degrees Celsius! Can’t wait to try them out!
Hi Hester, I bake these on a regular oven, if you are using a fan oven, lower the temp by 25 degrees and bake for the same time. 350 degrees F is 175 C. Hope that helps!