How to Make a Naked Cake with Flowers
This post might have affiliate links, please check out my full disclosure policy.
Making a naked cake is not as hard to make as it seems! All you need are a few simple baking tools and some decorations or flowers. This is one of my favorite ways to decorate a cake because it can be as simple or as elaborate as you want. It’s perfect for a birthday cake or even as a wedding cake!
What is a naked cake?
A naked cake is a cake that has little to no frosting on the outside of the cake. It is filled with buttercream or frosting between the layers, but the outside remains, well, semi-naked.
People love these cakes for their rustic look, and for their simplicity. You dont have to make sure that the cake is frosted perfectly or if the crumbs are in their exact place.
If it looks a little messy we just call it rustic!
What you need:
- At least 3 layers of a cake
- Buttercream
- Flowers
- A cake stand
- An offset spatula and/or bench scraper
Cake
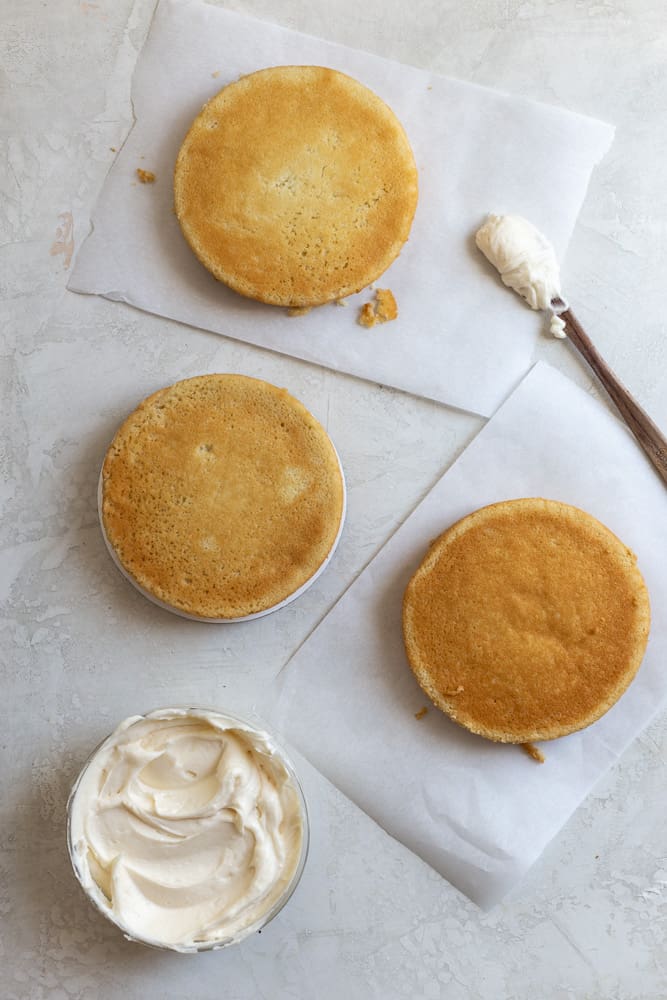
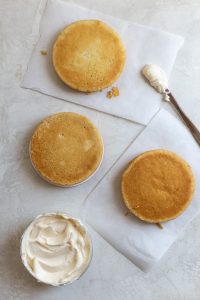
First make sure you start off with a good cake recipe. Most of the time people use vanilla cake recipes because they are a great canvas for the flowers, but you can also use chocolate or even red velvet!
Next, make sure you bake enough layers.
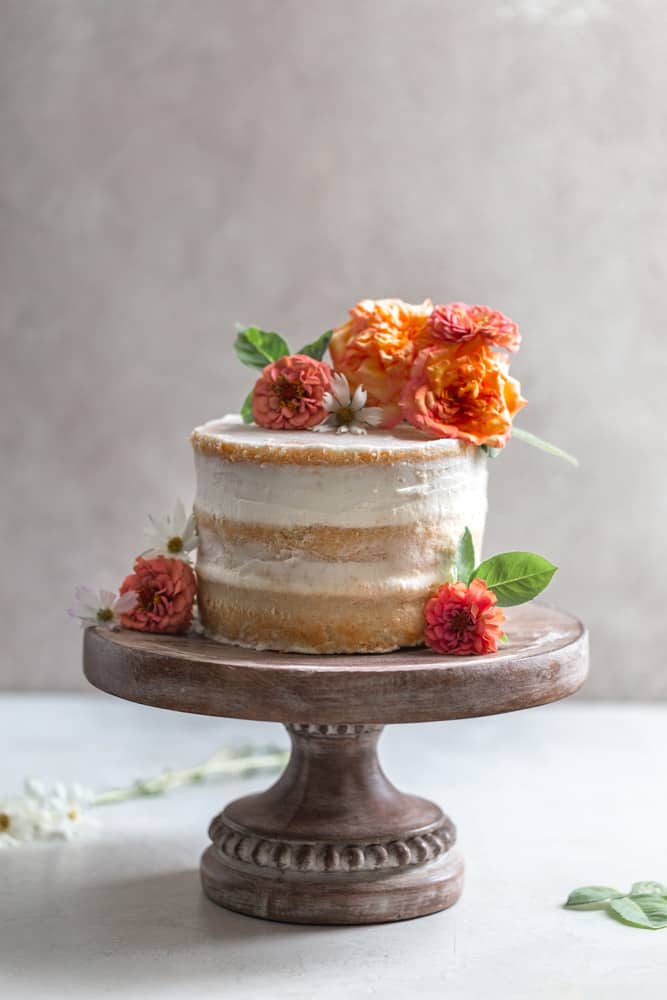
If you want your cake to be a showstopper, it needs to have height to it. The layers also need to be even and level. I usually bake my cakes into 3 cake layers instead of two. This gives the cake the dramatic effect it needs by making it taller than a regular cake.
It will also show off the layers of the naked-ness. Imagine the difference between a cake with just one layer of frosting in the middle versus 2 layers. It just more visually pleasing.
Feel free to go higher than that but make sure that the cake will be able to remain stable.
My usual go to style for a naked cake is a 6″ cake with 3 layers. It feeds about 15-18 people. If you need a larger cake, go for an 8″cake pan to bake in.
Just make sure you still bake it in 3 layers. It’s handy to have multiples of the same size pan so you can bake the cakes all at once.
Buttercream
You will also need a good buttercream recipe. You can flavor it or color it any way you want. You can keep it white and simple, or you can color the buttercream in ombre colors and fill the layers accordingly.

One recipe for buttercream should be enough for a cake either 6″ or 8″ because you only need to fill in the layers and the top of the cake.
Flowers
Now on to the cake decorating! You will need some fresh flowers. I usually buy them at Trader Joes, or sometimes buy the edible ones from Whole Foods.
You can put fake flowers on your cake but I don’t recommend it. They never look real enough to not look tacky, so I say stick with the fresh ones but follow the rules below.
Try to get an idea about what you want the final cake to look like so you know what flowers to buy and colors to look for. You don’t have to know exactly what it will be but it’s smart to think about it first.
Get flowers in differing sizes too. Think about which one you want to be the main focus and then get some small ones as accents.
Make sure to also get some greenery! I love the way eucalyptus looks hanging off a cake stand.
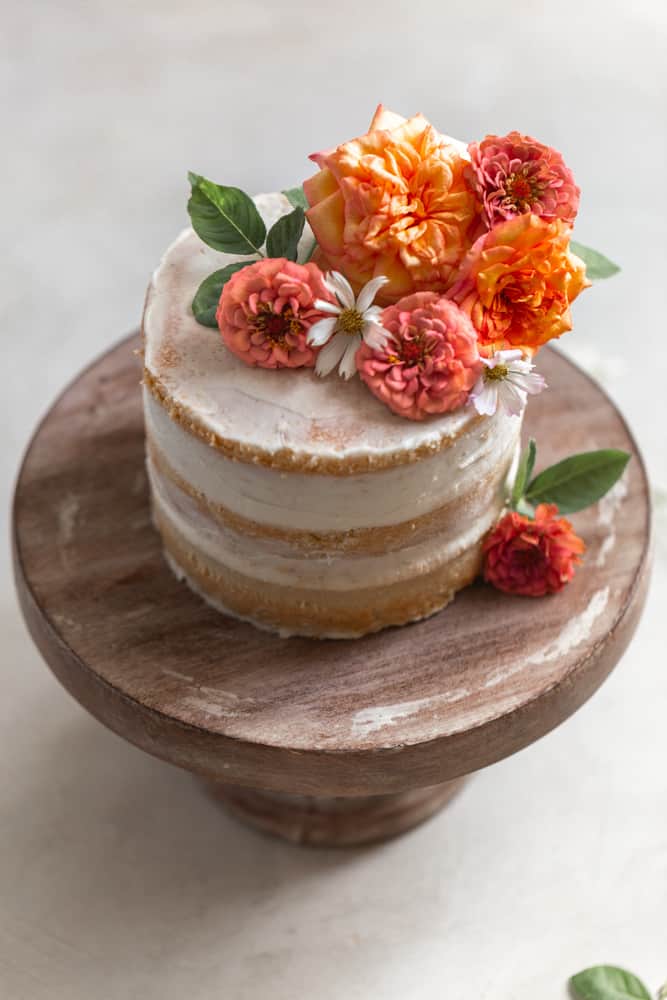
This is my absolute favorite way to decorate a cake. Flowers bring so much beauty and just make this cake even more rustic!
Cake stand
Make sure you find a pretty, yet rustic cake stand to show off your beautiful cake! You can definitely make and decorate the cake on this cake stand, but it will be easier to do on a turntable.
How to make and frost a naked cake
Now that you have your cake layers, buttercream, flowers, and cake stand, it’s time to get to work!
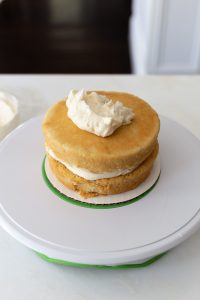
- Take one layer of cake and place it in the center of the cake stand. You can place it directly on the stand, or you can use a cardboard cake board. You definitely don’t NEED the cake board but it is useful if you want to move the cake around easily.
- With an offset spatula or piping bag frost the top of the cake layer. It doesn’t have to be perfect, just try to spread it evenly. You want this layer to be thick but not so thick that the cake layer on top will slide off.
- Take another cake layer and turn it upside down so the bottom is now the top. Place that on top of the buttercream frosting and repeat the second step.
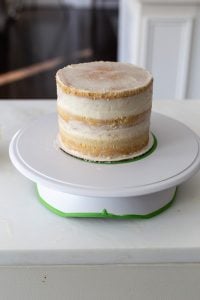
- Now take your last cake layer (assuming you have 3) and flip it again and place it on top. Since this is your last cake layer you want to frost the top but only lightly, to keep the “naked” look.
- Depending on how you want the cake to look you can either now add a small amount of frosting to the sides and smooth it out using a bench scraper. If you don’t have a cake scraper you can use a large spatula or a butter knife. Or you can just leave the cake as is with just the buttercream peeking out.
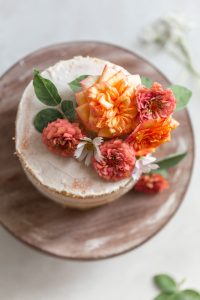
- Now time to decorate with the flowers!
How to add fresh flowers to the cake
If you want to learn how to decorate a cake with fresh flowers, I have it all broken down for you!
There are definitely some things you need to know before you start placing flowers on your cake.
If your’e gonna skip that post, just make sure that you wash the flowers completely from each petal to the stem before placing it on the cake.
If you are going to insert the stems, wrap them in plastic wrap first.
It is also a good idea to put a clear piece of plastic wrap on top of the cake before decorating it with flowers. This way you don’t have the flowers touching the cake and since the flowers are covering the plastic wrap, no one knows it’s there!
Make sure to cover any piece that is showing with a flower or tuck it in so it’s hidden.
Attach the flowers to the cake either by pressing lightly into the cake so that the buttercream sticks to it.
If the buttercream has already crusted, use small amount of leftover buttercream to “glue” the flower to the cake.
Decorating:
It depends on the kind of flowers you get but there are so many ways to make a cake look beautiful with flowers.
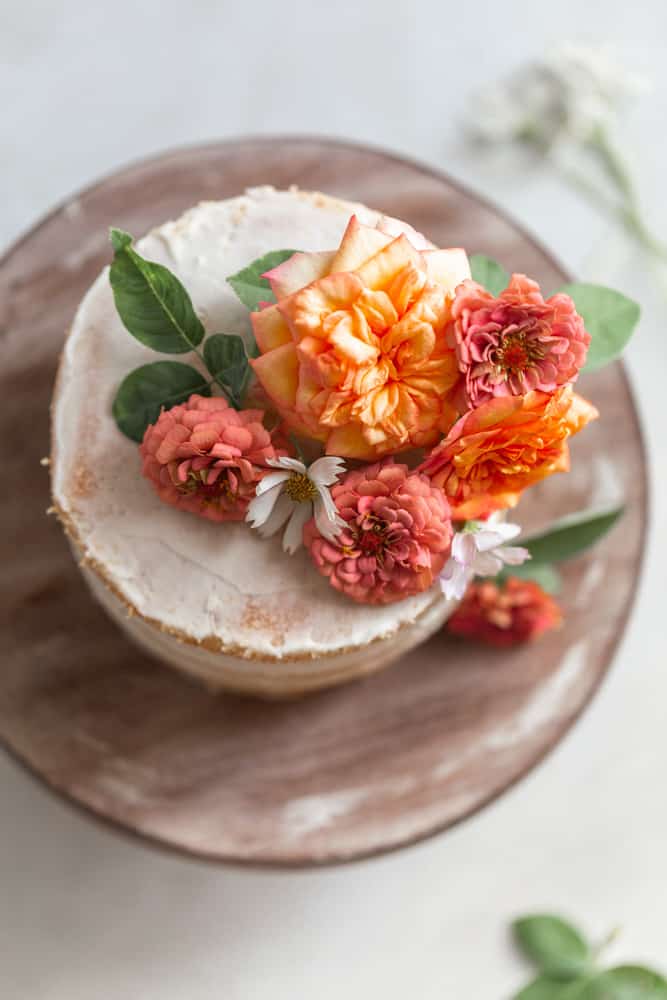
You can make a cluster of roses on the edge of the cake and then have greenery drape down the sides.
Or place a small bouquet in the middle and place single flowers along the sides of the cake or on the cake board.
Don’t just think about the top of the cake. The sides and the cake stand can be decorated too!
There is no right or wrong way to do it so just have fun and get creative!
If you find that you don’t like the design, you can take it off and just start again usually without detrimentally harming the cake.
Making ahead
Make the cake and frost with buttercream up to 2 days ahead.
When it comes to the flowers though, leave it up until the last minute that you can to decorate with them.
Flowers need water to survive and will look best within a 24 hour rand of decorating. Any time after that and they will start to droop and wilt.
Storing
Leave an undecorated cake at room temperature. You don’t have to cover it but you can if you have a large enough cake dome or light plastic wrap.
Once the cake is decorated with flowers store it in the fridge to keeo the flowers fresh.
Cutting
Remove the flowers before cutting the cake to avoid a mess.
For all the visual learners out there, make sure you watch the video for how to assemble and decorate a naked cake!
For more cake decorating tutorials:
- 10 ways to make your cakes more professional
- How to stack a two tier cake
- How to decorate a cake with flowers
This post contains affiliate links! This means that if you purchase something off one of those links I make a small commission at no extra cost to you. Thanks for supporting my blog!!!

How to make a naked cake
Equipment
- Offset Spatula or bench scraper
- Cake stand
- Cake turntable (optional)
Materials
For a 6"-8" Naked Cake
- 3 layers cake
- 1 1/2 cups buttercream
- 1 bunch fresh flowers differing colors and style
Instructions
Fill and stack the cake:
- Make sure the cake layers have level, even tops. Use a sharp serrated knife to level them off or a cake leveler.

- Place one layer of cake on a cake turntable if using or on the cake stand. Fill with an even layer of buttercream then top with the second cake layer. You can turn the cake layer upside down so that the bottom becomes the top to make sure the cake is more level. Repeat this step until the 3rd, top layer of cake.
- Using an offset spatual or bench scraper, lightly cover the top of the cake with a thin coat of buttercream.
- You can now cover the sides with a light coat of buttercream, smoothing it out with the bench scraper or spatula. Alternatively you can just leave the sides naked and have the buttercream peak out between the layers.
- Clean and dry each flower from petal to stem. Wrap the stems in plastic wrap if you are inserting them into the cake. Lightly cover the top of the cake with clear plastic wrap so the cake is safe from the flowers.
- Arrange the flowers around the cake


I LOVE this step by step! Thank you!
Thank you so much lady!!! Let me know if you make one!!
I had a customer order a naked cake from me and I had never made one. Thank GOODNESS you made this easy to follow, step by step, guide to the prettiest naked cake on earth! Thank you so much!!
YAY Mikyla I am so happy that it helped you! The cake is gorgeous! Thank you so much for reviewing and commenting!